The examples in previous sections all used the C1OlapPage control, which contains a complete UI and requires little or no code. In this section, we will walk through the creation of an OLAP application that does not use the C1OlapPage. Instead, it creates a complete custom UI using the C1OlapGrid, C1OlapChart, and some standard .NET controls.
The complete source code for this application is included in the "CustomUI" sample installed with C1Olap.
The image below shows the application in design view:

There is a panel docked to the top of the form showing the application title. There is a vertical toolstrip control docked to the right of the form with three groups of buttons. The top group allows users to pick one of three pre-defined views: sales by salesperson, by product, or by country. The next group allows users to apply a filter to the data based on product price (expensive, moderate, or inexpensive). The last button provides reporting.
The remaining area of the form is filled with a split container showing a C1OlapGrid on the left and a C1OlapChart on the right. These are the controls that will display the view currently selected.
The form also contains a C1OlapPrintDocument component that will be used to generate the reports. This component is not visible in the image above because it only appears in the tray area below the form. The C1OlapPrintDocument is connected to the OLAP controls on the page by its OlapGrid and OlapChart properties, which were set at design time.
Finally, there is a C1OlapPanel control on the form. Its Visible property is set to false, so users won’t ever see it. This invisible control is used as a data source for the grid and the chart, and is responsible for filtering and summarizing the data. Both the grid and the chart have their DataSource property set to the C1OlapPanel.
Once all the controls are in place, let’s add the code that connects them all and makes the application work.
First, let’s get the data and assign it to the C1OlapPanel:
private void Form1_Load(object sender, EventArgs e)
{
    // load data
    var da = new OleDbDataAdapter("select * from Invoices",
      GetConnectionString());
    var dt = new DataTable();
    da.Fill(dt);

    // assign it to C1OlapPanel that is driving the app
    this.c1OlapPanel1.DataSource = dt;

    // start with the SalesPerson view, all products
    _btnSalesperson.PerformClick();
    _btnAllPrices.PerformClick();
}
The code gets the data from the NorthWind database using a DataAdapter and assigns the resulting DataTable to the C1OlapPanel.DataSource property. It then uses the PerformClick method to simulate clicks on two buttons to initialize the current view and filter.
The event handlers for the buttons that select the current view look like this:
void _btnSalesperson_Click(object sender, EventArgs e)
{
    CheckButton(sender);
    BuildView("Salesperson");
}
void _btnProduct_Click(object sender, EventArgs e)
{
    CheckButton(sender);
    BuildView("ProductName");
}
void _btnCountry_Click(object sender, EventArgs e)
{
    CheckButton(sender);
    BuildView("Country");
}
All handlers use a BuildView helper method given below:
// rebuild the view after a button was clicked
void BuildView(string fieldName)
{
    // get olap engine
    var olap = c1OlapPanel1.OlapEngine;

    // stop updating until done
    olap.BeginUpdate();

    // format order dates to group by year
    var f = olap.Fields["OrderDate"];
    f.Format = "yyyy";

    // clear all fields
    olap.RowFields.Clear();
    olap.ColumnFields.Clear();
    olap.ValueFields.Clear();

    // build up view
    olap.ColumnFields.Add("OrderDate");
    olap.RowFields.Add(fieldName);
    olap.ValueFields.Add("ExtendedPrice");

    // restore updates
    olap.EndUpdate();
}
The BuildView method gets a reference to the C1OlapEngine object provided by the C1OlapPanel object provided by the C1OlapPanel and immediately calls the BeginUpdate method to stop updates until the new view has been completely defined. This is done to improve performance.
The code then sets the format of the "OrderDate" field to "yyyy" so sales are grouped by year and rebuilds view by clearing the engine’s RowFields, ColumnFields, and ValueFields collections, and then adding the fields that should be displayed. The "fieldName" parameter passed by the caller contains the name of the only field that changes between views in this example.
When all this is done, the code calls EndUpdate so the C1OlapPanel will update the output table.
Before running the application, let's look at the code that implements filtering. The event handlers look like this:
void _btnExpensive_Click(object sender, EventArgs e)
{
    CheckButton(sender);
    SetPriceFilter("Expensive Products (price > $50)", 50, double.MaxValue);
}
void _btnModerate_Click(object sender, EventArgs e)
{
    CheckButton(sender);
    SetPriceFilter("Moderately Priced Products ($20 < price < $50)", 20, 50);
}
void _btnInexpensive_Click(object sender, EventArgs e)
{
    CheckButton(sender);
    SetPriceFilter("Inexpensive Products (price < $20)", 0, 20);
}
void _btnAllProducts_Click(object sender, EventArgs e)
{
    CheckButton(sender);
    SetPriceFilter("All Products", 0, double.MaxValue);
}
All handlers use a SetPriceFilter helper method given below:
// apply a filter to the product price
void SetPriceFilter(string footerText, double min, double max)
{
    // get olap engine
    var olap = c1OlapPanel1.OlapEngine;

    // stop updating until done
    olap.BeginUpdate();

    // make sure unit price field is active in the view
    var field = olap.Fields["UnitPrice"];
    olap.FilterFields.Add(field);

    // customize the filter to apply the condition
    var filter = field.Filter;
    filter.Clear();
    filter.Condition1.Operator =
      C1.Olap.ConditionOperator.GreaterThanOrEqualTo;
    filter.Condition1.Parameter = min;
    filter.Condition2.Operator =
      C1.Olap.ConditionOperator.LessThanOrEqualTo;
    filter.Condition2.Parameter = max;

    // restore updates
    olap.EndUpdate();

    // set report footer
    c1OlapPrintDocument1.FooterText = footerText;
}
As before, the code gets a reference to the C1OlapEngine and immediately calls BeginUpdate.
It then gets a reference to the "UnitPrice" field that will be used for filtering the data. The "UnitPrice" field is added to the engine’s FilterFields collection so the filter will be applied to the current view.
This is an important detail. If a field is not included in any of the view collections (RowFields, ValueFields, FilterFields), then it is not included in the view at all, and its Filter property does not affect the view in any way.
The code proceeds to configure the Filter property of the "UnitPrice" field by setting two conditions that specify the range of values that should be included in the view. The range is defined by the "min" and "max" parameters. Instead of using conditions, you could provide a list of values that should be included. Conditions are usually more convenient when dealing with numeric values, and lists are better for string values and enumerations.
Finally, the code calls EndUpdate and sets the FooterText property of the C1OlapPrintDocument so it will be automatically displayed in any report.
The methods above use another helper called CheckButton that is listed below:
// show which button was pressed
void CheckButton(object pressedButton)
{
    var btn = pressedButton as ToolStripButton;
    btn.Checked = true;

    var items = btn.Owner.Items;
    var index = items.IndexOf(btn);
    for (int i = index + 1; i < items.Count; i++)
    {
        if (!(items[i] is ToolStripButton)) break;
        ((ToolStripButton)items[i]).Checked = false;
    }
    for (int i = index - 1; i > 0 && !(items[i] is ToolStripSeparator); i--)
    {
        if (!(items[i] is ToolStripButton)) break;
        ((ToolStripButton)items[i]).Checked = false;
    }
}
This method makes the buttons in the toolstrip behave like radio buttons. When one of them is pushed, all others in the same group are released.
The application is almost ready. You can run it now and test the different views and filtering capabilities of the application, as illustrated below:
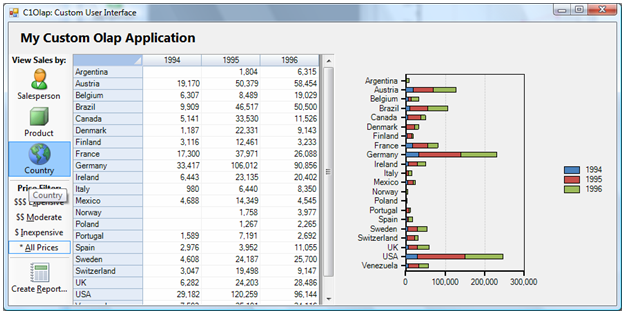
This view is showing sales for all products, grouped by year and country. Notice how the chart shows values approaching $300,000.
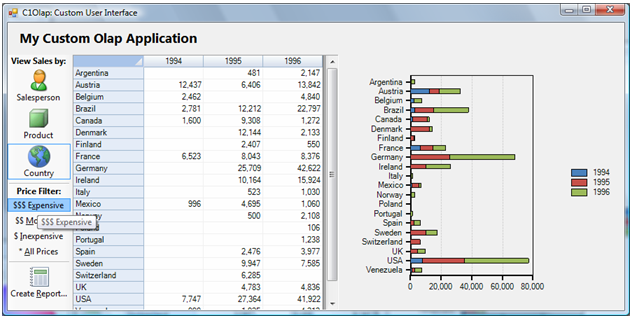
If you click the "$$$ Expensive" button, the filter is applied and the view changes immediately. Notice how now the chart shows values approaching $80,000 instead. Expensive values are responsible for about one third of the sales:
The last piece missing from the application is reporting. Users can already copy data from the OlapGrid, paste it into Excel, and print or save the results. But we can make it even easier, by allowing them to print or create PDF files directly from within the application.
To do this, let us add some code to handle clicks in the "Report…" button. The code is very simple:
void _btnReport_Click(object sender, EventArgs e)
{
    using (var dlg = new C1.Win.Olap.C1OlapPrintPreviewDialog())
    {
        dlg.Document = c1OlapPrintDocument1;
        dlg.StartPosition = FormStartPosition.Manual;
        dlg.Bounds = this.Bounds;
        dlg.ShowDialog(this);
    }
}
If you have done any printing in .NET, the code should look familiar. It starts by instantiating a C1OlapPrintPreviewDialog. This is a class similar to the standard PrintPreviewDialog, but with a few enhancements that include export to PDF capability.
The code then sets the dialog box’s Document property, initializes its position, and shows the dialog box. If you run the application now and click the "Report…" button, you should see a dialog box like the one below:
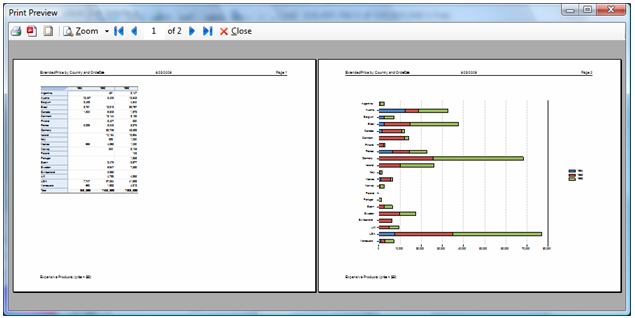
From this dialog box, users can modify the page layout, print or export the document to PDF.