One of the main strengths in Olap applications is interactivity. Users must be able to create and modify views easily and quickly see the results. C1Olap enables this with its Excel-like user interface and user friendly, simple dialogs..
But in some cases you may want to configure views using code. C1Olap enables this with its simple yet powerful object model, especially the Field and Filter classes.
The example that follows shows how you can create and configure views with C1Olap.
Start by creating a new WinForms application and adding a C1OlapPage control to the form.
Switch to code view and add the following code to load some data and assign it to the C1OlapPage control:
public Form1()
{
  InitializeComponent();

  // get data
  var da = new OleDbDataAdapter("select * from invoices",
                                 GetConnectionString());
  var dt = new DataTable();
  da.Fill(dt);

  // bind to olap page
  this.c1OlapPage1.DataSource = dt;

  // build initial view
  var olap = this.c1OlapPage1.OlapEngine;
  olap.ValueFields.Add("ExtendedPrice");
  olap.RowFields.Add("ProductName", "OrderDate");
}
static string GetConnectionString()
{
  string path = Environment.GetFolderPath(
         Environment.SpecialFolder.Personal) +
         @"\ComponentOne Samples\Common";
  string conn = @"provider=microsoft.jet.oledb.4.0;data source={0}\c1nwind.mdb;";
  return string.Format(conn, path);
}
The code loads the “Invoices” view from the NorthWind database (installed with C1Olap), binds the data to the C1OlapPage control, and builds an initial view that shows the sum of the “ExtendedPrice” values by product and by order date. This is similar to the examples given above.
If you run the sample now, you will see an Olap view including all the products and dates.
Next, let’s use the C1Olap object model to change the format used to display the order dates and extended prices:
public Form1()
{
  InitializeComponent();

  // get data
  // no change…

  // bind to olap page
  // no change…

  // build initial view
  // no change…

  // format order date
  var field = olap.Fields["OrderDate"];
  field.Format = "yyyy";

  // format extended price and change the Subtotal type
  // to show the average extended price (instead of sum)
  field = olap.Fields["ExtendedPrice"];
  field.Format = "c";
  field.Subtotal = C1.Olap.Subtotal.Average;
}
The code retrieves the individual fields from the Fields collection which contains all the fields specified in the data source. Then it assigns the desired values to the Format and Subtotal properties. Format takes a regular .NET format string, and Subtotal determines how values are aggregated for display in the Olap view. By default, values are added, but many other aggregate statistics are available including average, maximum, minimum, standard deviation, and variance.
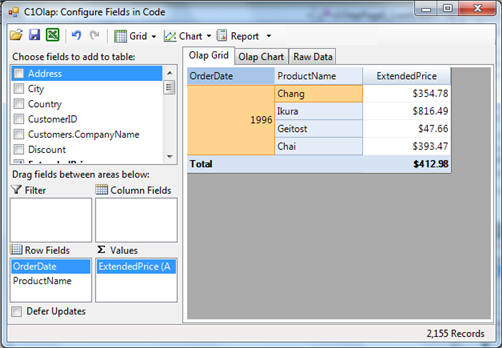
Now suppose you are interested only in a subset of the data, say a few products and one year. A user would right-click the fields and apply filters to them. You can do the exact same thing in code as shown below:
public Form1()
{
  InitializeComponent();

  // get data
  // no changes…

  // bind to olap page
  // no changes…

  // build view
  // no changes…

  // format order date and extended price
  // no changes…

  // apply value filter to show only a few products
  C1.Olap.C1OlapFilter filter = olap.Fields["ProductName"].Filter;
  filter.Clear();
  filter.ShowValues = "Chai,Chang,Geitost,Ikura".Split(',');

  // apply condition filter to show only some dates
  filter = olap.Fields["OrderDate"].Filter;
  filter.Clear();
  filter.Condition1.Operator =
         C1.Olap.ConditionOperator.GreaterThanOrEqualTo;
  filter.Condition1.Parameter = new DateTime(1996, 1, 1);
  filter.Condition2.Operator =
         C1.Olap.ConditionOperator.LessThanOrEqualTo;
  filter.Condition2.Parameter = new DateTime(1996, 12, 31);
  filter.AndConditions = true;

}
The code starts by retrieving the C1OlapFilter object that is associated with the “ProductName” field. Then it clears the filter and sets its ShowValues property. This property takes an array of values that should be shown by the filter. In C1Olap we call this a “value filter”.
Next, the code retrieves the filter associated with the “OrderDate” field. This time, we want to show values for a specific year. But we don’t want to enumerate all days in the target year. Instead, we use a “condition filter” which is defined by two conditions.
The first condition specifies that the “OrderDate” should be greater than or equal to January 1st, 1996. The second condition specifies that the “OrderDate” should be less than or equal to December 31st, 1996. The AndConditions property specifies how the first and second conditions should be applied (AND or OR operators). In this case, we want dates where both conditions are true, so AndConditions is set to True.
If you run the project again, you should see the following: