Filtering Data in a Field
In This Topic
In the C1OlapPanel control or the C1OlapPanel area of the C1OlapPage control, you can filter the data in a field from the Drag fields between areas below section of the panel at run time. Each field has two filters: the value filter, which allows you to check specific values in a list, and the range filter, which allows you to specify one or two criteria. The two filters are independent, and values must pass both filters in order to be included in the OLAP table.
Using the Value Filter
- 1.Right-click a field in the Filter, Column Fields, Row Fields, or Values area.
- 2.Click Field Settings in the context menu. The Field Settings dialog box opens.
- 3.Click the Filter tab. This is the value filter. You can clear the selection for any of the fields that you do not want to display in the OLAP table.
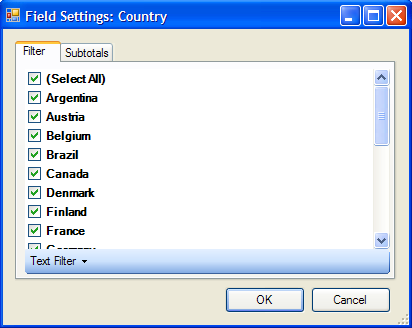
Once you have selected the fields to appear in the table, you can specify a range filter by clicking the Text Filter or Numeric Filter button at the bottom of the window.
Note: If the field you are filtering contains numeric data, Numeric Filter appears instead of Text Filter.
Using the Range Filter
- Right-click a field in the Filter, Column Fields, Row Fields, or Values area.
- Click Field Settings in the context menu. The Field Settings dialog box opens.
- Click the Filter tab and specify the value filter, if desired. You can clear tee selection for any of the fields that yon do not want to appear in the OLAP table.
- Click the Text Filter or Numeric Filter button to set the range filter.
- Select one of the following items.
Clear Filter Clears all filter settings. Equals Opens the Custom Filter dialog box so you can create a filter where items equal to the specified value are shown. Does Not Equal Opens the Custom Filter dialog box so you can create a filter where items that are not the same as the specified value are shown. Begins With Opens the Custom Filter dialog box so you can create a filter where items that begin with the specified values are shown. Ends With Opens the Custom Filter dialog box so you can create a filter where items that end with the specified values are shown. Contains Opens the Custom Filter dialog box so you can create a filter where items that contain the specified values are shown. Does Not Contain Opens the Custom Filter dialog box so you can create a filter where items that do not contain the specified values are shown. Custom Filter Opens the Custom Filter dialog box so you can create a filter with your own conditions. - Add an item to filter on, in the first blank text box.
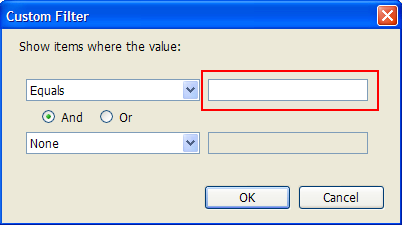
- Select And or Or.
- Add a second filter condition, if necessary. If you select an option other than None, the second text box becomes active and you can enter an item.
- Click OK to close the Custom Filter dialog box and click OK again to close the Field Settings dialog box.