A tag has two main properties: Name and Value. The name is used to identify the tag, while the value is the current tag value.
PrintDocument provides two kinds of tags, predefined and custom.
Predefined tags are enumerated as given below:
Custom tags are stored in the Tags collection of the document. To add a tag to that collection, you may use the following code:
| C# |
Copy Code
|
|---|---|
doc.Tags.Add(new C1.C1Preview.Tag("tag1", "tag value")); |
|
The value of the tag may be left unspecified when the tag is created, and may be specified later.
To use a tag, insert its name in square brackets in the text where you want the tag value to appear, for example, like this:
| C# |
Copy Code
|
|---|---|
RenderText rt = new RenderText(); rt.Text = "The value of tag1 will appear here: [tag1]."; |
|
By default, the ShowTagsInputDialog property is False and the Tags dialog box is not displayed. To allow the user to input all tags, each time a PrintDocument is generated, set the ShowTagsInputDialog property to True. Any tag you've added to the document's Tags collection will then be automatically presented in a dialog box to the user each time the document is about to be generated. This will give the end-user the opportunity to edit the tags values in the Tags dialog box.
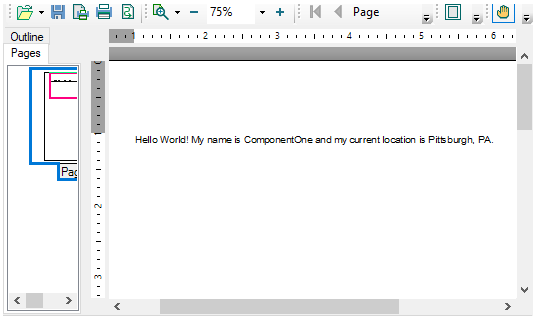
For example, the following code in the Form_Load event adds three tags to the document and text values for those tags:
| C# |
Copy Code
|
|---|---|
C1PrintDocument doc = new C1PrintDocument(); this.c1PrintPreviewControl1.Document = doc; // Show the Tags dialog box on document generation. doc.ShowTagsInputDialog = true; // Create tags that will be shown in the Tags dialog box. doc.Tags.Add(new C1.C1Preview.Tag("Statement", "Hello World!")); doc.Tags.Add(new C1.C1Preview.Tag("Name", "ComponentOne")); doc.Tags.Add(new C1.C1Preview.Tag("Location", "Pittsburgh, PA")); // Add tags to the document and generate. C1.C1Preview.RenderText rt = new C1.C1Preview.RenderText(); rt.Text = "[Statement] My name is [Name] and my current location is [Location]."; doc.Body.Children.Add(rt); doc.Generate(); |
|
Once the application is run, the following dialog box is displayed before the document is generated:

Changing the text in any of the textboxes in the Tags dialog box will change the text that appears in the generated document. If the default text is left, the following will produce the following text in the generated document:
When the ShowTagsInputDialog property is set to True, all the tags are displayed by default in the Tags dialog box. You can prevent users from editing specific tags by using the Tag.ShowInDialog property. To let users edit some but not all tags, set the Flags property to None on tags you want to restrict editing.
For example, the following code in the Form_Load event adds three tags to the document, one of which cannot be edited:
| C# |
Copy Code
|
|---|---|
C1PrintDocument doc = new C1PrintDocument(); this.c1PrintPreviewControl1.Document = doc; // Show the Tags dialog box on document generation. doc.ShowTagsInputDialog = true; // Create a tag but do not show it in the Tags dialog box. doc.Tags.Add(new C1.C1Preview.Tag("Statement", "Hello World!")); doc.Tags["Statement"].ShowInDialog = false; // Create tags that will be shown. doc.Tags.Add(new C1.C1Preview.Tag("Name", "ComponentOne")); doc.Tags.Add(new C1.C1Preview.Tag("Location", "Pittsburgh, PA")); // Add tags to the document and generate. C1.C1Preview.RenderText rt = new C1.C1Preview.RenderText(); rt.Text = "[Statement] My name is [Name] and my current location is [Location]."; doc.Body.Children.Add(rt); doc.Generate(); |
|
When the application is run, the following dialog box is displayed before the document is generated:

When the ShowTagsInputDialog property is set to True, the Tags dialog box is shown just before the document is generated. You can programmatically show this dialog whenever you want (and independently of the value of the ShowTagsInputDialog property) by calling the EditTags method.
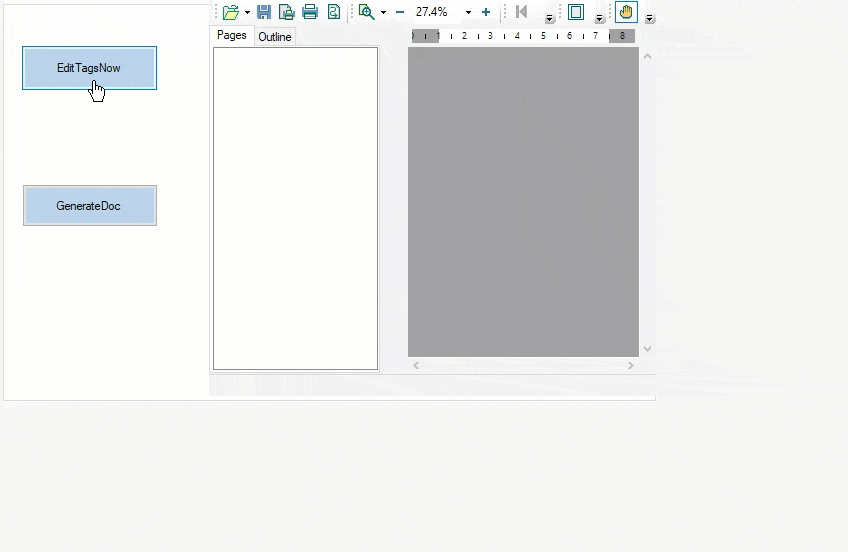
For example, the following code shows the tags input dialog box when a button is clicked:
To write code in C#
| C# |
Copy Code
|
|---|---|
public partial class Form1 : Form
{
    public Form1()
    {
        InitializeComponent();
    }
    C1PrintDocument doc = new C1PrintDocument();
    private void Form1_Load(object sender, EventArgs e)
    {
        this.c1PrintPreviewControl1.Document = doc;
        // Create tags to be shown.
        doc.Tags.Add(new C1.C1Preview.Tag("Statement", "Hello World!"));
        doc.Tags["Statement"].ShowInDialog = true;
        doc.Tags.Add(new C1.C1Preview.Tag("Name", "ComponentOne"));
        doc.Tags.Add(new C1.C1Preview.Tag("Location", "Pittsburgh, PA"));
        // Add tags to the document.
        C1.C1Preview.RenderText rt = new C1.C1Preview.RenderText();
        rt.Text = "[Statement] My name is [Name] and my current location is [Location].";
        doc.Body.Children.Add(rt);
    }
    private void EditTagsNow_Click(object sender, EventArgs e)
    {
        // Show the Tags dialog box on button click.
        doc.ShowTagsInputDialog = true;
        doc.EditTags();
    }
    private void GenerateDoc_Click(object sender, EventArgs e)
    {
        doc.ShowTagsInputDialog = false;
        // Generate the document on button click.
        doc.Generate();
    }
}
|
|
In the example above, the Tags dialog box will appear when the EditTagsNow button is clicked.
You can easily customize the Tags dialog box by adding an inherited form to your project that is based on either TagsInputForm or TagsInputFormBase. The difference in what approach you follow depends on whether you plan to make a small change to the form or if you want to completely redesign the form.
If you only want to make a small change to the default form (for example, add a Help button), you can add an inherited form to your project based on TagsInputForm, adjust it as needed, and assign that form's type name to the TagsInputDialogClassName property on the document.
If you choose, you can completely change the default form. For example, you can provide your own controls or entering tags' values, and so on. To do so, base your inherited form on TagsInputFormBase, change it as needed, and override the EditTags method.