Ribbon for WinForms | ComponentOne
Elements / Ribbon Items / Label
In This Topic
    Label
    In This Topic

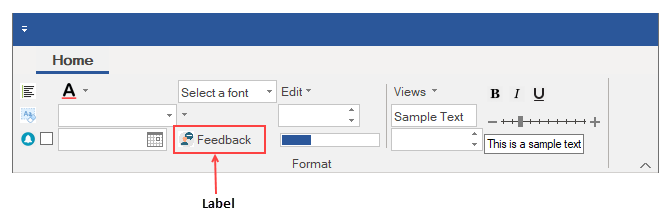
    A label displays content and can point to the element next to it. It can include both text and image.

    The image given below depicts a label.

    Label

    Add Label at Design-Time

    The Ribbon Label can be added at design-time using the Ribbon Group Floating Toolbar or RibbonGroup Items Collection Editor. Also, you can customize the look of the Ribbon Label using the Ribbon Label Floating ToolBar or by editing the properties in the Properties Window. For more information about floating toolbars, refer this topic.

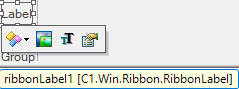
    This image below shows the floating toolbar of Label.

    Floating toolbar

    Add Label via Code 

    The Label can also be added to the C1Ribbon control through the code using the RibbonLabel class. This is depicted in the code below:

    ' Add Label ribbon item
    Dim ribbonLabel As RibbonLabel = New RibbonLabel("Feedback", Image.FromFile("images\feedback.png"))
    formatGroup.Items.Add(ribbonLabel)
    
    // Add a Label ribbon item
    RibbonLabel ribbonLabel = new RibbonLabel("Feedback", Image.FromFile(@"images\feedback.png"));
    formatGroup.Items.Add(ribbonLabel);
    

    Add Multiple Labels

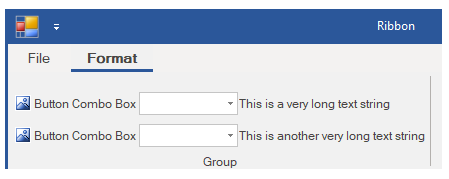
    C1Ribbon allows you to align multiple labels within your RibbonGroup using the MaxTextWidth and MinTextWidth properties. This section will walk you through the steps of adding multiple labels using two RibbonToolBars containing the default Ribbonlabel, a RibbonComboBox, and a RibbonLabel.

    1. Add two RibbonToolBars to your application. By default, the RibbonToolBar contains a Ribbonlabel.

      Add labels

    2. Float over the upper left corner of the first Toolbar until the glyph glyphappears. Click the Action label  and select Add ComboBox from the list.
    3. Click the glyph again and click the Action label again. Select Add Label from the list.
    4. Repeat steps 1- 3 with the second Toolbar.
    5. The Ribbon application should appear as in the following image:
    6. Select the RibbonLabel on the first Toolbar and choose Text Settings from the RibbonLabel Toolbar. In the Text textbox, enter This is a very long text string.
    7. In the RibbonLabel Properties window, scroll down to the MaxTextWidth property and set it to 130. Enter the same number for the MinTextWidth property.
    8. Select the RibbonLabel on the second Toolbar and choose Text Settings from the RibbonLabel Toolbar. In the Text textbox, enter This is another very long text string.
    9. In the RibbonLabel Properties window, scroll down to the MaxTextWidth property and set it to 130. Enter the same number for the MinTextWidth property.
    10. Press F5 to run your application. Your application should resemble the following image:

      Multiple labels

    Change ForeColor

    The ForeColor of an item typically refers to its text color. Users can change the ForeColor of the ribbon label item. The C1Ribbon class provides the UpdatingItemStyle event, which occurs before a style is applied to a ribbon item.

    Ribbon UI

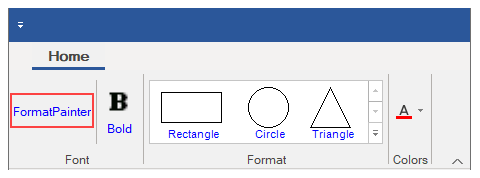
    Let's see how to change the ForeColor of RibbonLabel by setting the UpdatingItemStyle event in the code snippet.

    C#
    Copy Code
    //Handle UpdatingItemStyle event to set forecolor of RibbonLabel
    private void C1Ribbon1_UpdatingItemStyle(object sender, UpdatingItemStyleEventArgs e)
    {
        if (e.RibbonItem.GetType() == typeof(RibbonLabel))
        {
            e.ForeColor = Color.Blue;
        }
    }