The following quick start guide will take you through the basics of Ribbon control and its design customizations. You can add tabs, groups and items to the groups. By the end of this section, you will be able to create a simple text editor with the Ribbon user interface.
To create a simple WinForms application in .NET Framework for Ribbon control, complete the following steps:
With
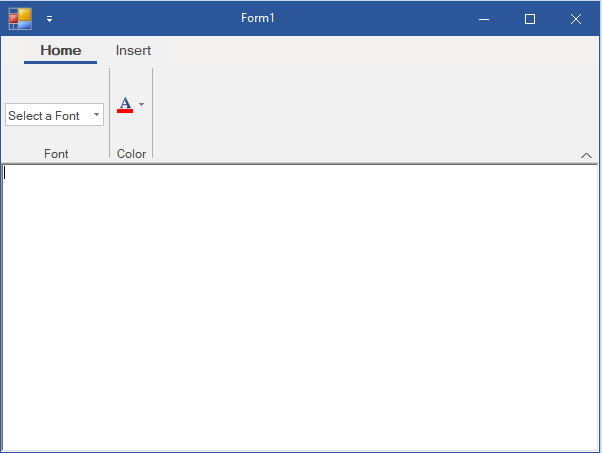
Run the application and observe the Ribbon Form generated in the following image. The Ribbon Form contains tabs, groups and FontComboBox and ColorPicker as items in the Group. Similarly, you can add other items from the group item list such as DatePicker, Gallery, Label, CheckBox, ToggleButton, TextBox etc.
Create a new Windows Forms application.
Switch to code editor and initialize the C1Ribbon object.
| C# |
Copy Code
|
|---|---|
C1Ribbon customRibbon; |
|
Initialize the Ribbon control and add the control to the Form.
| C# |
Copy Code
|
|---|---|
// Initialize the Ribbon control customRibbon = new C1Ribbon(); // Add the ribbon control to the Form this.Controls.Add(customRibbon); |
|
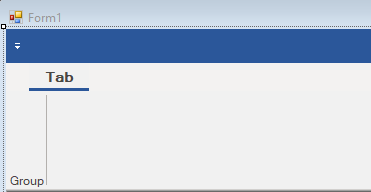
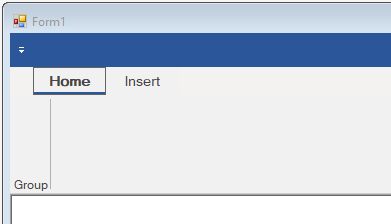
Create an instance of RibbonTab class and add the 'Home' tab to the Ribbon control using the Add method of RibbonTabCollection class.
| C# |
Copy Code
|
|---|---|
// Create and add the "Home" tab RibbonTab homeTab = new RibbonTab(); homeTab.Text = "Home"; customRibbon.Tabs.Add(homeTab); |
|
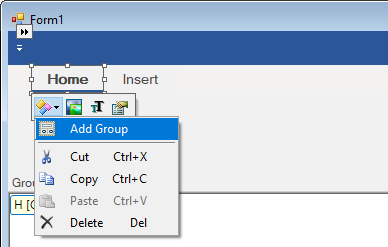
Create an instance of RibbonGroup class, assign it the name 'Font' and add it to the Home tab using the Add method of RibbonGroupCollection class.
| C# |
Copy Code
|
|---|---|
// Add a group named "Font" to the "Home" tab RibbonGroup fontStyle = new RibbonGroup(); fontStyle.Text = "Font"; homeTab.Groups.Add(fontStyle); |
|
Create Quick Access Toolbar in the Ribbon control using the Qat property of C1Ribbon class, and add items to the Quick Access Toolbar using the Items property of RibbonQat class and Add method of RibbonItemCollectionBase class.
| C# |
Copy Code
|
|---|---|
// Add Items to the quick access toolbar Image openImage = Image.FromFile(@"images\open.png"); customRibbon.Qat.Items.Add(new RibbonButton("Open", openImage)); Image undoImage = Image.FromFile(@"images\undo.png"); customRibbon.Qat.Items.Add(new RibbonButton("Undo", undoImage)); Image redoImage = Image.FromFile(@"images\redo.png"); customRibbon.Qat.Items.Add(new RibbonButton("Repeat", redoImage)); |
|
Create items to be added in application menu. Add them to the right and left panel of the Application Menu using ApplicationMenu property of C1Ribbon class.
| C# |
Copy Code
|
|---|---|
// Create Items to be added in the default Application Menu RibbonButton openButton = new RibbonButton("Open", Image.FromFile(@"images\open-file-icon.png")); RibbonButton saveButton = new RibbonButton("Save", Image.FromFile(@"images\save-file-icon.png")); RibbonButton closeButton = new RibbonButton("Close", Image.FromFile(@"images\close.png")); RibbonButton printButton = new RibbonButton("Print", Image.FromFile(@"images\print.png")); RibbonButton previewButton = new RibbonButton("Preview", Image.FromFile(@"images\preview.png")); RibbonListItem print = new RibbonListItem(printButton); RibbonListItem preview = new RibbonListItem(previewButton); // Add image Icon for ApplicationMenu C1BitmapIcon c1Bitmap1 = new C1BitmapIcon(); c1Bitmap1.Source = Image.FromFile(@"images\application_menu.png"); c1Bitmap1.Size = new Size(20, 20); customRibbon.ApplicationMenu.IconSet.Add(c1Bitmap1); // Add Application Menu items customRibbon.ApplicationMenu.LeftPaneItems.Add(openButton); customRibbon.ApplicationMenu.LeftPaneItems.Add(saveButton); customRibbon.ApplicationMenu.LeftPaneItems.Add(closeButton); customRibbon.ApplicationMenu.RightPaneItems.Add(print); customRibbon.ApplicationMenu.RightPaneItems.Add(preview); |
|
Create items to be added in configuration toolbar. Add the items using ConfigToolBar property of C1Ribbon class.
| C# |
Copy Code
|
|---|---|
//Create Items to be added in the default ConfigToolbar RibbonButton cutButton = new RibbonButton("Cut", Image.FromFile(@"images\cut.png")); RibbonButton copyButton = new RibbonButton("Copy", Image.FromFile(@"images\copy.png")); RibbonButton pasteButton = new RibbonButton("Paste", Image.FromFile(@"images\paste.png")); // Add ConfigToolbar items customRibbon.ConfigToolBar.Items.Add(cutButton); customRibbon.ConfigToolBar.Items.Add(copyButton); customRibbon.ConfigToolBar.Items.Add(pasteButton); |
|
Add a new tab 'Format' and new 'Clipboard' group. Add items like button, checkbox, fontcombobox, colorpicker, toggle button and separator to the new tab and group.
| C# |
Copy Code
|
|---|---|
// Add items like button, checkbox, fontcombobox, colorpicker, toggle button and separator //Create a new Tab RibbonTab format = new RibbonTab(); format.Text = "Format"; customRibbon.Tabs.Add(format); //Adding a Group RibbonGroup formatGroup = new RibbonGroup(); formatGroup.Text = "Clipboard"; format.Groups.Add(formatGroup); // Add ribbon button RibbonButton clearButton = new RibbonButton("Clear Format", Image.FromFile(@"images\clearformat.png")); clearButton.ToolTip = "Clear All Formatting"; formatGroup.Items.Add(clearButton); // Add CheckBox button ribbon item RibbonCheckBox reminderCheckBox = new RibbonCheckBox(); reminderCheckBox.IconSet.Add(new C1BitmapIcon(null, new Size(20, 20), Color.Transparent, Image.FromFile(@"images\reminder.png"))); reminderCheckBox.Text = "Reminder"; formatGroup.Items.Add(reminderCheckBox); //Add RibbonFontComboBox RibbonFontComboBox fontComboBox = new RibbonFontComboBox(); fontComboBox.ToolTip = "Font"; fontComboBox.Text = "Select a font"; formatGroup.Items.Add(fontComboBox); //Add RibbonSeparator RibbonSeparator separator = new RibbonSeparator(); formatGroup.Items.Add(separator); //Add RibbonColorPicker RibbonColorPicker colorPicker = new RibbonColorPicker(null, Image.FromFile(@"images\fontcolor.png")); colorPicker.ToolTip = "Color Picker"; formatGroup.Items.Add(colorPicker); // Add toggle button RibbonToggleButton leftAlign = new RibbonToggleButton(Image.FromFile(@"images\align_left.png")); leftAlign.ToolTip = "Align your content with left margin."; formatGroup.Items.Add(leftAlign); |
|
Add items like datepicker, gallery, label and menu to another tab and group.
| C# |
Copy Code
|
|---|---|
// Add items like datepicker, gallery, label and menu // Create a new Tab 'Tools' RibbonTab tool = new RibbonTab(); tool.Text = "Tools"; customRibbon.Tabs.Add(tool); // Add Editor group to Tools tab RibbonGroup toolGroup = new RibbonGroup(); toolGroup.Text = "Editor"; tool.Groups.Add(toolGroup); // Add DatePicker ribbon item RibbonDatePicker datePicker = new RibbonDatePicker(); datePicker.Format = "yyyy/MM/dd"; toolGroup.Items.Add(datePicker); // Add RibbonGallery ribbon item RibbonGallery ribbonGallery = new RibbonGallery(); ribbonGallery.ToolTip = "Select a shape"; RibbonGalleryItem ribbonGallery1 = new RibbonGalleryItem("Rectangle", Image.FromFile(@"images\rect.png")); RibbonGalleryItem ribbonGallery2 = new RibbonGalleryItem("Circle", Image.FromFile(@"images\circle.png")); RibbonGalleryItem ribbonGallery3 = new RibbonGalleryItem("Triangle", Image.FromFile(@"images\triangle.png")); RibbonGalleryItem ribbonGallery4 = new RibbonGalleryItem("Hexagon", Image.FromFile(@"images\hexagon.png")); ribbonGallery.Items.Add(ribbonGallery1); ribbonGallery.Items.Add(ribbonGallery2); ribbonGallery.Items.Add(ribbonGallery3); ribbonGallery.Items.Add(ribbonGallery4); toolGroup.Items.Add(ribbonGallery); // Add a Label ribbon item RibbonLabel ribbonLabel = new RibbonLabel("Feedback", Image.FromFile(@"images\feedback.png")); formatGroup.Items.Add(ribbonLabel); // Add RibbonMenu ribbon item RibbonMenu ribbonMenu = new RibbonMenu(); ribbonMenu.Text = "Edit"; RibbonButton buttonCut = new RibbonButton("Cut", Image.FromFile(@"images\cut.png")); RibbonButton buttonCopy = new RibbonButton("Copy", Image.FromFile(@"images\copy.png")); RibbonButton buttonPaste = new RibbonButton("Paste", Image.FromFile(@"images\paste.png")); RibbonSeparator separatoritem = new RibbonSeparator(); RibbonColorPicker colorpicker = new RibbonColorPicker("Color Picker", Image.FromFile(@"images\fontcolor.png")); RibbonLabel label = new RibbonLabel("Select Color"); RibbonColorPickerItem colorItem = new RibbonColorPickerItem(); ribbonMenu.Items.Add(buttonCut); ribbonMenu.Items.Add(buttonCopy); ribbonMenu.Items.Add(buttonPaste); ribbonMenu.Items.Add(separatoritem); ribbonMenu.Items.Add(colorpicker); ribbonMenu.Items.Add(label); ribbonMenu.Items.Add(colorItem); toolGroup.Items.Add(ribbonMenu); |
|
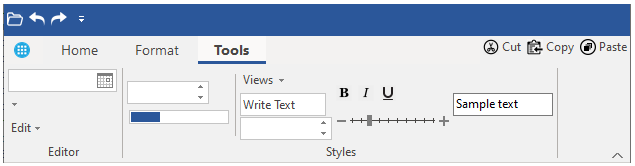
Add more items like Numeric box, progress bar, splitbutton, textbox, timepicker, toolbar and trackbar.
| C# |
Copy Code
|
|---|---|
// Add more items like Numeric box, progress bar, splitbutton, textbox, timepicker, toolbar and trackbar // Add Styles group to Tools tab RibbonGroup stylesGroup = new RibbonGroup(); stylesGroup.Text = "Styles"; tool.Groups.Add(stylesGroup); // Add Numeric Box ribbon item RibbonNumericBox numericBox = new RibbonNumericBox(); numericBox.Maximum = 10; numericBox.Minimum = 1; numericBox.ToolTip = "Select a number"; numericBox.Label = "Number Box"; stylesGroup.Items.Add(numericBox); // Add Progress Bar ribbon item RibbonProgressBar progressBar = new RibbonProgressBar(); progressBar.Minimum = 0; progressBar.Maximum = 100; progressBar.Value = 30; stylesGroup.Items.Add(progressBar); // Add Separator ribbon item RibbonSeparator separatorItem = new RibbonSeparator(); stylesGroup.Items.Add(separatorItem); // Add Ribbon Split Button RibbonSplitButton splitButton = new RibbonSplitButton("Views"); RibbonButton printLayout = new RibbonButton("Print Layout", Image.FromFile(@"images\printlayout.png")); RibbonButton fullScreenLayout = new RibbonButton("Full Screen Reading", Image.FromFile(@"images\fullscreen.png")); RibbonButton webLayout = new RibbonButton("Web Layout", Image.FromFile(@"images\weblayout.png")); splitButton.Items.Add(printLayout); splitButton.Items.Add(fullScreenLayout); splitButton.Items.Add(webLayout); stylesGroup.Items.Add(splitButton); // Add Ribbon TextBox RibbonTextBox textBox = new RibbonTextBox(); textBox.Text = "Write Text"; stylesGroup.Items.Add(textBox); // Add TimePicker RibbonTimePicker timePicker = new RibbonTimePicker(); timePicker.Label = "Select Time:"; stylesGroup.Items.Add(timePicker); // Add Ribbon Toolbar RibbonToolBar ribbonToolBar = new RibbonToolBar(); RibbonButton boldButton = new RibbonButton(Image.FromFile(@"images\bold.png")); RibbonButton italicButton = new RibbonButton(Image.FromFile(@"images\italic.png")); RibbonButton underlineButton = new RibbonButton(Image.FromFile(@"images\underline.png")); ribbonToolBar.Items.Add(boldButton); ribbonToolBar.Items.Add(italicButton); ribbonToolBar.Items.Add(underlineButton); stylesGroup.Items.Add(ribbonToolBar); // Add TrackBar RibbonTrackBar trackBar = new RibbonTrackBar(); trackBar.Minimum = 10; trackBar.Maximum = 100; trackBar.Value = 30; trackBar.TickFrequency = 10; stylesGroup.Items.Add(trackBar); |
|
Note that the Ribbon control provides dedicated class for each item in the ribbon, such as RibbonButton, RibbonCheckBox, RibbonFontComboBox, RibbonSeparator, RibbonColorPicker, RibbonToggleButton, RibbonDatePicker, RibbonGallery, RibbonLabel, RibbonMenu, RibbonNumericBox, RibbonProgressBar, RibbonSplitButton, RibbonTextBox, RibbonTimePicker, RibbonToolbar, RibbonTrackBar classes.
Ribbon control also allows the user to add a hosted control in the ribbon using the RibbonControlHost class. For this, the user has to create a new TextBoxHost class that inherits the RibbonControlHost element, and then initialize RibbonControlHost object in the form and add it to the ribbon group.
| C# |
Copy Code
|
|---|---|
// Add Control Host RibbonControlHost textboxHost = new RibbonControlHost(); textboxHost = new WinFormsRibbonQuickStart.TextBoxHost(); stylesGroup.Items.Add(textboxHost); |
|
| C# |
Copy Code
|
|---|---|
// Create a new TextBoxHost class public class TextBoxHost : C1.Win.Ribbon.RibbonControlHost { public TextBoxHost() : base(new System.Windows.Forms.TextBox()) { base.Text = "Sample text"; } } |
|
Run the application and observe the ribbon control with tabs, groups and ribbon items.