The Localize dialog box contains the following toolbar menu buttons:
| Button | Description |
|---|---|
 |
Create new translation begins a new localization for a ComponentOne assembly. |
 |
Open opens an existing translation for a particular assembly. |
 |
Save saves the current translation. |
 |
Save as saves the current translation and allows you to select the project in which to save the translation. |
 |
Add culture adds a new culture. |
 |
Delete culture removes a culture from the translations. |
 |
Select culture selects the culture to display and edit. |
 |
Options customizes the appearance and behavior of the localization window. |
Clicking the Create new translation button begins a new localization for a ComponentOne assembly. A dialog box opens for you to select the ComponentOne assembly to localize.
![]()
Clicking the Open button opens an existing translation for a particular assembly. All translations that you create are stored as .resx files and are automatically added to the project that you select while saving the translation. Clicking this item shows a dialog box where a previously saved translation can be selected.
When you create a new solution it does not contain any translations, so initially that window would look like this:
![]()
After you have created and saved a translation, the Available cultures panel shows the list of cultures for which translations were created for the selected assembly.
Clicking the Save button saves the current translation.
The translation is saved in the project shown in the status bar. When the translation is saved, a folder with the name C1LocalizedResources is created in the selected project (if it does not already exist), and the .resx files with translations are saved in that folder and added to the project. For each culture, a separate .resx file is created. These files are visible in the Solution Explorer window.
Clicking the Save as button saves the current translation and allows you to select the project in which to save the translation.
Clicking the Add culture button adds a new culture.
You can make translations for several cultures, and dynamically switch between them at run time. For each culture, a separate .resx file is created in the C1LocalizedResources folder. Clicking the Add culture button opens the Select culture dialog box that provides a list of available cultures:
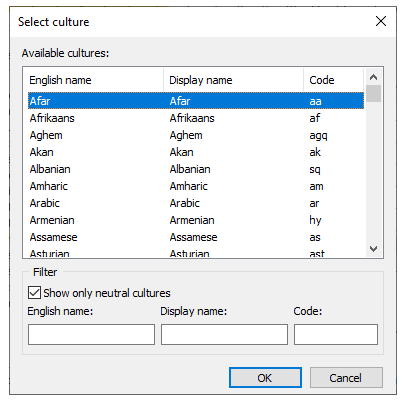
Initially the list contains neutral cultures only. To show all cultures, uncheck the Show only neutral cultures checkbox. You can use the English name, Display name, and Code boxes to filter the list of shown cultures. After you have selected a culture, press the OK button to add it to the translations. The newly added culture will appear in the Culture drop-down in the toolbar and will become current in the window.
Clicking the Delete culture button removes a culture from the translations. The Select cultures to delete dialog box provides the list of cultures existing in the translations:
Selecting a culture and clicking OK removes it from the translations.
The Culture drop-down allows you to select the culture to display and edit.
Clicking the Options button allows you to customize the appearance and behavior of the localization window.
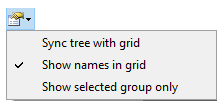
The available localization options include:
| Option | Description |
|---|---|
| Sync tree with grid | When this item is checked, selecting a string in the right panel list also selects that string in the tree on the left. By default this item is unchecked. |
| Show names in grid | When this item is checked, the Name column is shown in the right-hand panel, otherwise that column is hidden. By default this item is checked. |
| Show selected group only | When this item is checked, the list of strings on the right contains only the strings from the group currently selected in the tree on the left. By default this item is unchecked. |