Scheduler for WinForms | ComponentOne
In This Topic
    Scheduler for WinForms Quick Start
    In This Topic

    In this section you'll learn how to use the basic Scheduler for WinForms functionality to create a simple scheduling application. This section is not intended to be a comprehensive tutorial of all features of Scheduler for WinForms, but rather provide a quick introduction and highlight some general approaches to using the product.

    In the following quick start guide, you'll create a simple scheduling application and customize its appearance, bind your scheduling application to a data source, customize the calendar, and explore some of the run-time functionality Scheduler for WinForms provides.

    To create a simple WinForms application in .NET for FlexChart control, complete the following steps: 
    1. Create a new Windows Forms application.
    2. Add a SplitContainer control to the form and set its Orientation property to Horizontal.
    3. If the SplitContainer is not docked on the form, set its Dock property to Fill.
    4. Select Panel1, the top pane of the SplitContainer, and add a C1Calendar control to the form within the pane.
    5. Set C1Calendar1's Dock property to Fill.
    6. Select Panel2, the bottom pane of the SplitContainer, and add a C1Schedule control to the form within the pane.
    7. Set C1Schedule1's Dock property to Fill.
    8. Switch to code view and create a DataTable to fetch data from the data source through OLEDB adapters.
      C#
      Copy Code
      DataTable dt = new DataTable();
      string connectionString = "Provider=Microsoft.ACE.OLEDB.12.0;Data Source=" +
                   System.IO.Path.Combine(Environment.GetFolderPath(Environment.SpecialFolder.MyDocuments),
                   @"ComponentOne Samples\Common\C1NWind.mdb") + ";";
      OleDbConnection conn = new OleDbConnection(connectionString);
      OleDbDataAdapter adapter = new OleDbDataAdapter("Select * from Appointments", conn);
      adapter.Fill(dt);
      
    9. Connect the Scheduler control to c1nwind.mdb file with various data fields.
      C#
      Copy Code
      //Bind Scheduler to the datatable
      c1Schedule1.DataStorage.AppointmentStorage.DataSource = dt;
      
    10. Bind the AppointmentStorage object to Appointments list from the datatable.                       
      C#
      Copy Code
      c1Schedule1.DataStorage.AppointmentStorage.DataMember = "Appointments";
      
    11. Map appointments after setting the datasource using the DataStorage property and MappingInfo class.
      C#
      Copy Code
      c1Schedule1.DataStorage.AppointmentStorage.Mappings.AppointmentProperties.MappingName = "Properties";           
      // Bind the Body property to a field
      c1Schedule1.DataStorage.AppointmentStorage.Mappings.Body.MappingName = "Body";
      // Bind the End property to a field
      c1Schedule1.DataStorage.AppointmentStorage.Mappings.End.MappingName = "End";
      // Bind the IdMapping property to a field
      c1Schedule1.DataStorage.AppointmentStorage.Mappings.IdMapping.MappingName = "Id";
      // Bind the Location property to a field
      c1Schedule1.DataStorage.AppointmentStorage.Mappings.Location.MappingName = "Location";
      // Bind the Start property to a field
      c1Schedule1.DataStorage.AppointmentStorage.Mappings.Start.MappingName = "Start";              
      // Bind the Subject property to a field
      c1Schedule1.DataStorage.AppointmentStorage.Mappings.Subject.MappingName = "Subject";           
      
    12. Assign values to the StartDayTimeEndDayTimeTimeIntervalTimeScale and WeekStart properties of CalendarInfo object.
      C#
      Copy Code
      // 
      c1Schedule1.CalendarInfo.StartDayTime = new TimeSpan(10, 0, 0);
      c1Schedule1.CalendarInfo.EndDayTime = new TimeSpan(21, 0, 0);
      c1Schedule1.CalendarInfo.TimeInterval = C1.C1Schedule.TimeScaleEnum.FifteenMinutes;
      c1Schedule1.CalendarInfo.TimeScale = new TimeSpan(9000000000);
      c1Schedule1.CalendarInfo.WeekStart = DayOfWeek.Monday;
      
    13. Run the project and observe the output:

      Note: WinForms .NET Edition does not include rich design-time support yet. We will enhance it in future releases.

    Step 1 of 3: Creating the Scheduling Application

    In this step you'll create a simple scheduling application using the C1Calendar and C1Schedule controls. You'll then customize the appearance of your scheduling application using the incorporated Smart Designers and without adding any code to your project.

    To begin, complete the following steps:

    1. Create a new .NET project.
    2. Add a SplitContainer control to the form and set its Orientation property to Horizontal.
    3. If the SplitContainer is not docked on the form, set its Dock property to Fill.
    4. Select Panel1, the top pane of the SplitContainer, and add a C1Calendar control to the form within the pane.
    5. Set C1Calendar1's Dock property to Fill.
    6. Select Panel2, the bottom pane of the SplitContainer, and add a C1Schedule control to the form within the pane.
    7. Set C1Schedule1's Dock property to Fill.                                     
    8. Open the C1Calendar Smart Designer located near the top left of the C1Calendar control to set some of the C1Calendar settings. For more information on the C1Calendar Smart Designer, see C1Calendar Smart Designer.
    9. Click the Settings button on the C1Calendar Smart Designer to open the Settings dialog box and then complete the following:
      • Select C1Schedule1 from the C1Schedule control drop-down list to link the C1Calendar control to the C1Schedule control.
      • Set the Calendar dimensions box to 3.
      • Close the Settings dialog box.
                                  
      Note: The CalendarDimensions property can display only the number of months that it can fit into the available space.
    10. Resize the form and the SplitContainer to accommodate the new C1Calendar dimensions.
    11. Click the Visual Style button on the C1Calendar Smart Designer to open the Visual Style dialog box.
    12. In the Visual Style dialog box, select Office 2007 Black from the Current Visual Style drop-down list, and close the dialog box.                   
    13. Open the C1Schedule Smart Designer located near the top left of the C1Schedule control to set some of the C1Schedule settings. For more information on accessing the C1Schedule Smart Designer, see C1Schedule Smart Designer.
    14. Click the Calendar Settings button and in the Calendar Settings dialog box change the year in the First date drop-down box to 2005.
    15. Click the Visual Style button on the C1Schedule Smart Designer to open the Visual Style dialog box and complete the following:
      • Select Office 2007 Black from the Current Visual Style drop-down list.
      • Click the Week View button
      • Close the Visual Style dialog box.                          

    Run the program and observe the following:

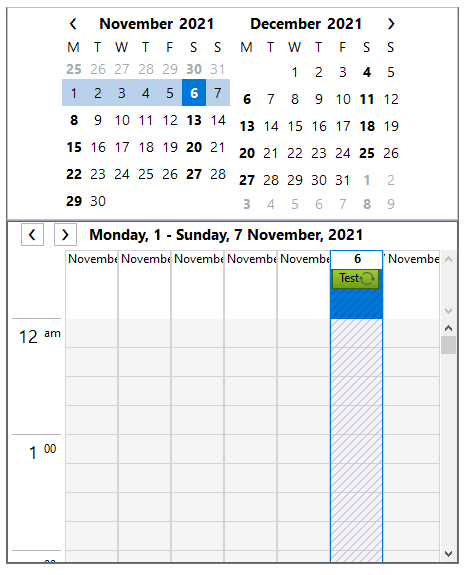
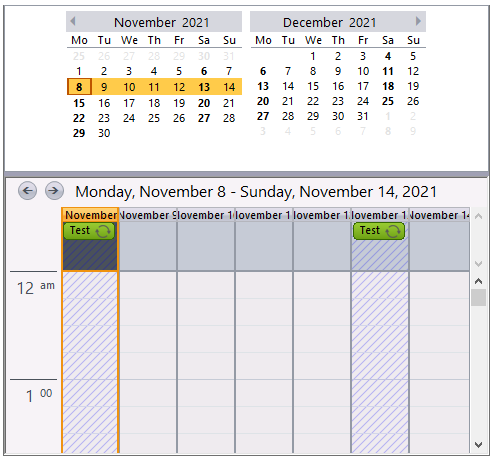
    A simple schedule application in week view with a three-month calendar using a predefined Visual Style will appear.

    You have successfully created a simple scheduling application without writing a single line of code. In the next step, you'll learn how to bind the C1Schedule control to a data source.

    Step 2 of 3: Binding to a Data Source

    In the last step you created a simple scheduling application. In this step you'll walk through binding a data source to the scheduling application you created in the Creating the Scheduling Application topic.

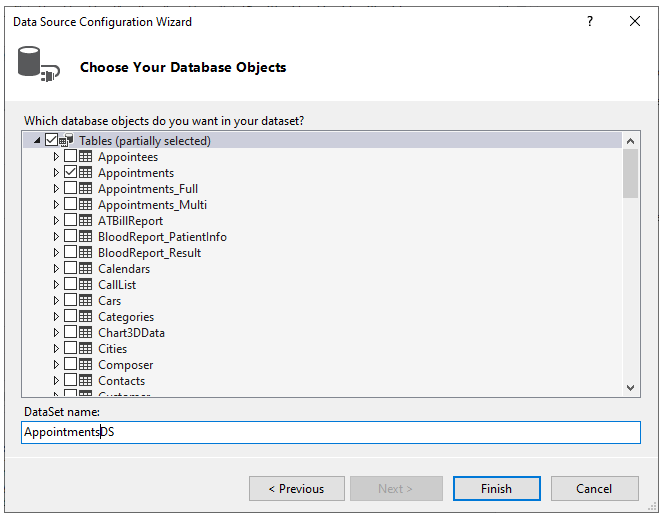
    To bind the C1Schedule control to a data source, complete the following steps:

    1. Click on the C1Schedule1's smart tag to open the C1Schedule Tasks menu. For more information on accessing the C1Schedule Tasks menu, see C1Schedule Tasks Menu.
    2. In the C1Schedule Tasks menu, click the Choose Appointment Data Source drop-down arrow and select the Add Project Data Source link from the drop-down box.                        
    3. The Data Source Configuration Wizard appears. Leave the default setting, Database, selected on the Choose a Data Source Type page, and click Next.
    4. Click the New Connection button to create a new connection or choose one from the drop-down list. The Add Connection dialog box appears.
    5. Click Browse. In the Select Microsoft Access Database File dialog box, browse to the NWind.mdb database included with the C1ScheduleDemo sample. Select the C1NWind.mdb file and click OK.
    6. In the Add Connection dialog box, click the Test Connection button to make sure that you have successfully connected to the database or server and click OK to close the dialog box that appears.
    7. Click OK to close the Add Connection dialog box. The new string appears in the on the Choose Your Data Connection page.
    8. Click the Next button to continue. A dialog box will appear asking if you would like to add the data file to your project and modify the connection string. Since it is not necessary to copy the database to your project, click No.
    9. Save the connection string in the application configuration file by checking the Yes, save the connection as box and leave the default name, C1NWindConnectionString. Click the Next button to continue.
    10. On the Choose Your Database Objects page, select the Appointments table and include all of the fields. Enter AppointmentsDS in the DataSet name box and click Finish to exit the wizard.

    11. Switch to Code view and notice that a DataSet and connection string are added to your project. Additionally, Visual Studio automatically creates the following code to fill the DataSet:
      C#
      Copy Code
      // TODO: This line of code loads data into the 'appointmentsDS.Appointments' table. You can move, or remove it, as needed.
      this.appointmentsTableAdapter.Fill(this.appointmentsDS.Appointments);
      
    12. Add the following code to the Form_FormClosing event to update the database when the form closes:
      C#
      Copy Code
      this.appointmentsTableAdapter.Update(this.appointmentsDS.Appointments);
      
    13. Return to Design view; in the C1Schedule Tasks menu, a Set Appointment Mappings link will appear after the data source is set. Click the Set Appointment Mappings link to open the Appointment Storage Properties dialog box.                        
    14. In the Appointment Storage Properties dialog box, click the Data Source drop-down arrow and select AppointmentDS from the drop-down list.
    15. Click the Data Member drop-down arrow and select Appointments from the drop-down list.
    16. Under Mappings, set the following properties:

      Note: Required properties will change from red to green when they are properly set. To ensure that all mappings are set, there should not be any red properties; otherwise, a run-time error will occur.
    17. Click OK to close the Appointment Storage Properties dialog box.                       

    Run the application and observe the following:

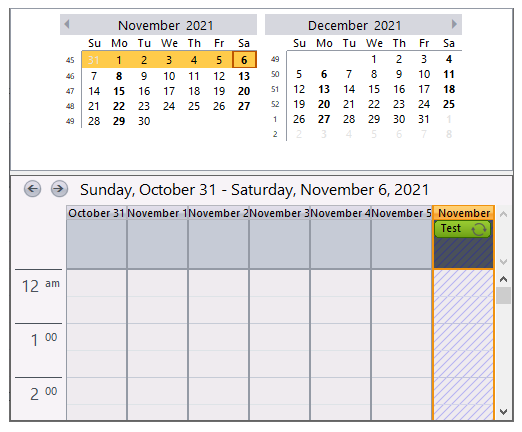
    Notice that the data from the Appointments table is reflected in both the C1Calendar and C1Schedule controls.

    By default, the Office 2007 Visual Style gives you added navigation options by enabling the navigation panels and the browse buttons. If an appointment is not present in the visible range of dates, a navigation panel appears on the left and right sides of the schedule. Clicking on one of the panels changes the current view to the previous or next date with appointments. If there is not a previous or next appointment, the corresponding panel is disabled. You can also use the navigation buttons to navigate through the schedule. The navigation buttons appear on the Title bar of the C1Schedule control. Clicking on one of the navigation buttons changes the current view to the next or previous range of dates. You have successfully bound the scheduling application to a data source. In the next topic, you will learn how to customize calendar settings for a 10-hour day, four-day work week.                

    Step 3 of 3: Customizing the Calendar Settings

    The following steps will walk you through setting up the calendar for a 10-hour day, four-day work week, including setting the start day time, end day time, the time scale, and week start properties. Complete the following to customize the calendar:

    1. On the C1Schedule Smart Designer, click the Calendar Settings button. For more information on accessing the C1Schedule Smart Designer, see C1Schedule Smart Designer.                        
    2. Set the start and end day times by setting the StartDayTime and EndDayTime properties in the Smart Designer or in code.

      In the Designer

      • In the Calendar Settings dialog box, set the Start day time box to 10:00 (AM) and set the End day time box to 21:00 (9:00 PM).                               
      • Don't close the dialog box.

      In Code

      • Add the following code to the Form_Load event to set the StartDayTime property to 10:00 AM and the EndDayTime property to 21:00 (9:00 PM):
        C#
        Copy Code
        this.c1Schedule1.CalendarInfo.StartDayTime = new TimeSpan(10, 0, 0);   
        this.c1Schedule1.CalendarInfo.EndDayTime = new TimeSpan(21, 0, 0);
        
    3. Set the time scale by setting the TimeScale property in the Smart Designer or in code.

      In the Designer

      • In the Calendar Settings dialog box, set the Time scale drop-down to 15 minutes.                                
      • Don't close the dialog box.

      In Code

      • Add the following code to the Form_Load even to set the TimeInterval property to 15 minutes using the TimeScaleEnum enumeration:
        C#
        Copy Code
        this.c1Schedule1.CalendarInfo.TimeInterval = C1.C1Schedule.TimeScaleEnum.FifteenMinutes;
        

        OR

      • Add the following code to the Form_Load event to set the TimeScale property to 15 minutes by assigning a value:
        C#
        Copy Code
        this.c1Schedule1.CalendarInfo.TimeScale = new TimeSpan(9000000000);
        
        Note: The TimeScale property cannot be set to any arbitrary value. When assigning a value to this property it is automatically calculated so as to be equal to the nearest TimeScaleEnum enumeration value.
    4. Set the week start day by setting the WeekStart property in the Smart Designer or in code.

      In the Designer

      • In the Calendar Settings dialog box, set the Week start drop-down to Monday.                                
      • Don't close the dialog box.

      In Code

      • Add the following code to the Form_Load event to set the WeekStart property to Monday:
        C#
        Copy Code
        this.c1Schedule1.CalendarInfo.WeekStart = DayOfWeek.Monday;
        
    5. Set the work days by setting the WorkDays property in the Smart Designer:
      • In the Calendar Settings dialog box under Work days, uncheck Friday.                           
    6. Close the Calendar Settings dialog box.

    Run the application and observe the following:

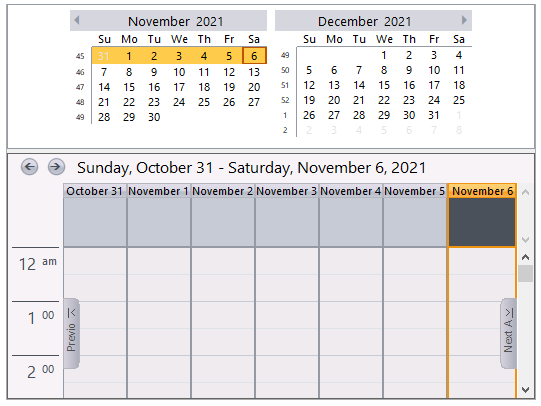
    The scheduling application displays a 4-day work week when in the Work Week view.

    Congratulations! You have successfully set the calendar settings for a 10-hour day, four-day work week. This concludes the Quick Start.