Step 4 of 4: Sizing the C1SplitContainer Control
In This Topic
In this step, you will create a fixed size and absolute size panel and run the project to see the effect of the panels sizing.
Complete the following steps:
- Select c1SplitterPanel1 of C1SplitContainer1 and set its following properties:
- Set the c1SplitterPanel1.Width property to 80.
- Set the c1SplitterPanel1.KeepRelativeSize property to False.
- Set the c1SplitterPanel1.Resizable property to False.
- Set the c1SplitterPanel1.Text property to Fixed.
- Select c1SplitterPanel4 of the C1SplitContainer1 and set its the c1SplitterPanel4.MinWidth property to 80.
- Press F5 to build the project. Observe the following behaviors:
- Hover over the expander button and notice that a tooltip appears with the default text, “minimize panel 1”.
- Click the expander button and notice panel1 collapses.
- Notice how you can’t resize the Fixed panel since you set the Resizable property to False.
- Click the splitter bar to activate it and then attempt to drag the splitter bar to the bottom of the control.
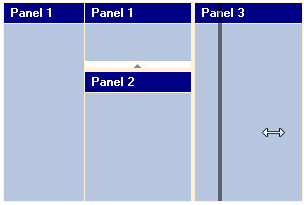
As you've probably noticed by now – and as you can see in the image above – you can't expand the bar all the way over to the right of the control. This is because you set the MinWidth to 80 so that users wouldn't be able to minimize Panel 3 to a width of less than 80 pixels. Thus, upon releasing your cursor, Panel 3 will appear no smaller than 80 pixels.
What You've Accomplished
Congratulations! You have successfully completed the C1SplitContainer quick start. In this topic, you added a C1SplitContainer control to your window page, added panels, customized its behavior and appearance, and manipulated the control at run time.
See Also