Step 2 of 3: Creating the Template with Elements
In This Topic
In the previous step you created a WinForms application and added the C1TileControl to your project.
To add a panel to your tile with image and text elements, complete the following steps:
To add a template with elements to the Tile at design time:
- Right-click the default Tile 1 and select Edit Templates. The C1TileControl.Templates Collection Editor appears.
- Click Add to add a new template to Tile1.
- Click on the ellipsis button next to Elements to open the Template.Elements Collection Editor. Select Add and click on the dropdown arrow to select the PanelElement and then the TextElement. This will add elements into the TemplateCollection.
- Select PanelElement from the Members list and enter 9 next to the ChildSpacing property.
- Click on the ellipsis button next to Children so the PanelElement.Children Collection Editor appears. Select Add and click on the dropdown arrow to select the ImageElement. Add 4 ImageElements and 3 TextElements. This will add elements into the TemplateCollection.
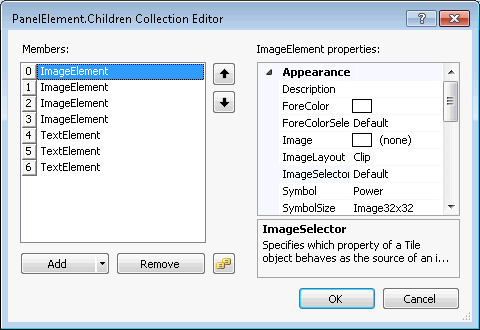
- Select the first [0] ImageElement from the Members list and set its properties to the following:
- ImageSelector property to UnboundSymbol. This will make the symbol that you select act as an image for the specified Tile.
- Symbol property to LeftToRight. This will make the LeftToRight image appear on the specified Tile.
- SymbolSize property to Image64x64. This will change the default symbol size from 32x32 to 64x64
- FixedHeight to 70. This will set the height of the contents in the panel to 70 pixels.
- Select the second [1]ImageElement from the Members list and set its properties to the following:
- ForeColor property to 255, 192, 255
- ForeColorSelector property to Unbound
- ImageSelector property to UnboundSymbol
- Symbol property to CircleWithPlus
- Select the third [2]ImageElement from the Members list and set its properties to the following:
- ForeColor property to 255, 192, 255
- ForeColorSelector property to Unbound
- ImageSelector property to UnboundSymbol
- Symbol property to CircleWithMinus
- Alignment property to TopCenter. This will align the symbol to the TopCenter of the Panel.
- Select the fourth [3]ImageElement from the Members list and set its properties to the following:
- ForeColor property to 255, 224, 192
- ForeColorSelector property to Unbound
- ImageSelector property to UnboundSymbol
- Symbol property to CircleWithMultiply
- Alignment property to BottomCenter
- Select the fifth [4]TextElement from the Members list and set its properties to the following:
- ForeColor property to 192, 192, 255
- ForeColorSelector property to Unbound
- Text property to Top
- TextSelector to Unbound
- Alignment to TopCenter
- Select the sixth [5]TextElement from the Members list and set its properties to the following:
- BackColorSelector property to Unbound
- ForeColor property to 255, 224, 192
- ForeColorSelector property to Unbound
- Text property to Bottom
- TextSelector property to Unbound. This will make the new text Bottom appear rather than the default text.
- Alignment property to BottomCenter
- DirectionVertical property to True
- Select the seventh [6]TextElement from the Members list and set its properties to the following:
- BackColorSelector property to Unbound
- ForeColor property to 255, 192, 255
- ForeColorSelector property to Unbound
- Text property to Middle
- TextSelector property to Unbound
- Click OK to save and close the PanelElement.Children Collection Editor
- In the Template.Elements Collection Editor select the [1] TextElement from the Members list.
- Select the second [1]TextElement from the Members list and set its properties to the following:
- Alignment property to BottomCenter
- Margin property to 0, 0, 0, 5
- Click OK to save and close the Template.Elements Collection Editor
- Click OK to save and close the C1TileControl.Templates Collection Editor
Run and observe the following:
Tile1 will appear the same since the template that we created, Template1, has not been applied to the Tiles Template property.
In the next step you will learn how to assign the new template to the specified tile as well as modify a few of the Tiles properties using the C1TileControl Tasks menu.