In many cases, the information that True DBGrid control receives from its data source is raw numeric data, and not ideal for end-user display. For example, date fields may need to be converted to a specific international format; currency fields may contain too many insignificant digits after the decimal point. Therefore, True DBGrid provides a method with which you can alter the format of numerical fields, the NumberFormat property.
True DBGrid for WinForms supports a variety of data formatting options through the C1DataColumn object's NumberFormat property. The NumberFormat property reconfigures the data format that is handed to the grid from the database. It can alter most types of numeric values for a particular column.
For example, to display all date values within a column according to the form 26-Apr-01, use the predefined Medium Date setting:
| C# |
Copy Code
|
|---|---|
//Numeric Field Formatting this.c1TrueDBGrid1.Columns["OrderDate"].NumberFormat = "Medium Date"; |
|
Note that if the NumberFormat property of a column is changed at run time, the display does not need to refresh since True DBGrid handles this automatically.
The NumberFormat property has several possible predefined options for numeric and time and date values.
For numeric data, the following predefined options are available in the NumberFormat property:
| Option | Description |
|---|---|
| Standard | Display number with thousands separator, at least one digit to the left and two digits to the right of the decimal separator. |
| General Number | Display number as is, with no thousand separators. |
| Currency | Display number with thousands separator, if appropriate; display two digits to the right of the decimal separator. Note that output is based on system locale settings. |
| Percent | Display number multiplied by 100 with a percent sign (%) appended to the right; always display two digits to the right of the decimal separator. |
| Fixed | Display at least one digit to the left and two digits to the right of the decimal separator. |
| Scientific | Use standard scientific notation. |
| Yes/No | Display No if number is 0; otherwise, display Yes. |
| True/False | Display False if number is 0; otherwise, display True. |
| On/Off | Display Off if number is 0; otherwise, display On. |
| 0% | Display number multiplied by 100, rounded to the nearest integer, with a percent sign (%) appended to the right. |
| 0.00% | Same as Percent. |
For date and time data, the following predefined options are available in the NumberFormat property:
| Option | Description |
|---|---|
| General Date | Display a date and/or time. For real numbers, display a date and time (for example, 4/3/93 05:34 PM); if there is no fractional part, display only a date (for example, 4/3/93); if there is no integer part, display only a time (for example, 05:34 PM). Date display is determined by your system settings. |
| Long Date | Display a date using your system's long date format. |
| Medium Date | Display a date using the medium date format appropriate for the language version of Visual Basic. |
| Short Date | Display a date using your system's short date format. |
| Long Time | Display a time using your system's long time format: includes hours, minutes, and seconds. |
| Medium Time | Display a time in 12-hour format using hours and minutes and the AM/PM designator. |
| Short Time | Display a time using the 24-hour format (for example, 17:45). |
You can customize the display of numeric information by setting the NumberFormat property to a custom value rather than to a predefined option.
For example to set a numeric column to specifically display with three decimal points, set the NumberFormat property using the following code:
| C# |
Copy Code
|
|---|---|
this.c1TrueDBGrid1.Columns["UnitPrice"].NumberFormat = "0.000"; |
|
To set a date column to specifically display in the mm/dd/yyyy format, set the NumberFormat property using the following code:
| C# |
Copy Code
|
|---|---|
this.c1TrueDBGrid1.Columns["OrderDate"].NumberFormat = "MM/dd/yy"; |
|
Since it is common for the input and display formats to be the same, the NumberFormat property has an Edit Mask option (note the space between words). If this option is selected, then the EditMask property setting will be used for both data input and display. However, the input and display formats need not be the same, so you are free to select a NumberFormat option that differs from the EditMask property.
For example, the following code applies a phone number template to a column for both display and editing:
| C# |
Copy Code
|
|---|---|
this.c1TrueDBGrid1.Columns["Phone"].EditMask = "(###) ###-####"; this.c1TrueDBGrid1.Columns["Phone"].NumberFormat = "Edit Mask"; |
|
On occasion, you may find that your current formatting options do not suit your particular needs. Furthermore, you may be restricted in the type of formatting that you can use or need a custom formatting option. In these cases, the FormatText Event option can be specified for the NumberFormat property. Choosing this option for a column will cause the FormatText event to fire each time data is about to be displayed in that column. The event allows you to reformat, translate, indent, or do anything you want to the data just prior to display:
| C# |
Copy Code
|
|---|---|
private void c1TrueDBGrid1_FormatText(object sender, C1.Win.C1TrueDBGrid.FormatTextEventArgs e) { e.Value = e.Value.ToUpper(); } |
|
A member of the FormatTextEventArgs object, ColIndex is the column number of the grid to be reformatted. While the Valuemember contains the current value of the data and also serves as a placeholder for the formatted display value.
Since the FormatText event has fewer restrictions than other formatting techniques, you can always use it to gain full control over the textual content of any value displayed in the grid.
For cases where complex per-cell customizations need to be performed you can render the contents of the cell by writing a handler for the OwnerDrawCell event. This event is raised as needed to display the contents of cells that have their OwnerDraw property set to True.
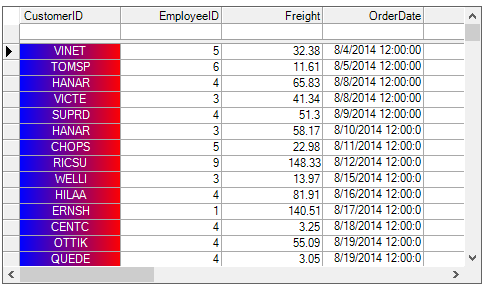
To create the owner-drawn cells in the above illustration, complete the following:
In the Designer
In Code
Add the following code to the Form_Load event:
| C# |
Copy Code
|
|---|---|
this.c1TrueDBGrid1.Splits[0].DisplayColumns["CustomerID"].OwnerDraw = true; |
|
| C# |
Copy Code
|
|---|---|
public struct RECT { long Left; long Top; long Right; long Bottom; } |
|
| C# |
Copy Code
|
|---|---|
private void c1TrueDBGrid1_OwnerDrawCell(object sender, C1.Win.C1TrueDBGrid.OwnerDrawCellEventArgs e) { if (e.Col == 0) { // Create a gradient brush, blue to red. Point pt1, pt2; pt1 = new Point(e.CellRect.X, e.CellRect.Y); pt2 = new Point(e.CellRect.Right, e.CellRect.Y); System.Drawing.Drawing2D.LinearGradientBrush linGrBrush; linGrBrush = new System.Drawing.Drawing2D.LinearGradientBrush(pt1, pt2, Color.Blue, Color.Red); RectangleF rt; rt = new RectangleF(e.CellRect.X, e.CellRect.Y, e.CellRect.Width, e.CellRect.Height); // Fill the cell rectangle with the gradient. e.Graphics.FillRectangle(linGrBrush, e.CellRect); Brush whiteBR; whiteBR = new SolidBrush(Color.White); C1.Win.C1TrueDBGrid.C1DisplayColumn dispCol; dispCol = this.c1TrueDBGrid1.Splits[0].DisplayColumns[e.Col]; // Center the text horizontally. StringFormat sfmt = new StringFormat(); sfmt.Alignment = StringAlignment.Center; // Draw the text. e.Graphics.DrawString(dispCol.DataColumn.CellText(e.Row), dispCol.Style.Font, whiteBR, rt, sfmt); whiteBR.Dispose(); // Let the grid know the event was handled. e.Handled = true; } |
|