Grouping refers to the process of organizing grid data into a hierarchical structure where rows with common column values are displayed as a group. The grouping feature also lets you collapse or expand the groups to support faster analysis of grid data. Also, the grouping feature allows users to dynamically configure a tree-view type structure. When in Group mode, a "grouping area" is added to the top of the grid, providing an intuitive interface for specifying column groups. In code, this collection is accessed through the GroupedColumns collection and consists of C1DataColumn objects that have been moved to the grouping area; it is similar to the C1DataColumnCollection class.
The grouping area is created when DataView is set to DataViewEnum.GroupBy. When AllowColMove is set to True, the grid will support the ability to move one or more columns into this area. Users can do this by selecting a single column and dragging its header into the grouping area. This action can also be performed in code by invoking the Add method of the GroupedColumnCollection. When a column is first added to the grouping area, nodes are added to the grid. Each node represents the unique value of the grouped column. Similarly when the last grouped column is removed from the area, the nodes are removed and the display will be similar to a normal grid.
When the expand icon ("+") is clicked the grid expands and the next set of grouping column data appears. If there is another grouped column, then this column has an expand icon next to it also. With the addition of each grouped column, another level of sorted information gets added to the tree view. When the expand icon on the final column in the GroupedColumns collection is clicked the data in the remaining columns is displayed in the grid's Normal style, as shown below:
To manipulate the grouping area in code, use the GroupedColumn identifiers to access the collection of grouped columns. Like the Columns property, the GroupedColumns supports Add, and RemoveAt methods. However, since the GroupedColumns serves as a placeholder for existing grid columns, the semantics of its Add and RemoveAt methods are different.
The Add method moves an existing column to the grouping area; it does not create a new column in the grid. Similarly, the RemoveAt method removes a column from the grouping area and returns it to its original position within the grid; it does not delete the column altogether.
Use the GroupByCaption property to add descriptive or directional text to the grouping area, which will be displayed when no columns are present there. Additionally, you can also set the position of the grouped row or column using Position property of the GroupInfo class which accepts its values from the GroupPositionEnum enumeration.
True DBGrid provides the GroupIntervalEnum enumeration that allows you to group data rows according to date, month, year, alphabet, date values (Outlook-style grouping), or you can customize how you would like to sort your data. The following topics explain how to group using a few of these settings.
This topic demonstrates how to use the GroupIntervalEnum.Year member in C1TrueDBGrid.
Complete the following steps:
In the Designer
In the C1TrueDBGrid Tasks menu, select GroupBy from the Data Layout drop-down.
In Code
Add the following code to the Form_Load event:
| Visual Basic |
Copy Code
|
|---|---|
Me.C1TrueDBGrid1.DataView = C1.Win.C1TrueDBGrid.DataViewEnum.GroupBy |
|
| C# |
Copy Code
|
|---|---|
this.c1TrueDBGrid1.DataView = C1.Win.C1TrueDBGrid.DataViewEnum.GroupBy; |
|
In the Designer
Locate the Interval property in the left pane of the C1TrueDBGrid Designer and set it to Year.
In Code
Add the following code to the Form_Load event
| Visual Basic |
Copy Code
|
|---|---|
' Set the GroupInfo.Interval of the HireDate column to Year.
Me.C1TrueDBGrid1.Columns("HireDate").GroupInfo.Interval = C1.Win.C1TrueDBGrid.GroupIntervalEnum.Year
|
|
| C# |
Copy Code
|
|---|---|
// Set the GroupInfo.Interval of the HireDate column to Year. this.c1TrueDBGrid1.Columns["OrderDate"].GroupInfo.Interval = C1.Win.C1TrueDBGrid.GroupIntervalEnum.Year; |
|
In the Designer
Locate the ColumnVisible property in the left pane of the C1TrueDBGrid Designer and set it to True.
In Code
Add the following code to the Form_Load event:
| Visual Basic |
Copy Code
|
|---|---|
' Keep the HireDate column visible while grouping.
Me.C1TrueDBGrid1.Columns("HireDate").GroupInfo.ColumnVisible = True
|
|
| C# |
Copy Code
|
|---|---|
// Keep the HireDate column visible while grouping. this.c1TrueDBGrid1.Columns["OrderDate"].GroupInfo.ColumnVisible = true; |
|
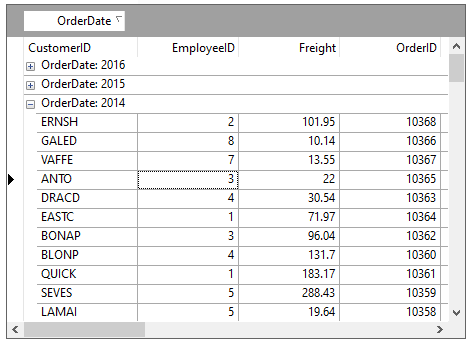
In this example, the OrderDate column is grouped by year.
This topic demonstrates how to use the GroupIntervalEnum.Alphabetical member in C1TrueDBGrid.
Complete the following steps:
In the Designer
In the C1TrueDBGrid Tasks menu, select GroupBy from the Data Layout drop-down.
In Code
Add the following code to the Form_Load event:
| Visual Basic |
Copy Code
|
|---|---|
Me.C1TrueDBGrid1.DataView = C1.Win.C1TrueDBGrid.DataViewEnum.GroupBy |
|
| C# |
Copy Code
|
|---|---|
this.c1TrueDBGrid1.DataView = C1.Win.C1TrueDBGrid.DataViewEnum.GroupBy; |
|
In the Designer
Locate the Interval property in the left pane of the C1TrueDBGrid Designer and set it to Alphabetical.
In Code
Add the following code to the Form_Load event:
| Visual Basic |
Copy Code
|
|---|---|
' Set the GroupInfo.Interval of the ProductName column to Alphabetical.
Me.C1TrueDBGrid1.Columns("ProductName").GroupInfo.Interval = C1.Win.C1TrueDBGrid.GroupIntervalEnum.Alphabetical
|
|
| C# |
Copy Code
|
|---|---|
// Set the GroupInfo.Interval of the ProductName column to Alphabetical. this.c1TrueDBGrid1.Columns["CustomerID"].GroupInfo.Interval = C1.Win.C1TrueDBGrid.GroupIntervalEnum.Alphabetical; |
|
In the Designer
Locate the ColumnVisible property in the left pane of the C1TrueDBGrid Designer and set it to True.
In Code
Add the following code to the Form_Load event
| Visual Basic |
Copy Code
|
|---|---|
' Keep the ProductName column visible while grouping.
Me.C1TrueDBGrid1.Columns("ProductName").GroupInfo.ColumnVisible = True
|
|
| C# |
Copy Code
|
|---|---|
// Keep the ProductName column visible while grouping. this.c1TrueDBGrid1.Columns["CustomerID"].GroupInfo.ColumnVisible = true; |
|
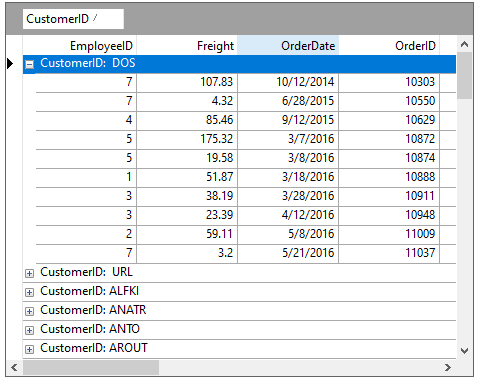
In this example, the CustomerID column is grouped by the first letter of the product name.