The following sections describe how users can select columns, move selected columns, and select rows. You can restrict any or all of these operations at design time as well as via code.
If the AllowColSelect property is True, the user can select an individual column or a range of columns with the mouse. Nonadjacent column selections are not supported.
When the user points to the header of an unselected column, the mouse pointer changes to a down arrow to indicate that the column can be selected:
When the user clicks a column header, that column is selected and highlighted, and any columns or rows that were previously selected are deselected:

There are two ways for the user to select a range of columns:
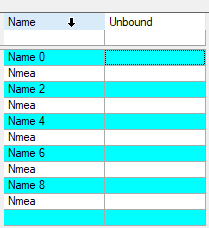
In order to manipulate the columns that have been selected at run-time, query the SelectedColumnCollection. This is a collection of all the C1DataColumn objects for the selected columns. For instance, if columns 5 through 10 are selected, the SelectedColumnCollection will have six members, each a C1DataColumn object. This feature enables the display properties of the column to be altered directly. Using the Item property to access the C1DisplayColumn properties, the code to change the backcolor to cyan for the first column selected would be:
| C# |
Copy Code
|
|---|---|
C1.Win.C1TrueDBGrid.C1DataColumn Col = new C1.Win.C1TrueDBGrid.C1DataColumn(); C1.Win.C1TrueDBGrid.C1DisplayColumn dc; c1TrueDBGrid1.Columns.Insert(0, Col); Col.Caption = "Unbound"; dc = c1TrueDBGrid1.Splits[0].DisplayColumns["Unbound"]; dc.Style.BackColor = System.Drawing.Color.Red; |
|
Also, you can prevent a column selection from occurring at run time by setting the Cancel argument to True in the grid's SelChange event.
If the AllowColMove property is True, the user can move previously selected columns as a unit to a different location by pressing the mouse button within the header area of any selected column. The pointer will change to an arrow with a column header box on its tip, a small box at its lower right corner, and a position marker consisting of two red triangles will appear at the left edge of the column being pointed to and highlighted.
The user specifies the desired location of the selected columns by dragging position marker, which changes position as the mouse pointer crosses the right edge of a column. The user completes the operation by releasing the mouse button, which moves the selected columns immediately to the left of the position marker. The moved columns remain selected.
If the user drags the marker to a position within the currently selected range, no movement occurs. Columns that are not selected cannot be moved interactively.
When a move occurs, the index in the Columns Collection is adjusted for all affected columns.
Prevent interactive column movement from occurring at run time by setting the Cancel argument to True in the ColMove event.
If the AllowColMove property is True, the user can move columns at run time also. Since there is no order property for a C1DisplayColumn the C1DisplayColumnCollection needs to be manipulated to move a column at run time. The C1DisplayColumnCollection holds all of the columns in a split. So to move a column, the user needs to remove the C1DisplayColumn from the collection, and then replace the column in the new position. The commonplace collection methods of RemoveAt and Add help accomplish this quite easily. The code which would transpose the first two columns in the default split would look as follows:
| C# |
Copy Code
|
|---|---|
c1TrueDBGrid1.Splits[0].DisplayColumns.RemoveAt(0); c1TrueDBGrid1.Splits[0].DisplayColumns.Insert(0, dc); |
|
Row selection is also very easy to master with True DBGrid. When the cursor hovers over the record selector to the left of a row, a small arrow will indicate that this row is about to be selected. Then by clicking on this record selector, the row then becomes selected. To select a contiguous range of rows, manipulate the arrow keys while holding down the shift button. This will select the cells in every field for the range of rows that the user has selected. To select a non-contiguous range of rows, click on the rows to be selected while holding down the CTRL button. This will select the cells in every field for the set of non-contiguous rows that the user has selected.
In order to find out which rows have been selected at run-time, query the SelectedRowCollection. This is a collection of all the row indices for the selected rows. For instance, if rows 5 through 10 are selected, the SelectedRowCollection will have six members. Each member will be an integer value and will be an integer that corresponds to the absolute row position of the selected row.
When it comes to cell selection, True DBGrid has multi-select capability enabled at all times, very similar to Microsoft Excel. By clicking on a cell and dragging the mouse, or by using the arrow keys, a range of cells can be selected. In turn, by clicking on a record selector and manipulating the mouse a set of rows can be selected. This range is not restricted to the row or column of the initial cells origin, although non-contiguous cell selection is not supported.
When a range of cells is selected the grid’s SelRange property becomes True. This will indicate that neither just the SelectedRowCollection nor just the SelectedColumnCollection collections will tell which cells are selected. By evaluating both collections, though, and taking the intersection of the two collections, the selected cell range can be discovered at run time. For instance, if the user clicked on the second row, second column, and dragged the mouse to the fourth row, fourth column, the SelectedRowCollection collection would contain the integers 2, 3, and 4, while the SelectedColumnCollection collection would contain the C1DataColumn objects for columns 2, 3, and 4. From this, it can be discerned at run-time that there is a nine-cell range selected from column 2, row 2, to column 4, row 4.