Tutorial 10: Enhancing the User Interface with In-Cell Bitmaps
In This Topic
In this tutorial, you will learn how to use the ValueItems object and its collection of ValueItem objects to display bitmaps and check boxes in a cell—without writing a single line of code!
Complete the following steps:
- Start with the project used in Tutorial 7: Displaying Translated Data with the Built-In Combo.
- First, change the captions of the ContactType and Callback columns. Open up the C1TrueDBGrid Designer by clicking on the ellipsis button next to the Columns property in the Properties window.
- Select the ContactType column, then in the left pane, change its Caption property to "How". Then in a similar manner, change the CallBack column caption to "Call?"
- Change the HorizontalAlignment property of these two columns by clicking the Align center button so that the bitmaps will be centered within each cell. Open the SplitCollection Editor by clicking on the ellipsis button next to the Splits property in the Properties window. Next open the C1DisplayColumnCollection Editor by clicking on the ellipsis next to the DisplayColumn property in the Splits editor. Select the How column in the left pane, then in the right pane, click the expand icon next to the Styles property. Under the Styles object for this column set the HorizontalAlignment property to Center. Then set the VerticalAlignment properties to Center. In a similar manner, set the HorizontalAlignment and VerticalAlignment properties for the Call? column.
- Next, assign bitmaps and check boxes to selected columns by populating the corresponding ValueItems object. We will start with the bitmaps in column 2. Open up the C1TrueDBGrid Designer by clicking on the ellipsis button next to the Columns property in the Properties window. Select the How column, and then in the left pane, click the expand icon next to the Valueitem object. Open up the ValueItemCollection Editor by clicking on the ellipsis button next to the Values property:

- Create three new ValueItem objects by clicking the Add button in the left pane. The possible values of the ContactType field are 0, 1, and 2, which represent telephone, mail, and personal contact, respectively. Bitmaps shall be displayed in the cell instead of these numeric values. If the full product is installed, the following files will be found in the Tutor10 subdirectory of the Tutorials installation directory: PHONE.BMP, MAIL.BMP, and PERSON.BMP.
- In the right pane, for the first ValueItem, enter 0 as the value, then in the DisplayValue property box, click the ellipsis button to search for the Image file to display in the cell. Locate the Phone.bmp file in the Tutor10 subdirectory of the WinForms Edition installation directory. In a similar manner set the other two ValueItem objects to a Value of 1, DisplayValue of Mail.bmp, and a Value of 2, DisplayValue of Person.BMP, respectively. Return to the ValueItems object in the C1TrueDBGrid Designer and set the Translate and CycleOnClick properties equal to True.
- To set the check boxes for column 3, in the C1TrueDBGrid Designer, select the Call column. In the left pane, expand the ValueItems object and set the Presentation property to CheckBox. This will display the column's Boolean values as check boxes. Then finally, under the same object set the Translate and CycleOnClick properties to True.
Run the program and observe the following:
- C1TrueDBGrid1 displays data from the joined table.
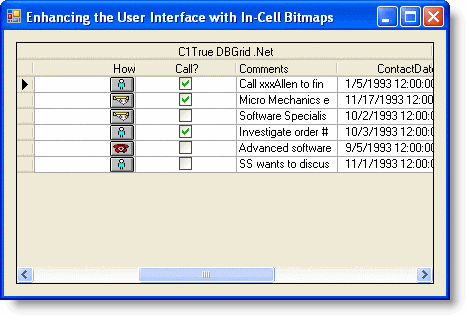
- The How and Call? columns now display bitmaps instead of numeric values as shown in the following figure.
- Click a cell in the How column to make it the current cell. Then click it again several times and observe how the cell cycles through the PHONE, MAIL, and PERSON bitmaps.
- Click a cell in the Call? column and observe how the cell cycles through the check box bitmaps.
You've successfully completed enhancing the user interface with in-cell bitmaps; this concludes tutorial 10.