This quick start will guide you through the steps of adding DataFilter and FlexGrid controls to a WinUI application, binding DataFilter and FlexGrid to a data source and setting the properties of controls.
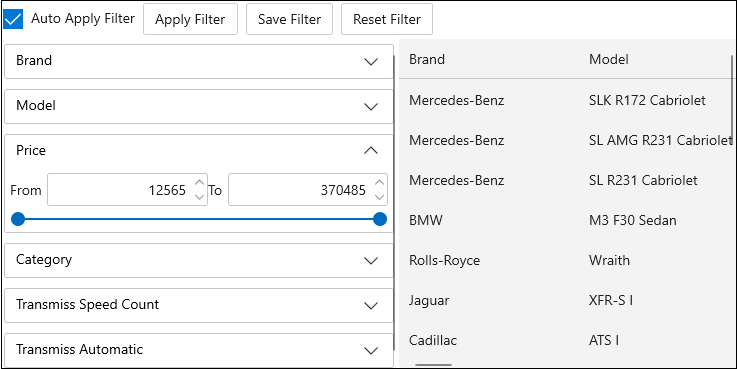
The following image shows filtered values in FlexGrid on the basis of filters applied in the DataFilter control.
| XAML |
Copy Code
|
|---|---|
xmlns:core="using:C1.WinUI.Core" xmlns:c1="using:C1.WinUI.DataFilter" xmlns:grid="using:C1.WinUI.Grid" |
|
| XAML |
Copy Code
|
|---|---|
<Grid Name="LayoutRoot"> <Grid.RowDefinitions> <RowDefinition Height="auto"/> <RowDefinition /> </Grid.RowDefinitions> <StackPanel Orientation="Horizontal"> <core:C1CheckBox x:Name="cbAutoApply" Content="Auto Apply Filter" IsChecked="True" Margin="4" Checked="CbAutoApply_CheckChanged" Unchecked="CbAutoApply_CheckChanged" /> <core:C1Button Content="Apply Filter" Click="BtnApplyFilter_Click" ToolTipService.ToolTip="Apply filter" Margin="4" /> <core:C1Button Content="Save Filter" Click="BtnSaveFilter_Click" ToolTipService.ToolTip="Save filter" Margin="4" /> <core:C1Button Content="Reset Filter" Click="BtnResetFilter_Click" ToolTipService.ToolTip="Reset filter" Margin="4"/> </StackPanel> <Grid Grid.Row="1"> <Grid.ColumnDefinitions> <ColumnDefinition Width="400" /> <ColumnDefinition /> </Grid.ColumnDefinitions> <c1:C1DataFilter x:Name="c1DataFilter" FilterAutoGenerating="C1DataFilter_FilterAutoGenerating" VerticalAlignment="Top" /> <grid:FlexGrid Grid.Column="1" AutoGenerateColumns="True" x:Name="flexGrid" HorizontalAlignment="Stretch" VerticalAlignment="Stretch"/> </Grid> </Grid> |
|
| C# |
Copy Code
|
|---|---|
private string _fileName = "Expressions.xml"; private DataTable _carsTable; public MainWindow() { this.InitializeComponent(); //Get Cars list _carsTable = DataProvider.GetCarTable(); var data = new C1DataCollection<Car>(DataProvider.GetCarDataCollection(_carsTable)); c1DataFilter.ItemsSource = data; flexGrid.ItemsSource = data; _fileName = Windows.Storage.UserDataPaths.GetDefault().LocalAppData + "/Temp/Expressions.xml"; c1DataFilter.SaveFilterExpression(_fileName); c1DataFilter.ExpandDirection = C1.WinUI.Accordion.ExpandDirection.Down; } |
|
| C# |
Copy Code
|
|---|---|
private void C1DataFilter_FilterAutoGenerating(object sender, FilterAutoGeneratingEventArgs e) { switch (e.Property.Name) { case "Model": case "Brand": break; case "TransmissSpeedCount": var transmissFilter = (ChecklistFilter)e.Filter; transmissFilter.HeaderText = "Transmiss Speed Count"; transmissFilter.ShowSelectAll = false; break; case "Category": var categoryFilter = (ChecklistFilter)e.Filter; categoryFilter.ShowSelectAll = false; break; case "TransmissAutomatic": var taFilter = (ChecklistFilter)e.Filter; taFilter.HeaderText = "Transmiss Automatic"; taFilter.ItemsSource = new List<TransmissAutomatic>() { new TransmissAutomatic() { DisplayValue = "Yes", Value = "Yes" }, new TransmissAutomatic() { DisplayValue = "No", Value = "No" }, new TransmissAutomatic() { DisplayValue = "Empty", Value = null } }; taFilter.DisplayMemberPath = "DisplayValue"; taFilter.ValueMemberPath = "Value"; taFilter.ShowSelectAll = false; break; case "Price": var priceFilter = (RangeFilter)e.Filter; priceFilter.Maximum = _carsTable.AsEnumerable().Max(x => x.Field<double>("Price")); priceFilter.Minimum = _carsTable.AsEnumerable().Min(x => x.Field<double>("Price")); priceFilter.Increment = 1000; priceFilter.Format = "F0"; break; default: e.Cancel = true; break; } } |
|
| C# |
Copy Code
|
|---|---|
private void CbAutoApply_CheckChanged(object sender, RoutedEventArgs e) { if (c1DataFilter != null) { c1DataFilter.AutoApply = cbAutoApply.IsChecked == true; } } private void BtnSaveFilter_Click(object sender, RoutedEventArgs e) { c1DataFilter.SaveFilterExpression(_fileName); } private async void BtnResetFilter_Click(object sender, RoutedEventArgs e) { c1DataFilter.LoadFilterExpression(_fileName); await c1DataFilter.ApplyFilterAsync(); } private async void BtnApplyFilter_Click(object sender, RoutedEventArgs e) { await c1DataFilter.ApplyFilterAsync(); } |
|