Basic Library for WPF and Silverlight | ComponentOne
WPF and Silverlight Edition Basic Library / Masked Text Box / Mask Elements / Adding Mask
In This Topic
    Adding Mask
    In This Topic

    You can easily add a mask for currency values using the Mask property. By default the C1MaskedTextBox control starts with its Mask not set but you can customize this at design time, in XAML, and in code. For more details about mask characters, see Mask Elements.

    For example, to set the Mask property add Mask="$999,999.00" to the <c1:C1MaskedTextBox> tag so that it appears similar to the following:

    XAML
    Copy Code
    <c1:C1MaskedTextBox Height="23" HorizontalAlignment="Left" Margin="10,10,0,0" Name="C1MaskedTextBox1" VerticalAlignment="Top" Width="120" Mask="$999,999.00"></c1:C1MaskedTextBox>


    For example, to set the Mask property add the following code to your project:

    Visual Basic
    Copy Code
    C1MaskedTextBox1.Mask = "$999,999.00"


    C#
    Copy Code
    c1MaskedTextBox1.Mask = "$999,999.00";


    To set the Mask property at run time, complete the following steps:

    1. Click the C1MaskedTextBox control once to select it.
    2. Navigate to the Properties window and enter "$999,999.00" in the text box next to the Mask property.

    This will have set the Mask property to the number you chose.

    Run your project and observe:

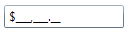
    The mask will appear in the control:

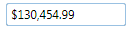
    Enter a number; notice that the mask is filled: