Step 4 of 4: Running the Application
In This Topic
Now that you've created a WPF or Silverlight application and customized the application's appearance and behavior, the only thing left to do is run your application. To run your application and observe NumericBox for WPF and Silverlight's run-time behavior, complete the following steps:
- From the Debug menu, select Start Debugging to view how your application will appear at run time.
The application will appear similar to the following:
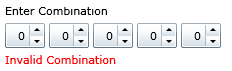
- Click the Up arrow in the first (left-most) C1NumericBox control until 5 is displayed. Note that the number increased by 1 each time you click – this is because the Increment property is set to 1 by default.
- Click inside the second C1NumericBox, highlight the "0" value, and type "2" to replace it.
- Try clicking the Down button in the third C1NumericBox control and notice that the number does not change. This is because the Minimum property was set to 0 and so the control will not accept values less than zero. Click the Up button until 3 is displayed.
- In the fourth C1NumericBox control, place the cursor in front of the 0 and click. Enter "5" so that "50" is displayed.
- Click inside the last C1NumericBox control. Notice that the 50 inside the fourth C1NumericBox was reset to 9. That's because the Maximum property was set to 9 so the control will not accept values greater than nine.
- Enter 9 in the last C1NumericBox control.
- Click the Down button of the fourth C1NumericBox control twice so 7 is displayed. Note that the text of the second Label changed and the button is now visible:
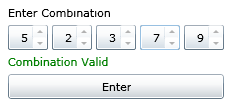
- Try typing inside a C1NumericBox control or clicking its Up or Down buttons, notice that you cannot. That is because the IsReadOnly property was set to True when the correct number sequence was entered and the controls are now locked from editing.
- Click the now-visible Enter button to navigate to the ComponentOne Web site.
Congratulations!
You've completed the NumericBox for WPF and Silverlight quick start and created a NumericBox for WPF or Silverlight application, customized the appearance and behavior of the controls, and viewed some of the run-time capabilities of your application.