Basic Library for WPF and Silverlight | ComponentOne
WPF and Silverlight Edition Basic Library / LayoutPanels / Layout Panels Quick Starts / WrapPanel Quick Start
In This Topic
    WrapPanel Quick Start
    In This Topic

    The following quick start guide is intended to get you up and running with WrapPanel for WPF and Silverlight. In this quick start, you'll create a new project in Visual Studio, add styled HyperlinkButtons that can be wrapped, and change the orientation for the buttons.

    To set up your project, complete the following steps:

    1. In Visual Studio, select File | New Project.
    2. In the New Project dialog box, select either Windows Desktop or Silverlight from the Templates in the left-hand pane.
      New Project Dialog

      New Project Dialog

    3. Select WPF Application or Silverlight Application, depending on the template you chose. 
    4. Enter a Name for your project, for example "QuickStart", and click OK. In a WPF Application, the MainWindow.xaml file will open.
      1. If you selected a Silverlight Application, when you click OK, the New Silverlight Application dialog box will appear.
      2. Click OK to accept default settings. This will close the New Silverlight Application dialog box and create your project.
      3. The MainPage.xaml file should open.
    5. Add the following assemblies to your application by right-clicking the References folder and selecting Add Reference:
      • WPF: C1.WPF.4.dll
      • Silverlight: C1.Silverlight.5.dll

    In the next step, you'll add, style, and wrap several HyperlinkButtons.

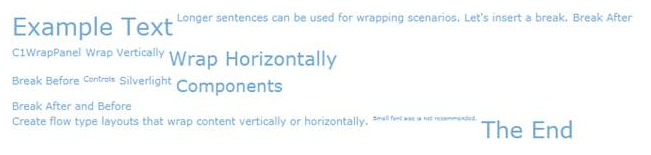
    We're going to use simple HyperlinkButtons to show how content can be wrapped vertically or horizontally. This is the typical scenario to create a TagCloud view; very commonly used in Web applications.

    1. First, remove the Grid tags from your project.
    2. From the Visual Studio Toolbox, drag a C1WrapPanel control to the page.
    3. Place your cursor in between the <c1:C1WrapPanel> tags and add the HyperlinkButtons using the following XAML:
    XAML
    Copy Code
    <HyperlinkButton Content="Example Text" FontSize="25" />
    <HyperlinkButton Content="Longer sentences can be used for wrapping scenarios." />
    <HyperlinkButton Content="Let's insert a break." />
    <HyperlinkButton c1:C1WrapPanel.BreakLine="After" Content="Break After" />
    <HyperlinkButton Content="C1WrapPanel" />
    <HyperlinkButton Content="Wrap Vertically" />
    <HyperlinkButton Content="Wrap Horizontally" FontSize="20"  />
    <HyperlinkButton c1:C1WrapPanel.BreakLine="Before" Content="Break Before" />
    <HyperlinkButton Content="Controls" FontSize="8" />
    <HyperlinkButton Content="Silverlight" />
    <HyperlinkButton Content="Components" FontSize="18" />
    <HyperlinkButton c1:C1WrapPanel.BreakLine="AfterAndBefore" Content="Break After and Before" />
    <HyperlinkButton Content="Create flow type layouts that wrap content vertically or horizontally." />
    <HyperlinkButton Content="Small font size is not recommended." FontSize="6" />
    <HyperlinkButton Content="The End" FontSize="24" />
    

    In the next step, you'll run the application.

    Now you're ready to run the application. Complete the following steps:

    1. From the Debug menu, select Start Debugging. Your application will look similar to the following:
    2. Click the Stop Debugging button to close the application.
    3. Go back to MainPage.xaml. In the <c1:C1WrapPanel> tag, set the Orientation property to Vertical; the XAML will look like the following:
    XAML
    Copy Code
    <c1:C1WrapPanel Orientation="Vertical">
    
    1. Click Start Debugging again in the Debug menu. Your application will now look like this:

    Notice how the buttons are stacked vertically.

    Congratulations! You have successfully completed the WrapPanel for WPF/Silverlight quick start.