The following quick start guide is intended to get you up and running with the Calendar control. In this quick start, you'll start with creating a new application, add the Calendar control to it, and display the calendar.
The image snapshot below is based on an application that displays the selected date in the Calendar control using a TextBox and Label.
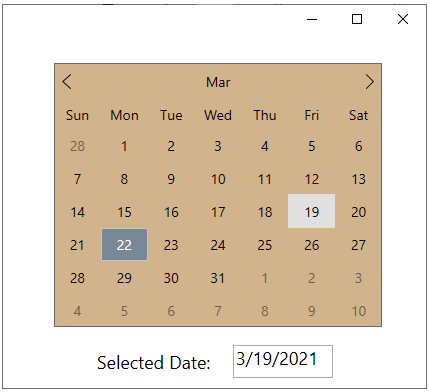
Drag and drop the Calendar control, TextBox and Label on the designer page, so that all the controls are arranged as in the image above. We have also added a Border around the Calendar control. The properties of all controls can be configured via the Properties window.
You can also add the XAML code directly between the grid tags as shown below:
| XAML |
Copy Code
|
|---|---|
<c1:C1Calendar Name="demoCalendar" HorizontalAlignment="Center" VerticalAlignment="Top" /> <Label Content="Selected Date:" HorizontalAlignment="Left" VerticalAlignment="Top" /> <TextBox Text="{Binding ElementName=demoCalendar, Path=SelectedDate, StringFormat=d, UpdateSourceTrigger=PropertyChanged}" HorizontalAlignment="Left" VerticalAlignment="Top" /> <Border BorderBrush="DimGray" HorizontalAlignment="Center" VerticalAlignment="Top" /> |
|
As you can observe from the code snippet, the Text property of TextBox control can be data-bound to the SelectedDate property of the Calendar control. So, when you select a date from the Calendar control, the currently selected date appears in the Textbox control.
We have also added a background color to the Calendar control, just to enhance the look of the application UI.