The DataFilter control supports four different kinds of filters namely, BoolFilter, RangeFilter, DateRangeFilter and ChecklistFilter, to filter different types of data. Corresponding to each filter, an accordion tab is added to the DataFilter control which contains the controls used to filter the data-aware control by a specific field.
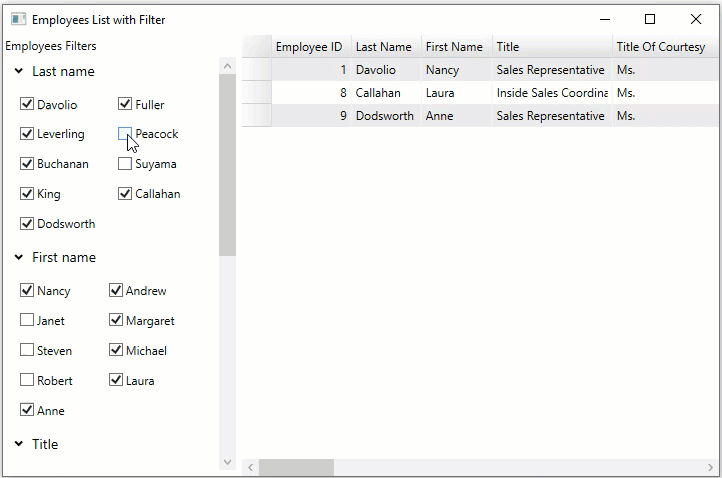
The section below gives a brief idea about different types of filters supported by DataFilter control.
When the AutoGenerateFilters property of the C1DataFilter class is set to true, filters are automatically generated depending on the type of the fields present in the DataSource. These filters are added to the FilterCollection and can be accessed using Filters property of the C1DataFilter class.
The following code demonstrates how filters can be automatically generated in the DataFilter control:
To add filters programmatically to the DataFilter control, follow these steps:
The following code demonstrates how to add a RangeFilter to the DataFilter control through code:
In WPF DataFilter .NET version, the filters can be specified using XAML code as shown in the code snippet below.
| XAML |
Copy Code
|
|---|---|
<c1:C1DataFilter AutoGenerateFilters="False"> <local:MapFilter x:Name="mf" HeaderText="Store" PropertyName="Store.ID" /> <local:ModelFilter x:Name="mdf" HeaderText="Model" PropertyName="Car.Model"/> <local:PriceFilter x:Name="pf" HeaderText="Price" PropertyName="Car.Price" ShowSelectAll="False" ShowSearchBox="False"/> <local:TransmissionFilter x:Name="tf" PropertyName="Car.TransmissAutomatic" HeaderText="Automatic transmission"/> <local:ColorFilter x:Name="cf" HeaderText="Color" PropertyName="Color"/> </c1:C1DataFilter> |
|
You can search data in DataFilter control using the full text filtering feature wherein the data source is filtered based on the user input to return the search results. You can use the FullTextFilter class to implement the text filter feature. You can customize the filtering behavior using the MatchCase and MatchWholeWord properties which allow you to filter data by matching case and whole word.
The following GIF below demonstrates a simple text filter that lets you type the value you want to search in the DataFilter. Here, when you type “BMW” in the Filter text box, it filters the data to display all values related to “BMW” brand.
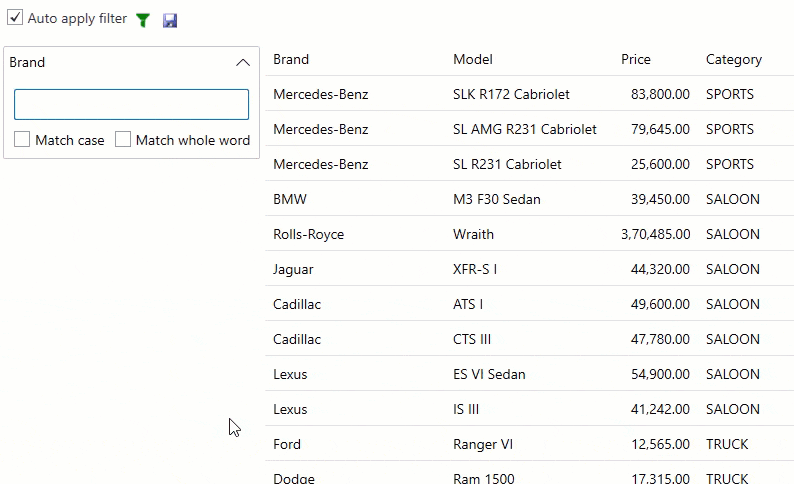
The following markup adds a full text filter and filter across the “Brand” column in the data.
| XAML |
Copy Code
|
|---|---|
<c1:C1DataFilter x:Name="c1DataFilter" AutoGenerateFilters="False" Grid.ColumnSpan="3" Margin="0,0,533,0"> <c1:C1DataFilter.Filters> <c1:FullTextFilter PropertyName="Brand" HeaderText="Brand" MatchCase="True" MatchWholeWord="True" /> </c1:C1DataFilter.Filters> </c1:C1DataFilter> |
|
In order to filter large amount of data and get the specific value with certain criteria, DataFilter allows users to create conditional filter for the whole data. You can use the conditional filter to filter the data that meets two or more complex criteria such as extracting matches and differences between data.
The following GIF below demonstrates a conditional filtering applied to DataFilter control.
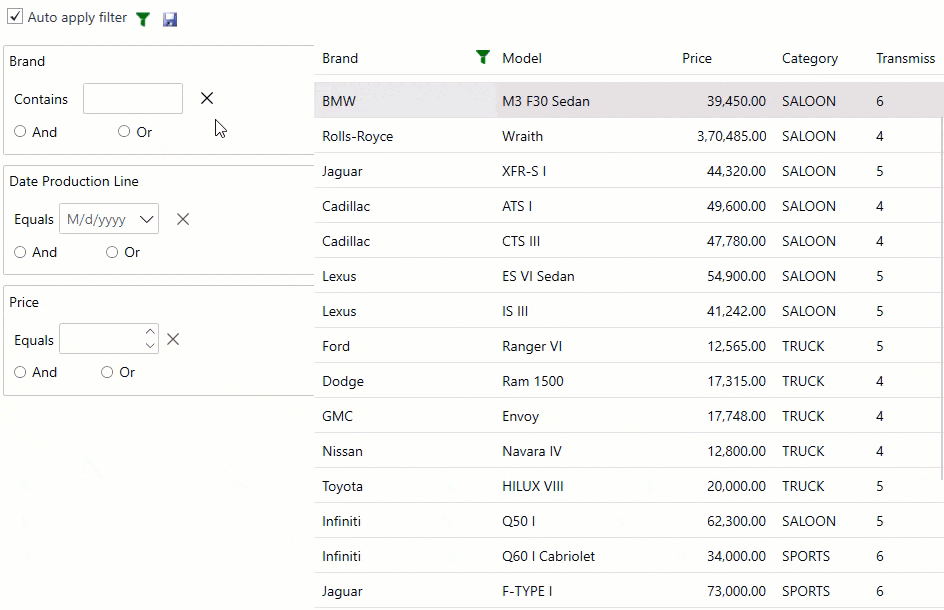
The following markup adds conditional filter and filters the data in the DataFilter control.
| XAML |
Copy Code
|
|---|---|
<c1:C1DataFilter x:Name="c1DataFilter" AutoGenerateFilters="False" Grid.ColumnSpan="3" Margin="0,0,533,0"> <c1:C1DataFilter.Filters> <c1:TextFilter PropertyName="Brand" /> <c1:DateFilter PropertyName="DateProductionLine" HeaderText="Date Production Line" /> <c1:NumericFilter PropertyName="Price" Increment="1000" Format="F2" /> </c1:C1DataFilter.Filters> </c1:C1DataFilter> |
|