The following quick start guide is intended to get you up and running with the C1DatePicker control. In this quick start, you'll start in Visual Studio to create a new project, add a C1DatePicker control to your application, and customize the C1DatePicker control.
You have completed the first step of the C1DatePicker quick start. In this step, you created a project and added a C1DatePicker control to it. In the next step, you'll customize the control.
To customize the C1DatePicker control, set the following properties from the Properties window:
Now that you've customized the application, you can run the project and observe the run time behaviors of the control.
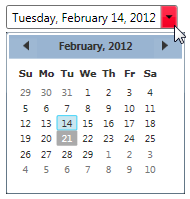
Press F5 to run the project. Notice the drop-down arrow is the color you specified in the C1DatePicker.ButtonBackground property. The C1DatePicker.SelectedDate should appear in the display box and it should show the full week day and month names.
Congratulations – you have completed the quick start. Now that you have finished the quick start, we recommend that you visit the C1DatePicker Task-Based Help topics.