ComponentOne DockControl for WPF
DockControl for WPF Task-Based Help / Setting the Dock Mode
In This Topic
    Setting the Dock Mode
    In This Topic

    You can set the dock mode at design time using the C1DockTabControl.DockMode property.

    To set the dock mode, follow these steps:

    1. Open the .xaml page in Visual Studio.
    2. Place your cursor between the <Grid></Grid> tags.
    3. In the Toolbox, double-click the C1DockControl icon to add the control to the project.
    4. Place your cursor between the <c1:C1DockControl> and </c1:C1DockControl> tags.
    5. In the Toolbox, double-click the C1DockTabControl icon to add the control to the project.
    6. Set the DockMode property to Sliding. Your XAML markup will now look similar to this:
      XAML
      Copy Code
      <c1:C1DockControl>
              <c1:C1DockTabControl DockMode="Sliding"></c1:C1DockTabControl>
      </c1:C1DockControl>
      
    7. Place your cursor between the <c1:C1DockTabControl> and </c1:C1DockTabControl> tags.
    8. In the Toolbox, double-click the C1DockTabItem icon to add the control to the project and set the C1DockTabItem.Header property to Toolbox. Your XAML should look similar to the following:
      XAML
      Copy Code
      <c1:C1DockControl>
                  <c1:C1DockTabControl DockMode="Sliding">
                       <c1:C1DockTabItem Header="Toolbox"></c1:C1DockTabItem>
                  </c1:C1DockTabControl>
           </c1:C1DockControl>
      
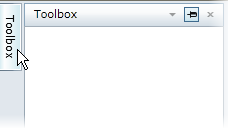
    9. Run your project. The C1DockControl will resemble the following image:

    10. Click the Toolbox tab to slide the window into view.