In this step, you'll begin in Expression Blend to create a Silverlight application using CoverFlow for Silverlight. You will also add a StackPanel control, a TextBlock control, and a folder containing three album cover images to the project.
Complete the following steps:
a. On the menu, select Window | Assets to open the Assets tab.
b. In the Assets panel, enter "StackPanel" into the search bar. The StackPanel control's icon appears.
c. Double-click the C1CoverFlow icon to add the control to your project.
a. In the Objects and Timeline panel, select [StackPanel].
b. In the Assets panel, enter "C1CoverFlow" into the search bar. The C1CoverFlow control's icon appears.
c. Double-click the C1CoverFlow icon to add the control to the StackPanel.
a. In the Objects and Timeline panel, select [StackPanel].
b. In the Assets panel, enter "TextBlock" into the search bar. The TextBlock control's icon appears.
c. Double-click the TextBlock icon to add the control to the StackPanel.
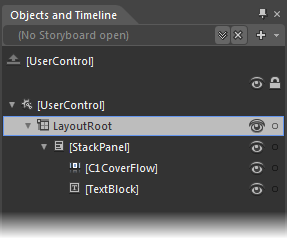
In the Objects and Timeline tab, the layout hierarchy looks as follows:
a. In the Projects panel, right-click the project to open its context menu and select Add New Folder; name the new folder “Images”.
b. Right-click the Images folder and select Add Existing Item. The Add Existing Item dialog box opens.
c. Navigate to the following location:
· In XP
C:\Documents and Settings\<username>\My Documents\ComponentOne Samples\Studio for Silverlight\QuickStart\QuickStart
· Windows 7/Vista
C:\Users\<username>\Documents\ComponentOne Samples\Studio for Silverlight\QuickStart\QuickStart
d. Select cover1.jpg, cover2.jpg, and cover3.jpg.
e. Click Open to close the Add Existing Item dialog box and to add the images to the folder. The images are added to the Images folder.
In this step, you created a project and added a C1CoverFlow control, a StackPanel control, and a TextBlock control to it; in addition, you added a folder with three album images to the project. In the next step, you’ll customize the controls by setting a few properties.