Step 3 of 5: Adding Items to the C1CoverFlow Control
In This Topic
In the last step, you customized the StackPanel, C1CoverFlow, and TextBlock controls by setting a few properties. In this step, you’ll add four items – a TextBox control and three images – to the C1CoverFlow control. You will also customize each item by settings its properties.
Complete the following steps:
- Add a TextBox control to the C1CoverFlow control by completing the following steps:
- In the Objects and Timeline panel, select C1CoverFlow1.
- In the Assets panel, enter "TextBox" into the search bar.
- The TextBox control's icon appears.
- Double-click the TextBox icon to add the control to the C1CoverFlow control.
- Add the first image to the control by completing the following steps:
- In the Objects and Timeline panel, select C1CoverFlow1.
- In the Projects panel, expand the Images folder if it’s not already expanded.
- Double-click cover1.jpg to add the image to the C1CoverFlow control.
- Double-click cover2.jpg to add the image to the C1CoverFlow control.
- Double-click cover3.jpg to add the image to the C1CoverFlow control.
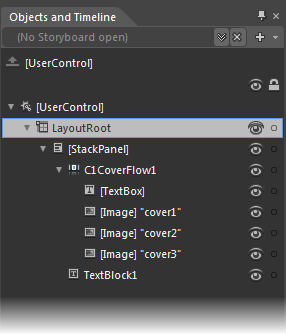
In the Objects and Timeline tab, the layout looks as follows:
- In the Objects and Timeline panel, select [TextBox] and set the following properties in the Properties panel:
- Set the Background property to a light purple by entering “#FFB3AED8” into the Hex value text box.
- Set the Width property to “150”.
- Set the Height property to “150”.
- Set the Text property to the following string: “As you scroll through the list of album covers, the TextBlock control will display the title of the currently selected item.”
- In the Objects and Timeline panel, select [Image] “cover1” and set the following properties in the Properties panel:
- Set the Width property to “150”.
- Set the Height property to “150”.
- In the Objects and Timeline panel, select [Image] “cover2” and set the following properties in the Properties panel:
- Set the Width property to “150”.
- Set the Height property to “150”.
- In the Objects and Timeline panel, select [Image] “cover3” and set the following properties in the Properties panel:
- Set the Width property to “150”.
- Set the Height property to “150”.
In this step, you added four items to the C1CoverFlow control and then set the items’ properties. In the next step, you’ll add code to the project.