You can use the C1Gauge.Minimum and C1Gauge.Maximum properties to set a numeric range that the gauge would be limited to. You can customize the Minimum and Maximum values at design time, in XAML, and in code. Although this topic sets the Minimum and Maximum properties of the C1LinearGauge control, the same steps can be used to customize the Minimum and Maximum of other controls.
At Design Time
To set the Minimum and Maximum for the C1LinearGauge at run time, complete the following steps:
This will set Minimum and Maximum values.
In XAML
To set the C1LinearGauge control's Minimum and Maximum in XAML addMaximum="50" Minimum="-50" to the <c1:C1LinearGauge> tag so that it appears similar to the following:
<c1:C1LinearGauge Height="89" Margin="47,57,33,43" Name="C1LinearGauge1" Width="287" Maximum="50" Minimum="-50">
In Code
To set the C1LinearGauge control's Minimum and Maximum add the following code to your project:
| Visual Basic |
Copy Code
|
|---|---|
C1LinearGauge1.Minimum = -50 C1LinearGauge1.Maximum = 50 |
|
| C# |
Copy Code
|
|---|---|
c1LinearGauge1.Minimum = -50; c1LinearGauge1.Maximum = 50; |
|
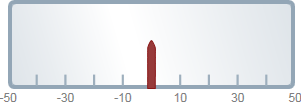
Run your project and observe:
The gauge will be limited to the selected range at run time: