The following quick start guide is intended to get you up and running with NumericBox for WPF. In this quick start, you add a C1NumericBox control to your application and customize the appearance and behavior of the control.
In this step you'll begin in Visual Studio to create a WPF application using NumericBox for WPF. When you add a C1NumericBox control to your application, you'll have a complete, functional numeric editor. You can further customize the control to your application.
Complete the following steps:
- Width = 40
- Minimum = 0
- Maximum = 9
The Width property will resize the control. The Minimum and Maximum properties will set the minimum and maximum values that are allowed in the control. Users will not be able to enter values outside of that range providing built-in data validation.
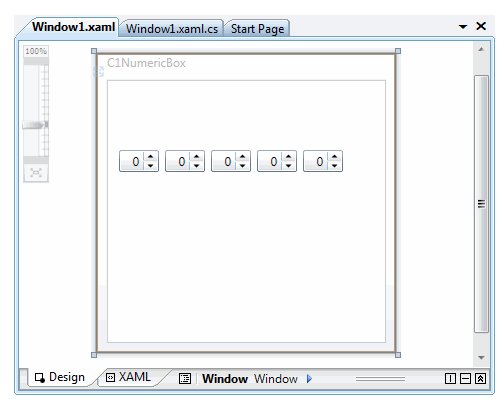
Your application should now look similar to the following:
You've successfully created a WPF application, added C1NumericBox controls to the application, and customized those controls. In the next step you'll complete setting up the application.
In the previous step you created a new WPF project and added five C1NumericBox controls to the application. In this step you'll continue by adding additional controls to customize the application.
Complete the following steps:
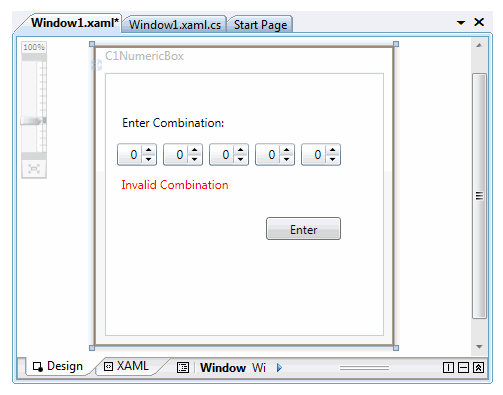
Your application will now look similar to the following:
You've successfully set up your application's user interface. In the next step you'll add code to your application.
In the previous steps you set up the application's user interface and added C1NumberBox, Label, and Button controls to your application. In this step you'll add code to your application to finalize it.
Complete the following steps:
Visual Basic
C#
Visual Basic
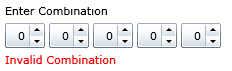
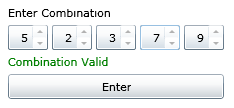
C# These numbers will be used as the correct 'code' in the application. When the user enters the correct combination of numbers at run time the button will appear.
Visual Basic Private Sub btn1_Click(ByVal sender As System.Object, ByVal e As System.Windows.RoutedEventArgs) Handles btn1.Click HtmlPage.PopupWindow(New Uri("https://developer.mescius.com"), "new", Nothing) End Sub
C#
Visual Basic Private Sub NBValidation() If Me.c1nb1.Value = nb1 And Me.c1nb2.Value = nb2 And Me.c1nb3.Value = nb3 And Me.c1nb4.Value = nb4 And Me.c1nb5.Value = nb5 Then Me.lbl2.Foreground = New SolidColorBrush(Colors.Green) Me.lbl2.Content = "Combination Valid" Me.c1nb1.IsReadOnly = True Me.c1nb2.IsReadOnly = True Me.c1nb3.IsReadOnly = True Me.c1nb4.IsReadOnly = True Me.c1nb5.IsReadOnly = True Me.btn1.Visibility = Windows.Visibility.Visible End If End Sub
C# When the user enters the correct numbers (as indicated in step 3 above) the C1NumericBox controls will be set to read only and will no longer be editable, the text of the label below the controls will change to indicate the correct code has been entered, and a button will appear allowing users to enter the ComponentOne Web site.
Visual Basic Private Sub c1nb1_ValueChanged(ByVal sender As System.Object, ByVal e As C1.WPF.PropertyChangedEventArgs(Of System.Double)) Handles c1nb1.ValueChanged NBValidation() End Sub Private Sub c1nb2_ValueChanged(ByVal sender As System.Object, ByVal e As C1.WPF.PropertyChangedEventArgs(Of System.Double)) Handles c1nb2.ValueChanged NBValidation() End Sub Private Sub c1nb3_ValueChanged(ByVal sender As System.Object, ByVal e As C1.WPF.PropertyChangedEventArgs(Of System.Double)) Handles c1nb3.ValueChanged NBValidation() End Sub Private Sub c1nb4_ValueChanged(ByVal sender As System.Object, ByVal e As C1.WPF.PropertyChangedEventArgs(Of System.Double)) Handles c1nb4.ValueChanged NBValidation() End Sub Private Sub c1nb5_ValueChanged(ByVal sender As System.Object, ByVal e As C1.WPF.PropertyChangedEventArgs(Of System.Double)) Handles c1nb5.ValueChanged NBValidation() End Sub
C#
In this step you completed adding code to your application. In the next step you'll run the application and observe run-time interactions.
Now that you've created a WPF application and customized the application's appearance and behavior, the only thing left to do is run your application. To run your application and observe NumericBox for WPF's run-time behavior, complete the following steps:
The application will appear similar to the following:
Congratulations!
You've completed the NumericBox for WPF quick start and created a NumericBox for WPF application, customized the appearance and behavior of the controls, and viewed some of the run-time capabilities of your application.