In this step, you begin by creating a WPF application in Visual Studio and then adding a RadialMenu control to your application.
| XAML |
Copy Code
|
|---|---|
<Window.Resources>
    <Style TargetType="TextBlock" x:Key="TextIconStyle">
        <Setter Property="Margin" Value="-10" />
        <Setter Property="FontSize" Value="20" />
        <Setter Property="FontFamily" Value="Segoe UI Symbol" />
        <Setter Property="FontWeight" Value="Normal" />
        <Setter Property="Foreground" Value="#333333" />
        <Setter Property="HorizontalAlignment" Value="Center" />
        <Setter Property="VerticalAlignment" Value="Center" />
    </Style>
    <Style TargetType="Image" >
        <Setter Property="Width" Value="25"/>
        <Setter Property="Height" Value="25"/>
        <Setter Property="Margin" Value="0"/>
    </Style>
</Window.Resources>
|
|
| XAML |
Copy Code
|
|---|---|
<Border Background="LemonChiffon" MinHeight="40" BorderBrush="#969696" BorderThickness="1" Padding="5" HorizontalAlignment="Stretch" VerticalAlignment="Stretch"></Border> |
|
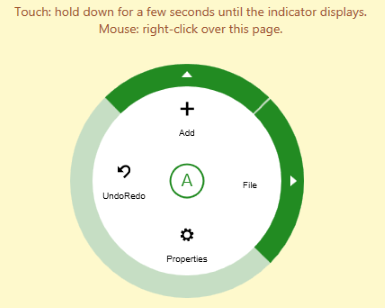
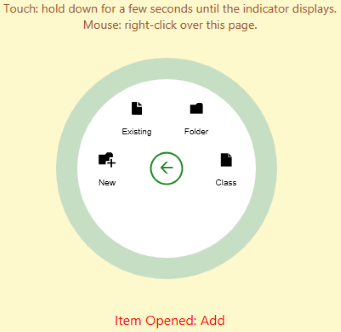
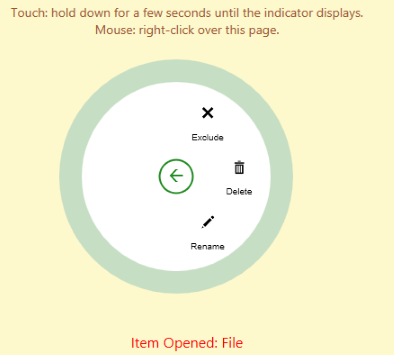
In this step, you start by setting some properties of the RadialMenu control that you added in the previous step, and adding a few C1RadialMenuItem controls as submenus to the main radial menu. Each menu item that you add in the markup contains an image and a TextBlock label.
| XAML |
Copy Code
|
|---|---|
<c1:C1ContextMenuService.ContextMenu>
    <c1:C1RadialMenu x:Name="contextMenu" Offset="-133,0" Opened="contextMenu_Opened" AccentBrush="ForestGreen"
         ItemClick="contextMenu_ItemClick" ItemOpened="contextMenu_ItemOpened" BorderBrush="#FFC6DEC4">
        <c1:C1RadialMenuItem Header="UndoRedo" SelectedIndex="0" ShowSelectedItem="True"
                 Command="{Binding UndoCommand, ElementName=page}">
            <c1:C1RadialMenuItem.Icon>
                <Image Source="Menu/e10e-Undo.48.png" />
            </c1:C1RadialMenuItem.Icon>
        </c1:C1RadialMenuItem>

        <c1:C1RadialMenuItem Header="Add" SectorCount="6">
            <c1:C1RadialMenuItem.Icon>
                <Image Source="Menu/e109-Add.48.png"/>
            </c1:C1RadialMenuItem.Icon>
            <c1:C1RadialMenuItem Header="New" ToolTip="New Item">
                <c1:C1RadialMenuItem.Icon>
                    <Image Source="Menu/e1da-Folder.48.png"/>
                </c1:C1RadialMenuItem.Icon>
            </c1:C1RadialMenuItem>
            <c1:C1RadialMenuItem Header="Existing" ToolTip="Existing Item">
                <c1:C1RadialMenuItem.Icon>
                    <Image Source="Menu/e132-File.48.png"/>
                </c1:C1RadialMenuItem.Icon>
            </c1:C1RadialMenuItem>
            <c1:C1RadialMenuItem Header="Folder">
                <c1:C1RadialMenuItem.Icon>
                    <Image Source="Menu/e188-Folder.48.png"/>
                </c1:C1RadialMenuItem.Icon>
            </c1:C1RadialMenuItem>
            <c1:C1RadialMenuItem Header="Class">
                <c1:C1RadialMenuItem.Icon>
                    <Image Source="Menu/1f4c4-Document.48.png"/>
                </c1:C1RadialMenuItem.Icon>
            </c1:C1RadialMenuItem>
        </c1:C1RadialMenuItem>

        <c1:C1RadialMenuItem Header="File" SectorCount="6">
            <c1:C1RadialMenuItem Header="Exclude" ToolTip="Exclude From Project" DisplayIndex="2">
                <c1:C1RadialMenuItem.Icon>
                    <Image Source="Menu/e10a-Cancel.48.png"/>
                </c1:C1RadialMenuItem.Icon>
            </c1:C1RadialMenuItem>
            <c1:C1RadialMenuItem Header="Delete">
                <c1:C1RadialMenuItem.Icon>
                    <Image Source="Menu/e107-Delete.48.png"/>
                </c1:C1RadialMenuItem.Icon>
            </c1:C1RadialMenuItem>
            <c1:C1RadialMenuItem Header="Rename">
                <c1:C1RadialMenuItem.Icon>
                    <Image Source="Menu/e104-Edit.48.png"/>
                </c1:C1RadialMenuItem.Icon>
            </c1:C1RadialMenuItem>
        </c1:C1RadialMenuItem>

        <c1:C1RadialMenuItem Header="Properties">
            <c1:C1RadialMenuItem.Icon>
                <Image Source="Menu/e115-Settings.48.png"/>
            </c1:C1RadialMenuItem.Icon>
        </c1:C1RadialMenuItem>
    </c1:C1RadialMenu>
</c1:C1ContextMenuService.ContextMenu>
|
|
The C1ContextMenuService enables the C1RadialMenu control to act as a context menu for any control. This context menu appears when the user right-click or right-tap on the parent control (which is Grid in this example). The markup illustrated above also adds items to the RadialMenu. If you prefer to show the C1RadialMenu control programmatically, you can skip C1ContextMenuService and simply call the Show method in code.
The icons added in the markup above are .png image files added to the Menu folder of the Visual Studio project. These images are available at the following path:
Documents\ComponentOne Sample\WPF\C1.WPF\CS\Menu\MenuExplorer\Resources
| XAML |
Copy Code
|
|---|---|
<Grid HorizontalAlignment="Stretch" VerticalAlignment="Top" Height="75" > <TextBlock Foreground="Sienna" TextAlignment="Center" FontSize="14" x:Name="text" Text="Touch: hold down for a few seconds until the indicator displays. Mouse: right-click over this page." TextWrapping="Wrap" /> </Grid> |
|
| XAML |
Copy Code
|
|---|---|
<TextBlock x:Name="txt" Foreground="Red" Text="" FontSize="16" VerticalAlignment="Bottom" HorizontalAlignment="Center" Margin="10" /> |
|
| C# |
Copy Code
|
|---|---|
private void contextMenu_ItemClick(object sender, SourcedEventArgs e) { txt.Text = "Item Clicked: " + ((C1RadialMenuItem)e.Source).Header.ToString(); string str = "Item Clicked: " + ((C1RadialMenuItem)e.Source).Header.ToString(); } private void contextMenu_ItemOpened(object sender, SourcedEventArgs e) { C1RadialMenuItem item = e.Source as C1RadialMenuItem; txt.Text = "Item Opened: " + (item.Header ?? item.Name).ToString(); string str = "Item Opened: " + (item.Header ?? item.Name).ToString(); } private void contextMenu_Opened(object sender, EventArgs e) { contextMenu.Expand(); } |
|