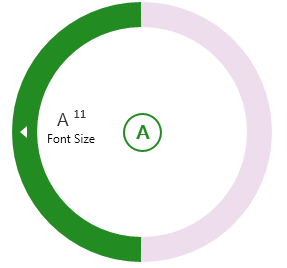
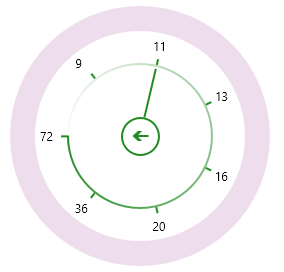
The RadialMenu control allows you to create a radial numeric slider menu. This is especially useful for applications where you might want users to select a font size for an application. You'll use both XAML markup and code to create the application.
Complete the following steps to create a radial numeric slider menu:
| XAML |
Copy Code
|
|---|---|
<Page.Resources>
<Style TargetType="TextBlock" x:Key="TextIconStyle">
<Setter Property="Margin" Value="-10" />
<Setter Property="FontSize" Value="20" />
<Setter Property="FontFamily" Value="Segoe UI Symbol" />
<Setter Property="FontWeight" Value="Normal" />
<Setter Property="Foreground" Value="#333333" />
<Setter Property="HorizontalAlignment" Value="Center" />
<Setter Property="VerticalAlignment" Value="Center" />
</Style>
<Style TargetType="Image" x:Key="MenuIcon">
<Setter Property="Width" Value="16"/>
<Setter Property="Height" Value="16"/>
<Setter Property="Margin" Value="0"/>
</Style>
</Page.Resources>
<Grid Background="{ThemeResource ApplicationPageBackgroundThemeBrush}">
<c1:C1ContextMenuService.ContextMenu>
</c1:C1ContextMenuService.ContextMenu>
<c1:C1ListViewer x:Name="text" Foreground="Sienna" HorizontalAlignment="Stretch" VerticalAlignment="Center" Height="75" ZoomMode="Disabled" FontSize="16" >
<TextBlock Text="Touch: hold down for a few seconds until the indicator displays. Keyboard: press the context-menu button over this text. Mouse: right-click over this text." TextWrapping="Wrap" />
</c1:C1ListViewer>
<TextBlock x:Name="txt" Foreground="Red" Text="" FontSize="16" VerticalAlignment="Bottom" HorizontalAlignment="Center" Margin="10" />
|
|
| XAML |
Copy Code
|
|---|---|
<c1:C1RadialMenu x:Name="contextMenu" Offset="-130,0" Opened="contextMenu_Opened" AccentBrush="ForestGreen" ItemClick="contextMenu_ItemClick" ItemOpened="contextMenu_ItemOpened" BorderBrush="#FFC6DEC4"> |
|
| XAML |
Copy Code
|
|---|---|
<c1:C1RadialNumericItem Header="Font Size" Minimum="9" Maximum="72" MarkStartAngle="-128" MarkEndAngle="231" x:Name="fontSize" Value="11"> <c1:C1RadialNumericItem.Icon> <TextBlock Style="{StaticResource TextIconStyle}" FontFamily="Segoe UI" FontSize="18"> <Run Text="A"/> <Run Text="{Binding Value, ElementName=fontSize}" Typography.Variants="Superscript"/> </TextBlock> </c1:C1RadialNumericItem.Icon> <x:Double>9</x:Double> <x:Double>11</x:Double> <x:Double>13</x:Double> <x:Double>16</x:Double> <x:Double>20</x:Double> <x:Double>36</x:Double> <x:Double>72</x:Double> </c1:C1RadialNumericItem> |
|
| C# |
Copy Code
|
|---|---|
using C1.WPF.Core; using C1.WPF.Menu; |
|
| XAML |
Copy Code
|
|---|---|
private void contextMenu_ItemClick(object sender, SourcedEventArgs e) { C1RadialMenuItem item = e.Source as C1RadialMenuItem; if (item is C1RadialNumericItem) { txt.FontSize = ((C1RadialNumericItem)item).Value; txt.Text = "Item Clicked: " + ((C1RadialNumericItem)item).Value.ToString(); } else { txt.Text = "Item Clicked: " + (item.Header ?? item.Name).ToString(); } } |
|
| XAML |
Copy Code
|
|---|---|
private void contextMenu_ItemOpened(object sender, SourcedEventArgs e) { C1RadialMenuItem item = e.Source as C1RadialMenuItem; txt.Text = "Item Opened: " + (item.Header ?? item.Name).ToString(); } private void contextMenu_Opened(object sender, EventArgs e) { // expand menu immediately, as in this sample we don't have underlying editable controls contextMenu.Expand(); } |
|