While you can use the C1RichTextBox control to add a full toolbar to use with the C1RichTextBox control, you can also easily create your own simple toolbar. Most rich editors include a toolbar with buttons that format the current selection, making it bold, italic, or underlined. The buttons also change state when you move the selection, to show that the selected text is bold, italic, underlined, and so on.
Implementing a simple toolbar with the C1RichTextBox is easy. For example, complete the following steps:
| XAML |
Copy Code
|
|---|---|
<Window xmlns:c1="http://schemas.componentone.com/winfx/2006/xaml" x:Class=" C1RichTextBoxIntro.MainWindow" xmlns="http://schemas.microsoft.com/winfx/2006/xaml/presentation" xmlns:x="http://schemas.microsoft.com/winfx/2006/xaml" Title="MainWindow"> <Grid x:Name="LayoutRoot" Background="White"> <Grid.RowDefinitions> <RowDefinition Height="Auto" /> <RowDefinition /> </Grid.RowDefinitions> <StackPanel Orientation="Horizontal" > <ToggleButton x:Name="_btnBold" Content="B" Click="_btnBold_Click" Checked="_btnBold_Click" /> <ToggleButton x:Name="_btnItalic" Content="I" Click="_btnItalic_Click" /> <ToggleButton x:Name="_btnUnderline" Content="U" Click="_btnUnderline_Click" /> </StackPanel> <c1:C1RichTextBox x:Name="_rtb" Grid.Row="1" AcceptsReturn="True" SelectionChanged="_rtb_SelectionChanged"/> </Grid> |
|
This markup adds a C1RichTextBox control and three buttons (bold, italic, and underline) that control its formatting. When a button is clicked, the attached event handlers are responsible for updating the format of the selection. The code in the next step accomplishes that.
| Visual Basic |
Copy Code
|
|---|---|
Private Sub _btnBold_Click(sender As Object, e As RoutedEventArgs) Dim fw As System.Nullable(Of FontWeight) = _rtb.Selection.FontWeight _rtb.Selection.FontWeight = If(fw.HasValue AndAlso fw.Value = FontWeights.Bold, FontWeights.Normal, FontWeights.Bold) End Sub |
|
| C# |
Copy Code
|
|---|---|
private void _btnBold_Click(object sender, RoutedEventArgs e) { FontWeight? fw = _rtb.Selection.FontWeight; _rtb.Selection.FontWeight = fw.HasValue && fw.Value == FontWeights.Bold ? FontWeights.Normal : FontWeights.Bold; } |
|
The code starts by getting the value of the FontWeight property for the current selection. Note that the value returned is nullable (hence the '?' in the type declaration). If the selection contains a mix of different font weights, the value returned is null. The code above sets the font weight to "normal" if the whole selection has a single font weight and is bold; otherwise, the code sets the font weight to "bold".
| Visual Basic |
Copy Code
|
|---|---|
Private Sub _btnItalic_Click(sender As Object, e As RoutedEventArgs)
    Dim fs As System.Nullable(Of FontStyle) = _rtb.Selection.FontStyle
    _rtb.Selection.FontStyle = If(fs.HasValue AndAlso fs.Value = FontStyles.Italic, FontStyles.Normal, FontStyles.Italic)
End Sub
|
|
| C# |
Copy Code
|
|---|---|
private void _btnItalic_Click(object sender, RoutedEventArgs e) { FontStyle? fs = _rtb.Selection.FontStyle; _rtb.Selection.FontStyle = fs.HasValue && fs.Value == FontStyles.Italic ? FontStyles.Normal : FontStyles.Italic; } |
|
The code that handles the italics button is very similar to the code that handles the bold button, except it uses the FontStyle property instead of FontWeight.
| Visual Basic |
Copy Code
|
|---|---|
Private Sub _btnUnderline_Click(sender As Object, e As RoutedEventArgs) If _btnUnderline.IsChecked.HasValue Then rtb.Selection.TextDecorations = If(_btnUnderline.IsChecked.Value, C1TextDecorations.Underline, Nothing) End If End Sub |
|
| C# |
Copy Code
|
|---|---|
private void _btnUnderline_Click(object sender, RoutedEventArgs e) { if (_btnUnderline.IsChecked.HasValue) { _rtb.Selection.TextDecorations = _btnUnderline.IsChecked.Value ? C1.WPF.RichTextBox.Documents.C1TextDecorations.Underline : null; } } |
|
The code that handles the underline button is similar, this time using the TextDecorations property. Note that TextDecorations property returns an actual object, and thus is not a nullable property. The above code is all it takes to make the three buttons work.
| Visual Basic |
Copy Code
|
|---|---|
Private Sub _rtb_SelectionChanged(sender As Object, e As EventArgs) Dim fw As System.Nullable(Of FontWeight) = _rtb.Selection.FontWeight _btnBold.IsChecked = fw.HasValue AndAlso fw.Value = FontWeights.Bold Dim fs As System.Nullable(Of FontStyle) = _rtb.Selection.FontStyle _btnItalic.IsChecked = fs.HasValue AndAlso fs.Value = FontStyles.Italic _btnUnderline.IsChecked = (sel.TextDecorations IsNot Nothing) End Sub |
|
| C# |
Copy Code
|
|---|---|
void _rtb_SelectionChanged(object sender, EventArgs e) { var sel = _rtb.Selection; FontWeight? fw = _rtb.Selection.FontWeight; _btnBold.IsChecked = fw.HasValue && fw.Value == FontWeights.Bold; FontStyle? fs = _rtb.Selection.FontStyle; _btnItalic.IsChecked = fs.HasValue && fs.Value == FontStyles.Italic; _btnUnderline.IsChecked = (sel.TextDecorations != null); } |
|
This event handler is responsible for changing the state of the buttons as the user moves the selection. For example, selecting a word that is bold and underlined would make the buttons appear pressed.
The code uses the C1TextElement.FontWeight, C1TextElement.FontStyle, and C1TextElement.TextDecorations properties as before, and sets the IsChecked property on the corresponding buttons.
What You've Accomplished
You've created a simple toolbar. When run, the application would appear similar to the following image:
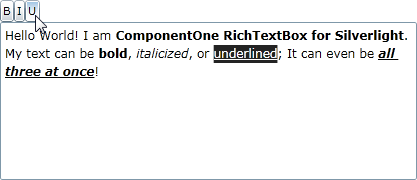
You can enter text and press the bold, italic, and underline buttons to format the text as in the above image.
A full toolbar would include more buttons and controls, and would handle them in a similar fashion. WPF Edition includes C1RichTextBoxToolbar, a complete toolbar as a separate assembly. The source code for the C1RichTextBoxToolbar control is included so you can create your own customized version. For details, see Working with C1RichTextBoxToolbar.