In this topic, we will bind to C1Scheduler the Schedule.mdb database that is installed with Scheduler for WPF by default. First we must configure the datasource. Then we can add the dataset as a resource in the Blend project and map to the C1Scheduler Data Storage.
To configure the data source in Visual Studio 2008:
- Create a new WPF project in Microsoft Visual Studio:
- Select File | New Project.
- Expand the Visual C# node and select NET Framework 3.0 (or later). Note that you may have to expand the Other Languages node to find Visual C#.
- Select WPF Application from the Templates pane.
- Enter a name for the project in the Name text box and click OK. A new project is created.
- From the Project menu, select Add Page. The Add New Item window appears. Visual C# will be selected under Categories, and Page (WPF) will be selected in the Templates pane.
- Leave Page1.xaml in the Name text box and click Add.
- If it is not already open, double-click Page1.xaml.cs under the Page1.xaml node in the Solution Explorer to open it.
- Add a reference to C1.WPF.Schedule:
- Select Project | Add Reference.
- Browse to find the location of the assembly file. When Scheduler for WPF is installed, this file is installed to C:\Program Files\ComponentOne\WPF Edition, by default. Note that the location may be different if you performed a custom install.
- Add the following using statements to the page:
XAML Copy Codeusing C1.WPF.Schedule; using C1.Schedule; using MYProjectNAME.ScheduleDataSetTableAdapters;
Note that this last using statement should contain the name of your project to work correctly. It will be used to set up the table adapter for your data set.
- Next we will add the data source we are binding to:
- Select Data | Add New Data Source. The Data Source Configuration Wizard appears.
- Select Database and click Next.
- Click the New Connection button and browse to locate your database. In this example we will use the Schedule.mdb database installed with Scheduler for WPF. This file was placed in the Common folder during installation.
- Click Next once you create the new connection. It is not necessary to copy this file to your project, so click No if you receive a dialog box asking you to do this. The connection is given a name.
- Click Next to save the connection string.
- Select the database objects to use in the dataset and click Finish.
- Add the following C# code to your Page1.xaml.cs Page1 class so it looks like the following. This code will use the data from the dataset to fill the schedule.
XAML Copy Codepublic partial class Page1 : System.Windows.Controls.Page { private ScheduleDataSet _schedulerDataSet = null; public Page1() { InitializeComponent(); // Use the data set to fill in the data. FillData(SchedulerDataSet); } public ScheduleDataSet SchedulerDataSet { get { if (_schedulerDataSet == null) { _schedulerDataSet = Resources["dataSet"] as ScheduleDataSet; } return _schedulerDataSet; } } private void FillData(ScheduleDataSet ds) { if (ds == null) return; AppointmentsTableAdapter appAd = new AppointmentsTableAdapter(); appAd.Fill(ds.Appointments); } } - Save and close the project.
To add the new dataset as a resource to your Blend project:
- In Blend, open the project (.sln) that you created in Visual Studio 2008.
- Double-click the Page1.xaml in the Project panel to open the page and click the Design tab to access the Design view, if necessary.
- Add a C1Scheduler control to the page. See Adding the Scheduler for WPF Controls to a Blend Project for more information on how to do this.
- Click the XAML tab to switch to XAML view.
- Create a CLR namespace by adding the following XAML code to the namespace list within the Page tag. Use your project's name for the clr-namespace value.
xmlns:local="clr-namespace:MYProjectNAME"
Your XAML code should look similar to the following:
XAML Copy Code<Page xmlns="http://schemas.microsoft.com/winfx/2006/xaml/presentation" xmlns:x="http://schemas.microsoft.com/winfx/2006/xaml" x:Class="WpfApplication1.Page1" xmlns:local="clr-namespace:WpfApplication1" Title="Page1" xmlns:c1sched="http://schemas.componentone.com/wpf/Schedule">
- Select Project | Build Solution.
- Add the ScheduleDataSet as a resource by entering the following code after the opening <Page> tag:
XAML Copy Code<Page.Resources> <local:ScheduleDataSet x:Key="dataSet" /> </Page.Resources>
To map to the C1Scheduler Data Storage:
- In your Blend project, click the Design tab to switch back to Design view of Page1.xaml.
- Select the C1Scheduler control on Page1.xaml of your project.
- In the Properties panel, under Data, click the DataStorage button. The Data Source settings dialog box appears.
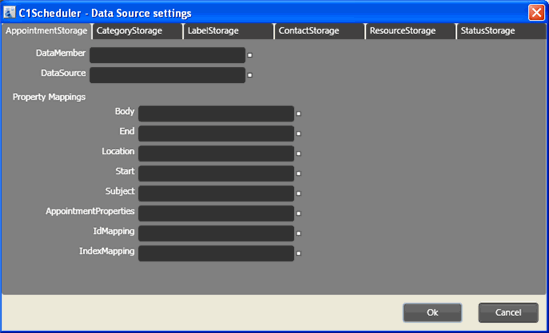
- Click the Advanced Property Options button next to the DataSource property, select Local Resource and check dataSet. This property is set to the ScheduleDataSet.
- Enter Appointments next to the DataMember property. C1Scheduler will map to the Appointments table and use its data to fill in the schedule.
- Next, set the mappings for the properties to the corresponding data fields in the Appointments table. Enter the following text for each of the Property Mappings items:
Property
Text
Body
Body
End
End
Location
Location
Start
Start
Subject
Subject
AppointmentProperties
Properties
IdMapping
Id
IndexMapping
N/A
- Click OK to close the Property Dialog Editor. The database is now mapped to the Appointment Storage. The XAML code for the mappings looks like the following:
XAML Copy Code<c1:C1Scheduler Margin="0,0,-80,-80" Theme="{DynamicResource {ComponentResourceKey ResourceId=Office2007.Blue, TypeInTargetAssembly={x:Type c1sched:C1Scheduler}}}"> <c1:NestedPropertySetter PropertyName="DataStorage.AppointmentStorage.DataMember" Value="Appointments"/> <c1:NestedPropertySetter PropertyName="DataStorage.AppointmentStorage.DataSource" Value="{DynamicResource dataSet}"/> <c1:NestedPropertySetter PropertyName="DataStorage.AppointmentStorage.Mappings.Body.MappingName" Value="Body"/> <c1:NestedPropertySetter PropertyName="DataStorage.AppointmentStorage.Mappings.End.MappingName" Value="End"/> <c1:NestedPropertySetter PropertyName="DataStorage.AppointmentStorage.Mappings.Location.MappingName" Value="Location"/> <c1:NestedPropertySetter PropertyName="DataStorage.AppointmentStorage.Mappings.Start.MappingName" Value="Start"/> <c1:NestedPropertySetter PropertyName="DataStorage.AppointmentStorage.Mappings.Subject.MappingName" Value="Subject"/> <c1:NestedPropertySetter PropertyName="DataStorage.AppointmentStorage.Mappings.AppointmentProperties.MappingName" Value="Properties"/> <c1:NestedPropertySetter PropertyName="DataStorage.AppointmentStorage.Mappings.IdMapping.MappingName" Value="Id"/> <c1:NestedPropertySetter PropertyName="DataStorage.AppointmentStorage.Mappings.IndexMapping.MappingName" Value="N/A"/> <c1:C1Scheduler>