Step 2 of 4: Binding C1Scheduler to a Data Source
In This Topic
Now you can add a C1Scheduler control to the Blend project and bind to the data source.
To add the new dataset as a resource to your Blend project:
- Open Microsoft Expression Blend 4 and select File|Open Project from the menu to open the project (.sln) that you created in Visual Studio 2010.
- Double-click the Page1.xaml in the Project panel to open the page and click the Design tab to access the Design view, if necessary.
- Add a C1Scheduler control to the page. Since you have already added a reference to the C1.WPF.C1Schedule assembly when you created the project in Visual Studio 2010, all you need to do is add C1Scheduler from the Asset Library:
- Click the Asset Library button in the Blend toolbox.
- In the Asset Library, click the Categories tab.
- Select C1Scheduler. The component will appear in the toolbox above the Asset Library button.
- Double-click the C1Scheduler button in the toolbox to add it to the page.
- Click the XAML tab to switch to XAML view.
- Create a CLR namespace by adding the following XAML code to the namespace list within the Page tag. Use your Visual Studio 2010 project's name for the clr-namespace value.
xmlns:local="clr-namespace:MYProjectNAME"
Your XAML should look similar to the following:
XAML Copy Code<Page xmlns="http://schemas.microsoft.com/winfx/2006/xaml/presentation" xmlns:x="http://schemas.microsoft.com/winfx/2006/xaml" x:Class="MYProjectName.Page1" Title="Page1" xmlns:c1sched="http://schemas.componentone.com/wpf/Schedule" x:Class=”WpfScheduleQuickStart.Page1” xmlns:local="clr-namespace:MYProjectName">
- Right-click Page1.xaml in the Project panel and select Startup. This will set Page1 as the opening window.
- Select Project | Build Project to build your project.
- While you are still in XAML view, add the ScheduleDataSet as a resource by entering the following XAML immediately after the XAML above:
XAML Copy Code<Page.Resources> <local:ScheduleDataSet x:Key="dataSet" /> </Page.Resources>
To map to the Scheduler for WPF Data Storage:
- In your Blend project, click the Design tab to switch back to Design view of Page1.xaml.
- Select the C1Scheduler control on Page1.xaml of your project.
- In the Properties panel, under Data, click the DataStorage ellipsis button. The Data Source settings dialog box appears.
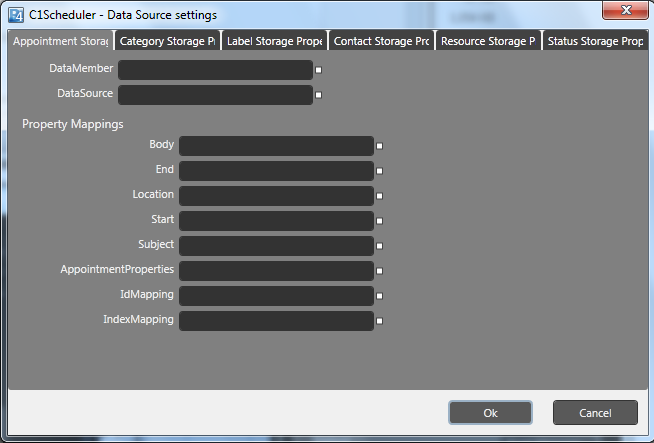
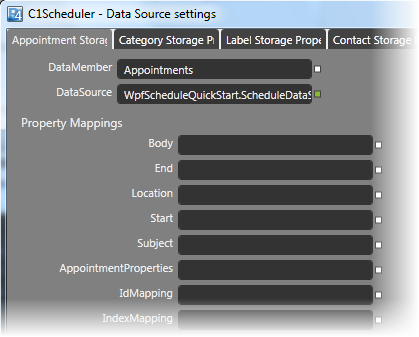
- Click the Advanced Property Options button next to the DataSource property, select Local Resource and check dataSet. This property is set to the ScheduleDataSet.
- Enter Appointments next to the DataMember property. C1Scheduler will map to the Appointments table and use its data to fill in the schedule.
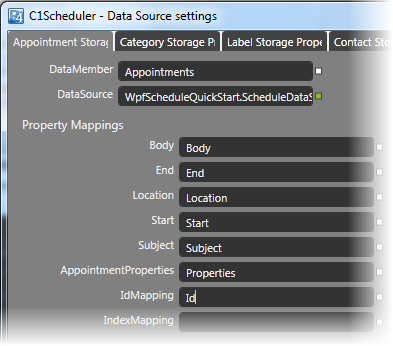
- Next, set the mappings for the properties to the corresponding data fields in the Appointments table. Enter the following text for each of the Property Mappings items:
Property
Text
Body
Body
End
End
Location
Location
Start
Start
Subject
Subject
AppointmentProperties
Properties
IdMapping
Id
IndexMapping
- Click OK to close the Data Source settings dialog box. The database is now mapped to the Appointment Storage. The XAML code for the mappings looks similar to the following:
XAML Copy Code<c1:C1Scheduler HorizontalAlignment="Left" Height="400" VerticalAlignment="Top" Width="480"> <c1sched:NestedPropertySetter PropertyName="DataStorage.AppointmentStorage.DataMember" Value="Appointments"/> <c1:NestedPropertySetter PropertyName="DataStorage.AppointmentStorage.DataSource" Value="{DynamicResource dataSet}"/> <c1:NestedPropertySetter PropertyName="DataStorage.AppointmentStorage.Mappings.Body.MappingName" Value="Body"/> <c1:NestedPropertySetter PropertyName="DataStorage.AppointmentStorage.Mappings.End.MappingName" Value="End"/> <c1:NestedPropertySetter PropertyName="DataStorage.AppointmentStorage.Mappings.Location.MappingName" Value="Location"/> <c1:NestedPropertySetter PropertyName="DataStorage.AppointmentStorage.Mappings.Start.MappingName" Value="Start"/> <c1:NestedPropertySetter PropertyName="DataStorage.AppointmentStorage.Mappings.Subject.MappingName" Value="Subject"/> <c1:NestedPropertySetter PropertyName="DataStorage.AppointmentStorage.Mappings.AppointmentProperties.MappingName" Value="Properties"/> <c1:NestedPropertySetter PropertyName="DataStorage.AppointmentStorage.Mappings.IdMapping.MappingName" Value="Id"/> <c1:C1Scheduler>
You have successfully bound C1Scheduler to a data source. Now you can customize the schedule.