Appointments can be created at run time by double-clicking the time for the appointment to begin or by pressing ENTER key, which opens the Appointment dialog box. For more information about appointments, see Appointments.
Appointments can be added to the Scheduler using the Appointment dialog box.
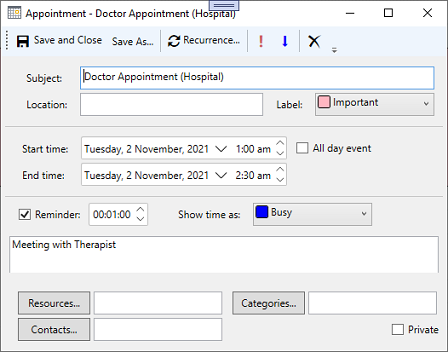
Appointments can be also created programmatically using the Appointment class and its properties such as, Start, Duration, Body, etc. and added to the Scheduler using the Add method as showcased in the following code.
| C# |
Copy Code
|
|---|---|
// Showing Appointment var appointment = new Appointment(); appointment.Start = new DateTime(DateTime.Now.Year, DateTime.Now.Month, DateTime.Now.Day, 1, 0, 0); appointment.Duration = TimeSpan.FromHours(1.5); appointment.Subject = "Doctor Appointment (Hospital)"; appointment.Body = "Meeting with Therapist"; //Adding appointment to scheduler. scheduler.DataStorage.AppointmentStorage.Appointments.Add(appointment); |
|
Appointments can be changed and updated in Scheduler either in-place or through the Appointment dialog box.
You can also edit an appointment in the Scheduler programmatically. For doing so, you can add a Button control to edit an appointment and a Scheduler control to your application as shown in the following steps:
| XAML |
Copy Code
|
|---|---|
<Button x:Name="btnEdit" Click="btnEdit_Click" Margin="5" HorizontalAlignment="Left">Edit Selected Appointment</Button> <c1:C1Scheduler x:Name="scheduler" Grid.Row="1"></c1:C1Scheduler> |
|
| C# |
Copy Code
|
|---|---|
public EditingAppointment() { InitializeComponent(); InitAppointments(); } private void InitAppointments() { for (int day = 1; day <= 7; day++) { scheduler.DataStorage.AppointmentStorage.Appointments.Add(new Appointment() { Start = new DateTime(2021, DateTime.Now.Month, day), Duration = TimeSpan.FromHours(1), Subject = $"Test Appointment {day}", Body = "New Appointment" }); } } private void btnEdit_Click(object sender, RoutedEventArgs e) { if (scheduler.SelectedAppointment == null) MessageBox.Show("No Appointment selected.", "Select Appointment", MessageBoxButton.OK, MessageBoxImage.Information); else { scheduler.EditAppointmentDialog(scheduler.SelectedAppointment); // Opens edit dialog for provided appointment scheduler.SelectedAppointment = null; } } |
|
Selected appointments can be easily removed from your schedule through the Edit Appointment dialog box.
Scheduler allows you to delete an appointment programmatically as well. For doing so, you can add a Button control to delete an appointment and a Scheduler control to your application as shown in the following steps:
| XAML |
Copy Code
|
|---|---|
<Button x:Name="btnDelete" Click="btnDelete_Click" Margin="5" HorizontalAlignment="Left">Delete Selected Appointment</Button> <c1:C1Scheduler x:Name="scheduler" Grid.Row="1"></c1:C1Scheduler> |
|
| C# |
Copy Code
|
|---|---|
public DeleteAppointment() { InitializeComponent(); InitAppointments(); } private void InitAppointments() { for (int day = 1; day <= 7; day++) { scheduler.DataStorage.AppointmentStorage.Appointments.Add(new Appointment() { Start = new DateTime(2021, DateTime.Now.Month, day), Duration = TimeSpan.FromHours(1), Subject = $"Test Appointment {day}", Body = "New Appointment" }); } } private void btnDelete_Click(object sender, RoutedEventArgs e) { if (scheduler.SelectedAppointment == null) MessageBox.Show("No Appointment selected.", "Select Appointment", MessageBoxButton.OK, MessageBoxImage.Information); else { scheduler.SelectedAppointment.Delete(); // Deletes the appointment from the scheduler. scheduler.SelectedAppointment = null; } } |
|
Appointments can be set to recur at specified intervals. An appointment can recur daily, weekly, monthly, or yearly.
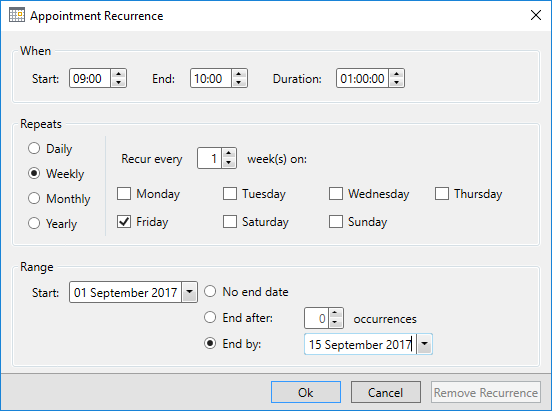
When
The properties in the When group allow you to set the start time, end time, and duration of the appointment.

Repeats
The Repeats group settings change depending on whether the appointment recurs Daily, Weekly, Monthly, or Yearly.
|
Daily |
The Daily settings allow you to repeat an appointment every specified number of days or only on working days.
For example, setting the appointment to every 2 day(s) will make the appointment appear every other day. Setting the appointment to on working days will make the appointment appear only Monday through Friday, by default.
|
|
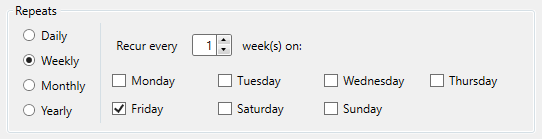
Weekly |
The Weekly settings allow you to repeat the appointment on every specified week on specified days.
For example, setting the appointment to every 2 week(s) on and selecting Tuesday and Thursday will repeat the appointment every other week on Tuesdays and Thursdays.
|
|
Monthly |
The Monthly settings allow you to repeat an appointment on every specified date at a specified interval of months or on a specified day and week of the month at a specified interval of months.
For example, setting the appointment to on the 8 day of every 2 month will make the appointment appear on the 8th of every other month. Setting the appointment to on the third Monday of every 2 month will make the appointment appear on the third Monday of every other month.
|
|
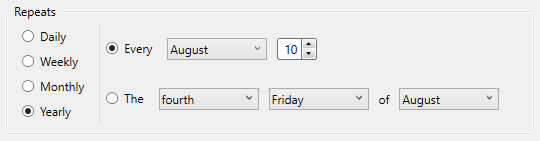
Yearly |
The Yearly setting allows you to repeat an appointment on a specified date or a specified day and week of a specified month.
For example, setting the appointment to on the 2 day of January will make the appointment appear on January 2nd every year. This setting is ideal for birthdays and anniversaries. Setting the appointment to on the first Friday of January will make the appointment appear on the first Friday in January every year. |
Range
The Range group allows you to set a time span for the recurrence.
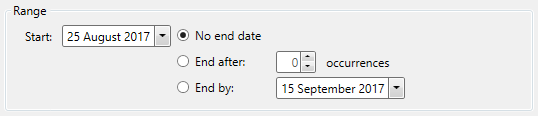
The Start drop-down calendar allows you to select the date from which the recurrence will start. There are three options to choose from for an end date:
Recurring appointments can also be created programmatically using the following code:
| C# |
Copy Code
|
|---|---|
var appointment = new Appointment(); appointment.Start = DateTime.Now; appointment.Duration = TimeSpan.FromHours(1); appointment.Subject = "Finance Meeting"; appointment.Body = "Meeting with Mr. Willson"; appointment.Importance = ImportanceEnum.High; // Setting Recurring pattern for appointment. var recurrencePattern = appointment.GetRecurrencePattern(); recurrencePattern.RecurrenceType = RecurrenceTypeEnum.Daily; // will occur daily recurrencePattern.PatternStartDate = DateTime.Now; recurrencePattern.Occurrences = 10; // will occur for 10 days // Adding appointment to scheduler. scheduler.DataStorage.AppointmentStorage.Appointments.Add(appointment); |
|
Scheduler provides keyboard options for the following actions:
|
Key |
Action |
|
Enter |
Creates new in-place appointment or opens the Appointment dialog for an existing selected appointment. |
|
Esc |
Cancels in-place appointment editing. |
|
F2 |
Turns on in-place appointment editing for selected appointment. |
|
Tab (SHIFT+Tab) |
Moves selection and keyboard focus to the next or previous appointment in the current view |