Silverlight 4 supports the ICommand interface on any object that derives from the ButtonBase class. Any button, including C1ToolbarButton, can be associated with an object that implements ICommand through the control’s Command property. Although the ICommand interface is supported, Silverlight does not provide any built-in implementation. Silverlight Edition includes a couple implementations, C1Command and C1ToolbarCommand, so you do not have to write one yourself.
The C1Command class is included in the C1.Silverlight assembly. C1ToolbarCommand, included in the C1.Silverlight.Toolbar assembly, extends C1Command by adding a few extra toolbar related properties for labels and images.
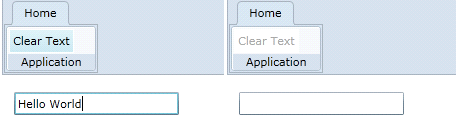
The following steps demonstrate how to use commanding with C1Toolbar.
Using C1ToolbarCommand
| XAML |
Copy Code
|
|---|---|
<Grid.RowDefinitions> <RowDefinition Height="Auto" /> <RowDefinition /> </Grid.RowDefinitions> |
|
| XAML |
Copy Code
|
|---|---|
<UserControl.Resources> <c1:C1ToolbarCommand x:Key="cmdClear" LabelTitle="Clear Text" LargeImageSource="/Resources/delete.png" /> </UserControl.Resources> |
|
| XAML |
Copy Code
|
|---|---|
<c1:C1Toolbar Name="c1Toolbar1"> <c1:C1ToolbarTabControl> <c1:C1ToolbarTabItem Header="Home"> <c1:C1ToolbarGroup Header="Application"> <c1:C1ToolbarButton c1:CommandExtensions.Command="{StaticResource cmdClear}" /> </c1:C1ToolbarGroup> </c1:C1ToolbarTabItem> </c1:C1ToolbarTabControl> </c1:C1Toolbar> |
|
| C# |
Copy Code
|
|---|---|
// register command methods CommandManager.RegisterClassCommandBinding(GetType(), new CommandBinding((C1ToolbarCommand)Resources["cmdClear"], Clear, CanClear)); // check the ability of registered commands to execute CommandManager.InvalidateRequerySuggested(); |
|
| C# |
Copy Code
|
|---|---|
private void Clear(object sender, ExecutedRoutedEventArgs e) { textBox1.Text = ""; } private void CanClear(object sender, CanExecuteRoutedEventArgs e) { if (textBox1.Text.Length > 0) { e.CanExecute = true; } else e.CanExecute = false; } |
|
| C# |
Copy Code
|
|---|---|
private void textBox1_TextChanged(object sender, TextChangedEventArgs e) { CommandManager.InvalidateRequerySuggested(); } |
|