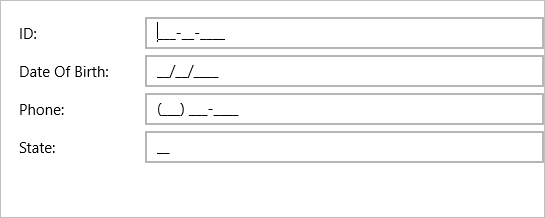
This section describes adding a MaskedEntry control to your portable or shared application and specifying four input fields, namely Social Security No., Date of Birth, Phone and State. The Social Security No. input field accepts a nine-digit number separated by hyphens, the Date of Birth field accepts a date in mm/dd/yyyy format, the Phone field accepts a 10-digit number with area code, and the State field accepts the abbreviated postal codes of a state.
Complete the following steps to initialize four input fields using MaskedEntry control.
The following image shows the input fields configured after completing the above steps.
Complete the following steps to initialize a MaskedEntry control in XAML.
| XAML |
Copy Code
|
|---|---|
xmlns:c1="clr-namespace:C1.Xamarin.Forms.Input;assembly=C1.Xamarin.Forms.Input" |
|
| XAML |
Copy Code
|
|---|---|
<StackLayout>
    <Grid VerticalOptions="Center">
        <Grid.ColumnDefinitions>
            <ColumnDefinition Width="120"/>
            <ColumnDefinition />
        </Grid.ColumnDefinitions>
        <Grid.RowDefinitions>
            <RowDefinition />
            <RowDefinition />
            <RowDefinition />
            <RowDefinition />
        </Grid.RowDefinitions>
        <Label Text="ID:" VerticalOptions="Center" />
        <c1:C1MaskedEntry x:Name="c1MaskedTextBox1" Mask="000-00-0000" Grid.Column="1"  />
        <Label Text="Date Of Birth:"  VerticalOptions="Center"  Grid.Row="1" />
        <c1:C1MaskedEntry x:Name="c1MaskedTextBox2" Keyboard="Numeric" Mask="90/90/0000"
            Grid.Row="1" Grid.Column="1" />
        <Label Text="Phone:"  VerticalOptions="Center"  Grid.Row="2"  />
        <c1:C1MaskedEntry x:Name="c1MaskedTextBox3" Mask="(999) 000-0000" Keyboard="Telephone"
            Grid.Row="2" Grid.Column="1"   />
        <Label Text="State:" VerticalOptions="Center" Grid.Row="3" />
        <c1:C1MaskedEntry x:Name="c1MaskedTextBox4" Mask="LL" Grid.Row="3" Grid.Column="1"   />
    </Grid>
</StackLayout>
|
|
| C# |
Copy Code
|
|---|---|
public App() { // The root page of your application MainPage = new Page1(); } |
|
| C# |
Copy Code
|
|---|---|
C1.Xamarin.Forms.Input.Platform.iOS.C1InputRenderer.Init(); |
|
| C# |
Copy Code
|
|---|---|
C1.Xamarin.Forms.Input.Platform.UWP.C1InputRenderer.Init(); |
|
(Optional) In case you compile your UWP application in Release mode, you need to explicitly add the following code to the OnLaunched method in your App.xaml.cs to include the correct assemblies with your application.
| C# |
Copy Code
|
|---|---|
var assembliesToInclude = new List<Assembly>(); assembliesToInclude.Add(typeof(C1.Xamarin.Forms.Input.Platform.UWP.C1InputRenderer) .GetTypeInfo().Assembly); assembliesToInclude.Add(typeof(C1.UWP.Input.C1InputRenderer).GetTypeInfo().Assembly); Xamarin.Forms.Forms.Init(e, assembliesToInclude); |
|