This section describes how to add a C1RadialGauge control to your iOS app and set its value. For information on how to add Xuni controls in, see Creating a New Xamarin.iOS App.
This topic comprises of two steps:
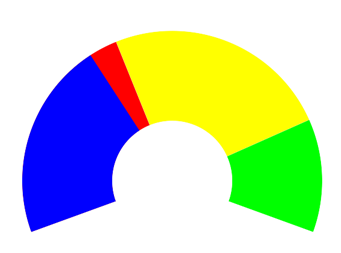
The following image shows how the Radial Gauge appears, after completing the steps above:
The value property denotes the value of the Gauge. Multiple ranges can be added to a single Gauge and the position of the range is defined by the min and max properties of the range. If you set the Gauge's isReadOnly property to false, then the user is be able to edit the value by tapping on the Gauge.
The StartAngle property specifies the RadialGauge's starting angle and the SweepAngle property specifies an angle representing the length of the RadialGauge's arc. These properties can be used to specify the start and end points of the radial gauge arc. The angle for both properties are measured clockwise, starting at the 9 o'clock position. When the SweepAngle is negative is formed counter clockwise.
RadialGauge also offers an autoScale property. When this property is set to true, the RadialGauge is automatically scaled to fill its containing element.
Complete the following steps to initialize a RadialGauge control in C#.
MainStoryboard to open the storyboard editor.To initialize the RadialGauge control, open the ViewController.m or ViewController.swift file from the Project Navigator and replace its content with the code below. This overrides the viewDidLoad method of the View controller in order to initialize RadialGauge.
| Example Title |
Copy Code
|
|---|---|
using C1.iOS.Gauge; using CoreGraphics; using System; using UIKit; namespace GaugeTest { public partial class ViewController : UIViewController { public ViewController(IntPtr handle) : base(handle) { } private const double DefaultValue = 25; private const double DefaultMin = 0; private const double DefaultMax = 100; C1RadialGauge radialGauge; public override void ViewDidLoad() { base.ViewDidLoad(); this.EdgesForExtendedLayout = UIRectEdge.None; radialGauge = new C1RadialGauge(); radialGauge.Value = 35; radialGauge.Min = 0; radialGauge.Max = 100; radialGauge.StartAngle = -20; radialGauge.SweepAngle = 220; radialGauge.AutoScale = true; radialGauge.ShowText = GaugeShowText.None; radialGauge.PointerColor = UIColor.Blue; radialGauge.ShowRanges = true; View.BackgroundColor = radialGauge.BackgroundColor = UIColor.White; GaugeRange low = new GaugeRange(); GaugeRange med = new GaugeRange(); GaugeRange high = new GaugeRange(); //Customize Ranges low.Color = UIColor.Red; low.Min = 0; low.Max = 40; med.Color = UIColor.Yellow; med.Min = 40; med.Max = 80; high.Color = UIColor.Green; high.Min = 80; high.Max = 100; //Add Ranges to Gauge radialGauge.Ranges.Add(low); radialGauge.Ranges.Add(med); radialGauge.Ranges.Add(high); this.Add(radialGauge); } public override void ViewDidLayoutSubviews() { base.ViewDidLayoutSubviews(); radialGauge.Frame = new CGRect(this.View.Frame.X, this.View.Frame.Y, this.View.Frame.Width, this.View.Frame.Height / 6); } } } |
|
Press F5 to run the application.