This section describes how to add a TreeMap control to your iOS app and add data to it. This topic consists of three steps:
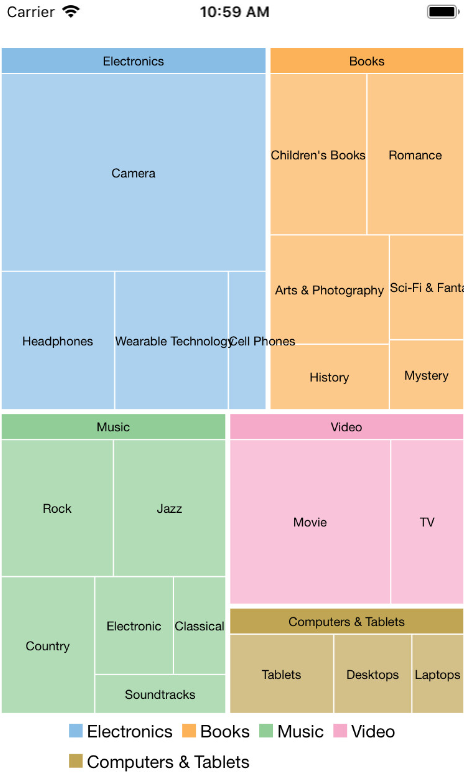
The following image shows how the TreeMap appears, after completing the steps above:
Add a new class ThingSale.cs to serve as the data source for TreeMap.
| ThingSale.cs |
Copy Code
|
|---|---|
public class ThingSale { private static List<string> Categories = new List<string> { "Music", "Video", "Books", "Electronics", "Computers & Tablets" }; private static Dictionary<string, List<string>> AllCategories = new Dictionary<string, List<string>>(); public string Category { get; set; } public double? Sales { get; set; } public List<ThingSale> Items { get; set; } public static void EnsureInitAllCategories() { if (AllCategories.Count > 0) { return; } AllCategories.Add("Music", new List<string> { "Country", "Rock", "Classical", "Soundtracks", "Jazz", "Electronic" }); AllCategories.Add("Country", new List<string> { "Classic Country", "Cowboy Country", "Outlaw Country", "Western Swing", "Roadhouse Country" }); AllCategories.Add("Rock", new List<string> { "Hard Rock", "Blues Rock", "Funk Rock", "Rap Rock", "Guitar Rock", "Progressive Rock" }); AllCategories.Add("Classical", new List<string> { "Symphonies", "Chamber Music" }); AllCategories.Add("Soundtracks", new List<string> { "Movie Soundtracks", "Musical Soundtracks" }); AllCategories.Add("Jazz", new List<string> { "Smooth Jazz", "Vocal Jazz", "Jazz Fusion", "Swing Jazz", "Cool Jazz", "Traditional Jazz" }); AllCategories.Add("Electronic", new List<string> { "Electronica", "Disco", "House" }); AllCategories.Add("Video", new List<string> { "Movie", "TV" }); AllCategories.Add("Movie", new List<string> { "Kid & Family", "Action & Adventure", "Animation", "Comedy", "Drama", "Romance" }); AllCategories.Add("TV", new List<string> { "Science Fiction", "Documentary", "Fantasy", "Military & War", "Horror" }); AllCategories.Add("Books", new List<string> { "Arts & Photography", "Children's Books", "History", "Mystery", "Romance", "Sci-Fi & Fantasy" }); AllCategories.Add("Arts & Photography", new List<string> { "Architecture", "Graphic Design", "Drawing", "Photography", "Performing Arts" }); AllCategories.Add("Children's Books", new List<string> { "Beginning Readers", "Board Books", "Chapter Books", "Coloring Books", "Picture Books", "Sound Books" }); AllCategories.Add("History", new List<string> { "Ancient", "Medieval", "Renaissance" }); AllCategories.Add("Mystery", new List<string> { "Thriller & Suspense", "Mysteries" }); AllCategories.Add("Romance", new List<string> { "Action & Adventure", "Holidays", "Romantic Comedy", "Romantic Suspense", "Western", "Historical" }); AllCategories.Add("Sci-Fi & Fantasy", new List<string> { "Fantasy", "Gaming", "Science Fiction" }); AllCategories.Add("Electronics", new List<string> { "Camera", "Headphones", "Cell Phones", "Wearable Technology" }); AllCategories.Add("Camera", new List<string> { "Digital Cameras", "Film Photography", "Lenses", "Video", "Accessories" }); AllCategories.Add("Headphones", new List<string> { "Earbud headphones", "Over-ear headphones", "On-ear headphones", "Bluetooth headphones", "Noise-cancelling headphones", "Audiophile headphones" }); AllCategories.Add("Cell Phones", new List<string> { "Cell Phone", "Accessories" }); AllCategories.Add("Accessoriess", new List<string> { "Batteries", "Bluetooth Headsets", "Bluetooth Speakers", "Chargers", "Screen Protectors" }); AllCategories.Add("Wearable Technology", new List<string> { "Activity Trackers", "Smart Watches", "Sports & GPS Watches", "Virtual Reality Headsets", "Wearable Cameras", "Smart Glasses" }); AllCategories.Add("Computers & Tablets", new List<string> { "Desktops", "Laptops", "Tablets" }); AllCategories.Add("Desktops", new List<string> { "All-in-ones", "Minis", "Towers" }); AllCategories.Add("Laptops", new List<string> { "2 in 1 laptops", "Traditional laptops" }); AllCategories.Add("Tablets", new List<string> { "IOS", "Andriod", "Fire OS", "Windows" }); } public static IEnumerable<ThingSale> GetData() { EnsureInitAllCategories(); var result = new List<ThingSale>(); Categories.ForEach(cat => { result.Add(Create(cat)); }); return result; } private static ThingSale Create(string category) { var rand = new Random(0); var item = new ThingSale { Category = category }; if (!AllCategories.ContainsKey(category)) { item.Sales = rand.NextDouble() * 100; } else { item.Items = new List<ThingSale>(); AllCategories[category].ForEach(subCat => { item.Items.Add(Create(subCat)); }); } return item; } } |
|
Complete the following steps to initialize a TreeMap control in C#.
To initialize the TreeMap control, open the ViewController file from the Solution Explorer and replace its content with the code below. This overrides the ViewDidLoad method of the View controller in order to initialize TreeMap.
| C# |
Copy Code
|
|---|---|
public partial class ViewController : UIViewController { C1TreeMap treeMap; public ViewController (IntPtr handle) : base (handle) { } public override void ViewDidLoad () { base.ViewDidLoad (); treeMap = new C1TreeMap(); treeMap.ChartType = C1.iOS.Chart.TreeMapType.Squarified; treeMap.Binding = "sales"; treeMap.BindingName = "type"; treeMap.MaxDepth = 2; treeMap.ChildItemsPath = "items"; treeMap.ItemsSource = SalesData.CreateHierarchicalData(); this.Add(treeMap); treeMap.DataLabel = new ChartDataLabel() { Content = "{}{type}", Position = ChartLabelPosition.Center }; treeMap.DataLabel.Style.FontSize = 10; } public override void ViewDidLayoutSubviews() { base.ViewDidLayoutSubviews(); treeMap.Frame = new CGRect(this.View.Frame.X, this.View.Frame.Y + 80, this.View.Frame.Width, this.View.Frame.Height - 80); } } |
|
Press F5 to run the application.