DsExcel not only allows you to add shapes and picture, the library also lets you customize shape formats and shape texts. A user can enhance the look of a shape in the Excel file by changing fill color, formatting three-dimensional orientation or adding lines around the shape.
Using DsExcel, a user can customize both the shape format and shape text.
In DsExcel, you can customize the shape format in three different ways. This includes setting the fill format for the inserted shape using the properties and methods of the IFillFormat interface, configuring the shape's line using the properties and methods of the ILineFormat interface and applying 3D formatting to the shape using the properties and methods of the IThreeDFormat interface.
To format the shape with Solid fill, first you need to use the Solid method of the IFillFormat interface to specify the fill format and then set the Color property and Transparency property to set the shape's fill color and transparency degree respectively.
Refer to the following example code to fill the shape with solid fill.
| C# |
Copy Code |
|---|---|
//Solid Fill
IShape shape = worksheet.Shapes.AddShape(AutoShapeType.Balloon, 10, 10, 100, 100);
IColorFormat color = shape.Fill.Color;
color.RGB = Color.Red;
shape.Fill.Solid(); | |
Gradient fill is a graphical effect which provides the 3D color look as one color blends into another. In gradient fill, you first need to set the shape fill to the gradient fill using the OneColorGradient method, TwoColorGradient method or PresetGradient method of the IFillFormat interface. When you're done, you can then insert, delete or modify gradient stops; set the fill style rotation along with the shape and the angle of the gradient fill using the GradientStops property, RotateWithObject property and GradientAngle property of the IFillFormat interface.
Four types of gradient fills, namely line, radial, rectangular and path are supported by DsExcel. By default, the 'Line' gradient fill is applied.
Refer to the following example code to fill the shape with gradient fill using PresetGradient method.
| C# |
Copy Code |
|---|---|
//Gradient Fill IShape shape1 = worksheet.Shapes.AddShape(AutoShapeType.Heart, 120, 10, 100, 100); shape1.Fill.PresetGradient(GradientStyle.Vertical, 3, PresetGradientType.Silver); shape1.Fill.RotateWithObject = false; | |
Refer to the following example code to fill the shape with gradient fill using TwoColorGradient method.
| C# |
Copy Code |
|---|---|
// Initialize workbook Workbook workbook = new Workbook(); // Fetch default worksheet IWorksheet worksheet = workbook.Worksheets[0]; // Add a shape IShape rectangle = worksheet.Shapes.AddShape(AutoShapeType.Rectangle, 20, 20, 300, 100); // Init a two color gradient fill rectangle.Fill.TwoColorGradient(GradientStyle.Horizontal, 1); //save to an excel file workbook.Save("LineGradient.xlsx"); | |
To set the radial, rectangular or path gradient fill, you also need to set the GradientPathType along with using the TwoColorGradient method.
Refer to the following example code to fill the shape with 'Radial' gradient fill.
| C# |
Copy Code |
|---|---|
// Initialize workbook Workbook workbook = new Workbook(); // Fetch default worksheet IWorksheet worksheet = workbook.Worksheets[0]; // Add a shape IShape rectangle = worksheet.Shapes.AddShape(AutoShapeType.Rectangle, 20, 20, 300, 100); // Init a two color gradient fill rectangle.Fill.TwoColorGradient(GradientStyle.FromCenter, 1); // Set gradient path type rectangle.Fill.GradientPathType = PathShapeType.Radial; //save to an excel file workbook.Save("RadialGradient.xlsx"); | |
In pattern fill, you first need to set the shape fill to pattern fill using the Patterned method of the IFillFormat interface. Afterwards, you can set the background color and the pattern color using Color property and PatternColor property of the IFillFormat interface.
Refer to the following example code to fill the shape with pattern fill.
| C# |
Copy Code |
|---|---|
//Pattern Fill
IShape shape2 = worksheet.Shapes.AddShape(AutoShapeType.Rectangle, 240, 10, 100, 100);
shape2.Fill.Patterned(GrapeCity.Documents.Excel.Drawing.PatternType.Percent10);
shape2.Fill.Color.ObjectThemeColor = ThemeColor.Accent2;
shape2.Fill.PatternColor.ObjectThemeColor = ThemeColor.Accent6; | |
In picture fill, you can use the AddShape method of the IShapes interface to first add the shape that you want to fill with a picture. Further, you can also set the picture format including characteristics like picture height, picture width, brightness, contrast ratio, re-coloring, x-axis and y-axis offset etc using the properties of the IPictureFormat interface.
Refer to the following example code to fill the shape with picture.
| C# |
Copy Code |
|---|---|
// Add shape of picture type IShape shape = worksheet.Shapes.AddShape(AutoShapeType.Rectangle, 20, 20, 100, 100); string path = @"Images\flower.jpg"; FileStream stream = System.IO.File.Open(path, FileMode.Open); shape.Fill.UserPicture(stream, ImageType.JPG); stream.Dispose(); // Recolor the picture shape.PictureFormat.ColorType = PictureColorType.Grayscale; // Set picture's brightness and contrast ratio. shape.PictureFormat.Brightness = 0.6; shape.PictureFormat.Contrast = 0.3; // Set height, width, x-axis offset and y-axis offset of the specified picture. shape.PictureFormat.Crop.PictureOffsetX = 10; shape.PictureFormat.Crop.PictureOffsetY = -5; shape.PictureFormat.Crop.PictureWidth = 120; shape.PictureFormat.Crop.PictureHeight = 80; | |
In texture fill, you can fill the shape with texture using the PresetTextured method, or UserTextured method of the IFillFormat interface. Further, you can also use the TextureAlignment property, TextureHorizontalScale property, TextureOffsetX property, TextureOffsetY property and TextureVerticalScale property to configure the layout of the texture.
Refer to the following example code to fill the shape with texture fill.
| C# |
Copy Code |
|---|---|
//Texture Fill
IShape shape3 = worksheet.Shapes.AddShape(AutoShapeType.Rectangle, 360, 10, 100, 100);
shape3.Fill.PresetTextured(PresetTexture.Canvas);
shape3.Fill.TextureAlignment = TextureAlignment.Center;
shape3.Fill.TextureOffsetX = 2.5;
shape3.Fill.TextureOffsetY = 3.2;
shape3.Fill.TextureHorizontalScale = 0.9;
shape3.Fill.TextureVerticalScale = 0.2;
shape3.Fill.Transparency = 0.5; | |
Line is a kind of border around the shape. You can create lines around shapes inserted on cells of a spreadsheet using the properties and methods of ILineFormat interface.
Refer to the following example code to configure the line and line style for the shape.
| C# |
Copy Code |
|---|---|
// To set shape's line style.
IShape shape = worksheet.Shapes.AddShape(AutoShapeType.Rectangle, 10, 10, 100, 100);
shape.Line.DashStyle = LineDashStyle.Dash;
shape.Line.Style = LineStyle.Single;
shape.Line.Weight = 2;
shape.Line.Color.ObjectThemeColor = ThemeColor.Accent6;
shape.Line.Transparency = 0.3; | |
DsExcel allows you to format the three-dimensional layout for the inserted shape by setting its rotation degree around x,y and z axis.
Refer to the following example code to apply 3D formatting to the embedded shape.
| C# |
Copy Code |
|---|---|
// To set shape's rotation degree arround x, y, z axis.
IShape shape = worksheet.Shapes.AddShape(AutoShapeType.Rectangle, 50, 10, 100, 100);
shape.ThreeD.RotationX = 50;
shape.ThreeD.RotationY = 20;
shape.ThreeD.RotationZ = 30;
shape.ThreeD.Depth = 7;
shape.ThreeD.Z = 20; | |
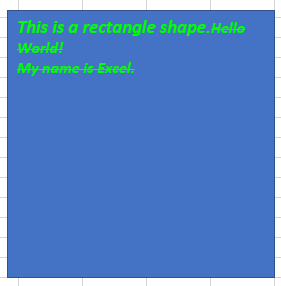
In DsExcel, you can configure the text and text style for the shape as per your own preferences by using the TextFrame property of the IShape interface.
Refer to the following example code to configure the text and text style for the inserted shape.
| C# |
Copy Code |
|---|---|
// To config shape's text and text style. IShape shape = worksheet.Shapes.AddShape(AutoShapeType.Rectangle, 40, 40, 200, 200); shape.TextFrame.TextRange.Font.Color.RGB = System.Drawing.Color.FromArgb(0, 255, 0); shape.TextFrame.TextRange.Font.Bold = true; shape.TextFrame.TextRange.Font.Italic = true; shape.TextFrame.TextRange.Font.Size = 12; shape.TextFrame.TextRange.Font.Strikethrough = true; shape.TextFrame.TextRange.Paragraphs.Add("This is a rectangle shape."); shape.TextFrame.TextRange.Paragraphs.Add("My name is Excel."); shape.TextFrame.TextRange.Paragraphs[0].Runs.Add("Hello World!"); shape.TextFrame.TextRange.Paragraphs[0].Runs[0].Font.Strikethrough = false; shape.TextFrame.TextRange.Paragraphs[0].Runs[0].Font.Size = 14; | |
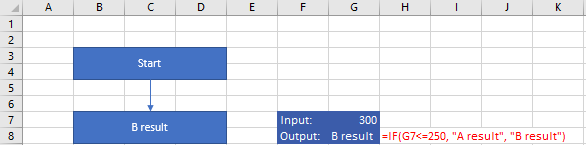
You can set formula for a shape by using Formula property of the IShape interface. This property configures a formula that refers to text of the range or a defined name. When you set a shape formula for the first time, the shape acquires text and font style of the first cell of the reference. Once shape text has been set, any kind of changes in content of the referenced cell updates value of the shape text also. However, font style remains the same.
| C# |
Copy Code |
|---|---|
// set shape formula to G8 IShape shapeResult = worksheet.Shapes.AddShape(AutoShapeType.Rectangle, worksheet.Range["B7:D8"]); shapeResult.Formula = "=G8"; | |
You can remove shape reference by setting the Formula property to null. On removing reference, the shape text becomes a custom normal text; shape content gets text of the first cell of removed reference and the font style is the default style. If shape text is removed from the shape, cell reference stops having any affect on the shape text.
Further, you can also retain formula of the referenced shape when exporting to JSON IO, DsExcel API, PDF, HTML, or an image.
To view the feature in action, see Set Shape Formula demo.
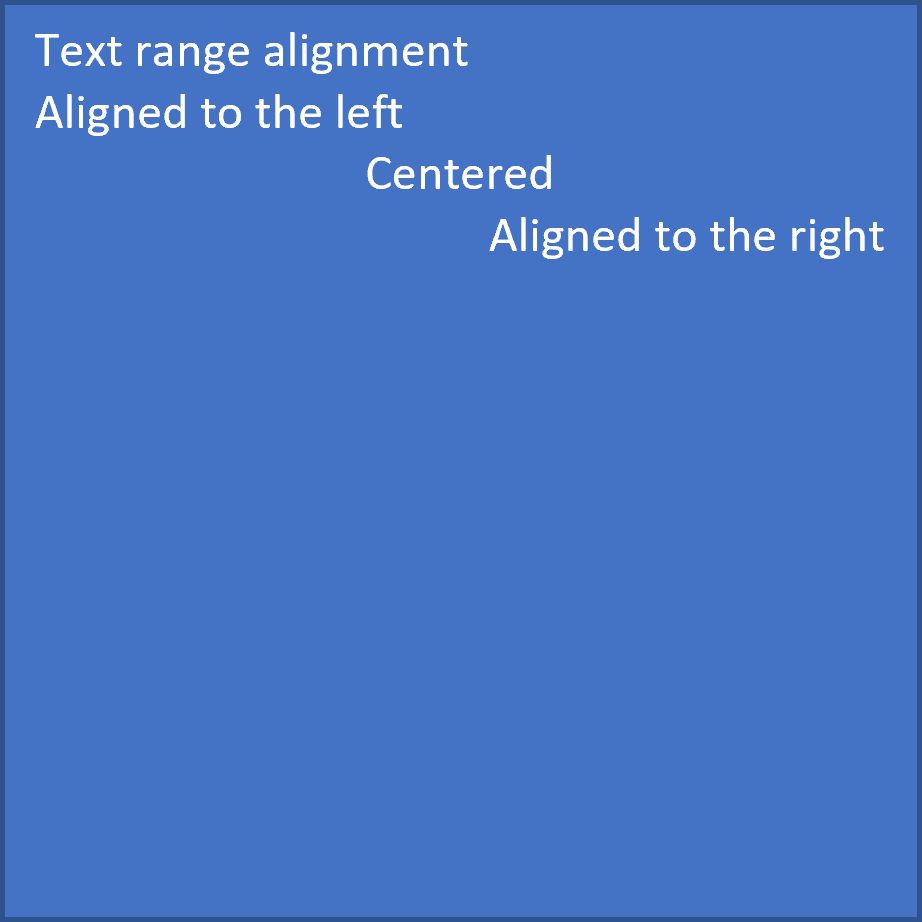
You can align the text in a shape to the left, right, center, distribute, and justify using the TextAlignment property. Also, you can secure the position of the text frame containing the text at the center using the HorizontalAnchor property and at the top, middle, and bottom using the VerticalAnchor property.
These different alignments and positions of text in a shape can also be exported to PDF documents.
The TextAlignment property in ITextRange interface allows you to set the alignment of a text range or a paragraph in a shape using TextAlignmentAnchor enumeration. This property sets the text alignment to left, right, center, distribute, and justify.
Refer to the following example code to set the alignment of text range and paragraphs in a shape:
| C# |
Copy Code |
|---|---|
Workbook workbook = new Workbook(); IWorksheet worksheet = workbook.Worksheets[0]; // Add a shape. IShape shape = worksheet.Shapes.AddShape(AutoShapeType.Rectangle, 10, 10, 200, 200); // Add text range and two paragraphs for the shape. shape.TextFrame.TextRange.Text = "Text range alignment"; shape.TextFrame.TextRange.Paragraphs.Add("Aligned to the left"); shape.TextFrame.TextRange.Paragraphs.Add("Centered"); shape.TextFrame.TextRange.Paragraphs.Add("Aligned to the right"); // Align text range to the left. shape.TextFrame.TextRange.TextAlignment = TextAlignmentAnchor.Left; // Align paragraph to the center. shape.TextFrame.TextRange.Paragraphs[2].TextAlignment = TextAlignmentAnchor.Center; // Align paragraph to the right. shape.TextFrame.TextRange.Paragraphs[3].TextAlignment = TextAlignmentAnchor.Right; // Save the workbook in XLSX and PDF formats. workbook.Save("Alignment.xlsx"); workbook.Save("Alignment.pdf"); | |
The text frame (or text body) contains the text or paragraph you add to a shape. The HorizontalAnchor and VerticalAnchor properties of ITextFrame interface allow you to set the horizontal and vertical anchors of a text frame in a shape using HorizontalAnchor and VerticalAnchor enumerations. The text frame can be positioned horizontally at the center or vertically at the top, middle, or bottom.
Refer to the following example code to anchor the text frame in a shape:
| C# |
Copy Code |
|---|---|
Workbook workbook = new Workbook(); IWorksheet worksheet = workbook.Worksheets[0]; //Add a shape. IShape shape = worksheet.Shapes.AddShape(AutoShapeType.Rectangle, 10, 10, 200, 200); //Add two paragraphs for the shape. shape.TextFrame.TextRange.Paragraphs.Add("Documents for Excel"); shape.TextFrame.TextRange.Paragraphs.Add("Middle Centered"); //Centers text vertically. shape.TextFrame.VerticalAnchor = VerticalAnchor.AnchorMiddle; //Centers text horizontally. shape.TextFrame.HorizontalAnchor = HorizontalAnchor.Center; workbook.Save("Alignment.xlsx"); workbook.Save("Alignment.pdf"); | |

You can also set the alignment of a text range and a paragraph, along with the anchor of the text frame in a shape. Refer to the following example code to align and anchor a paragraph at the bottom right:
| C# |
Copy Code |
|---|---|
Workbook workbook = new Workbook(); IWorksheet worksheet = workbook.Worksheets[0]; // Add a shape. IShape shape = worksheet.Shapes.AddShape(AutoShapeType.Rectangle, 10, 10, 400, 200); // Add a paragraph for the shape. shape.TextFrame.TextRange.Paragraphs.Add("Aligned and anchored to bottom right"); // Anchor the text frame to the bottom vertically. shape.TextFrame.VerticalAnchor = VerticalAnchor.AnchorBottom; // Align paragraph to the right. shape.TextFrame.TextRange.Paragraphs[0].TextAlignment = TextAlignmentAnchor.Right; // Save the workbook in XLSX and PDF formats. workbook.Save("Alignment.xlsx"); workbook.Save("Alignment.pdf"); | |

You can set the direction of the text in shape to horizontal, vertical, rotated (to 90 or 270 degree), and stacked (with text reading left-to-right or right to left). The Direction property in ITextFrame interface allows you to set the direction of the text frame in shape using TextDirection enumeration.
Refer to the following example code to set the text direction to vertical:
| C# |
Copy Code |
|---|---|
// Initialize Workbook. Workbook workbook = new Workbook(); IWorksheet worksheet = workbook.Worksheets[0]; // Add a shape. IShape shape = worksheet.Shapes.AddShape(AutoShapeType.Rectangle, 10, 10, 200, 200); // Add paragraph for the shape. shape.TextFrame.TextRange.Paragraphs.Add("Documents for Excel"); // Set the direction of text frame to vertical. shape.TextFrame.Direction = TextDirection.Vertical; // Save the workbook. workbook.Save("TextDirection.xlsx"); | |

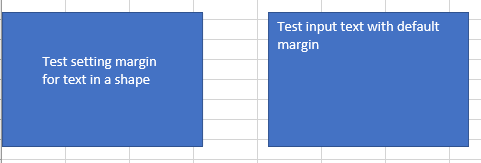
You can set the margin of text in a shape in the bottom, left, right and top directions. The MarginBottom, MarginLeft, MarginRight and MarginTop properties of ITextFrame interface can be used to achieve the same.
Refer to the following example code which configures the text margins in first shape and keeps it as default in the other.
| C# |
Copy Code |
|---|---|
IShape shape = worksheet.Shapes.AddShape(AutoShapeType.Rectangle, 1, 10, 150, 100); IShape shape2 = worksheet.Shapes.AddShape(AutoShapeType.Rectangle, 200, 10, 150, 100); //set the margin of text shape.TextFrame.MarginBottom = 30; shape.TextFrame.MarginLeft = 30; shape.TextFrame.MarginRight = 30; shape.TextFrame.MarginTop = 30; shape.TextFrame.TextRange.Paragraphs[0].Runs.Add("Test setting margin for text in a shape"); shape2.TextFrame.TextRange.Paragraphs[0].Runs.Add("Test input text with default margin"); | |