Drawing tables is a common task when creating documents in PDF, JPEG, SVG, and other formats. Creating a table requires calculating the position of the cells, size of the cells, position of the table, size of the table, etc., but calculating all these parameters manually consumes a lot of effort and time. DsImaging provides a TableRenderer class in GrapeCity.Documents.Drawing namespace that allows you to draw the table without having to think much about the size of table columns, merged cells, the layout of rotated text auto-fitting, etc.
DsImaging's layout engine handles the task of automatically calculating all the complex details of cell and table resizing and positioning; you just need to provide information about the desired layout, style, and content. The LayoutHost is the layout engine's core object. A host is always required to instantiate views and calculate the layout. A LayoutHost creates LayoutView. A LayoutView object is a fixed-width and fixed-height rectangle. Each view has its own transformation matrix. The LayoutView can be thought of as a transformed surface with an origin (zero point), two axes (X and Y), and base dimensions (Width and Height). LayoutView places rectangles (LayoutRect objects) whose sides are always parallel to the LayoutView's X or Y axis. Based on the constraints specified, the layout engine calculates the size and position of those rectangles relative to the owner LayoutView.
A LayoutView is created to place a table in it. A table is always contained within a rectangle (LayoutRect). The exact size of that rectangle is unknown. The size may vary depending on the contents of the table. However, we must repair at least one table corner (or two or four corners if necessary).
The TableRenderer class is built on top of the layout engine described in Layouts. All table rows, columns, vertical and horizontal grid lines, cells, and cell text have the associated LayoutRect objects available through the object model. The grid lines are individual rectangles with their own width and height. A table cell is also more than just the intersection of a table column and row. Table cells are added to the grid as separate objects on top of the columns and rows. The same grid cell may contain regular, background, and foreground table cells. TableRenderer is a useful tool for drawing tables of any complexity because it combines this flexibility with the power of the layout engine. TableRenderer represents an immutable table. You cannot add more rows to an existing table or split it into two parts; however, you can create a new TableRenderer instance or more instances with the desired number of rows. You can use an instance of TableRenderer for measuring a table without actually drawing it.
The TableRenderer constructor accepts multiple parameters. The following table lists the parameters accepted by TableRenderer constructor:
| Parameter | Description |
|---|---|
| graphics | This parameter specifies the GcGraphics object that will be used to draw the table after it has been constructed. |
| tableRect | This parameter is the table's LayoutRect. |
| fixedSides | This parameter specifies which sides of a table are fixed. |
| rowCount | This parameter specifies the overall number of rows in the table. The table will have at least one row. |
| columnCount | This parameter specifies the overall number of columns in the table. The table will have at least one column. |
| gridLineColor | This parameter specifies the color of grid lines. |
| gridLineWidth | This parameter specifies the thickness of the table grid lines by default. Use the SetVerticalGridLineWidth and SetHorizontalGridLineWidth methods for applying custom thickness to individual grid lines). |
The constructor also has optional parameters to specify row minimum height and column minimum width, in case they are not defined manually. The constructor can also set padding for all sides relative to the outer table frame.
The column width and row height do not have to be integers. You can apply star sizes to table columns if both the left and right sides of the table are fixed. It is possible to mix star width, fixed width, and auto width columns in the same table. To set the explicit column width, use the SetWidth method of LayoutRect. Alternatively, you can add a "minimal width" constraint for auto-sized columns by using the AppendMinWidth method of LayoutRect. Applying minimal width constraints is optional for auto-sized columns with horizontal text (and FixedWidth of CellStyle is set to false). Similar constraints can be applied to table rows. You can assign star heights to table rows if the top and bottom table sides are both fixed.
To create a simple table:
| C# |
Copy Code
|
|---|---|
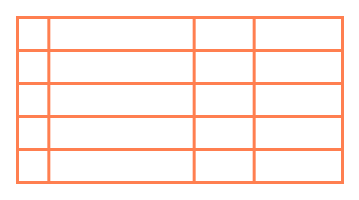
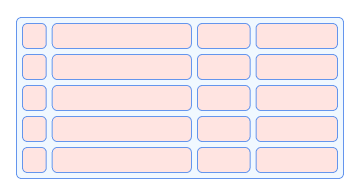
// Initialize GcBitmap. var bmp = new GcBitmap(440, 270, true); // Create a graphic. var g = bmp.CreateGraphics(Color.White); // Initialize LayoutHost. var host = new LayoutHost(); // Create LayoutView. var view = host.CreateView(400, 230, Matrix.Identity); // Create LayoutRect. Add anchor points. var rt = view.CreateRect(); rt.AnchorTopLeftRight(null, 36, 36, 36); // Create an instance of TableRenderer. var ta = new TableRenderer( g, rt, FixedTableSides.TopLeftRight, rowCount: 5, columnCount: 4, gridLineColor: Color.Coral, gridLineWidth: 3, rowMinHeight: 30); // Set the star width (proportional width) of the columns. var columns = ta.ColumnRects; columns[0].SetStarWidth(1); columns[1].SetStarWidth(5); columns[2].SetStarWidth(2); columns[3].SetStarWidth(3); // Calculate all coordinates based on the constraints provided. host.PerformLayout(); // Set the transformation matrix of the LayoutView when creating the view. var m = Matrix3x2.CreateTranslation(20, 20); g.Transform = view.Transform.Multiply(m); // Draw the table. ta.Render(); // Save the image. bmp.SaveAsPng("simple-table.png"); |
|
The output of the above-mentioned example code is shown in the image below:
The table cells are separate objects added to the table grid, and one cell can spread to several rows and/or columns. The AddCell method adds a table cell containing text or custom content in the specified position with the default or specified style. The AddCell method also allows you to specify row and column spans. There are three types of table cells: normal (regular), background, and foreground.
The regular cells appear on top of the grid and cannot overlap. For example, if such a cell merges two rows, there will be no grid line between the rows in the cell's column. These cells are added at the specified row or column index using the TableRenderer class's indexer property. If there is at least one regular cell, the grid lines will only be drawn around such cells. The grid lines are not drawn around the gaps that are not covered by regular cells. The AddMissingCells method ensures that there are no gaps in the grid.
The background cells always appear behind the grid and behind the filling of the regular and foreground cells (if such a fill exists). Background cells can be overlapped by other cells. You can use background cells to highlight some regions in the table. For example, the odd rows may have a different background color. Also, sometimes you may want to display two or more TextLayout objects in the same table cell. One TextLayout will belong to a regular cell, and the others will belong to background cells. If background cells have some text content, their size can be adjusted automatically, as for the regular cells.
The foreground cells appear on top of the background and regular cells. You can use such cells to draw additional elements on top of the grid. Foreground cells can overlap each other and other cells.
To add cells to the table:
| C# |
Copy Code
|
|---|---|
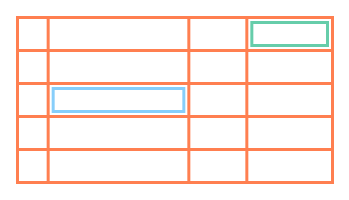
// Initialize GcBitmap. var bmp = new GcBitmap(440, 270, true); // Create a graphic. var g = bmp.CreateGraphics(Color.White); // Initialize LayoutHost. var host = new LayoutHost(); // Create LayoutView. var view = host.CreateView(400, 230, Matrix.Identity); // Create LayoutRect. Add anchor points. var rt = view.CreateRect(); rt.AnchorTopLeftRight(null, 36, 36, 36); /* Create an instance of TableRenderer. Pass paddingAll paramater to avoid overlapping of grid lines with the outer table frame. */ var ta = new TableRenderer( g, rt, FixedTableSides.TopLeftRight, rowCount: 5, columnCount: 4, gridLineColor: Color.Coral, gridLineWidth: 3, rowMinHeight: 30, paddingAll: 5); // Set the star width (proportional width) of the columns. var columns = ta.ColumnRects; columns[0].SetStarWidth(1); columns[1].SetStarWidth(5); columns[2].SetStarWidth(2); columns[3].SetStarWidth(3); // Set style of the new cell. var csBlue = new CellStyle { LineColor = Color.LightSkyBlue, LineWidth = 3f, LinePaddingAll = 2f }; // Add cell to the table. ta.AddCell(csBlue, 2, 1); // Set style of the second new cell. var csGreen = new CellStyle(csBlue) { LineColor = Color.MediumAquamarine }; // Add the second cell to the table. ta.AddCell(csGreen, 0, 3); // Fill gaps in the table with empty regular cells. ta.AddMissingCells(); // Set the transformation matrix of the LayoutView when creating the view. var m = Matrix3x2.CreateTranslation(20, 20); g.Transform = view.Transform.Multiply(m); // Draw the table. ta.Render(); // Save the image. bmp.SaveAsPng("add-cells.png"); |
|
The output of the above-mentioned example code is shown in the image below:
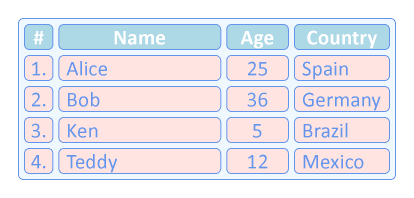
DsImaging allows you to add data to the cells by defining the TextFormat property. To add data to the cells:
| C# |
Copy Code
|
|---|---|
// Initialize GcBitmap. var bmp = new GcBitmap(470, 270, true); // Create a graphic. var g = bmp.CreateGraphics(Color.White); // Initialize LayoutHost. var host = new LayoutHost(); // Create LayoutView. var view = host.CreateView(450, 230, Matrix.Identity); // Create LayoutRect. Add anchor points. var rt = view.CreateRect(); rt.AnchorTopLeftRight(null, 36, 36, 36); // Create an instance of TableRenderer. var ta = new TableRenderer(g, rt, FixedTableSides.TopLeftRight, rowCount: 5, columnCount: 4, gridLineColor: Color.Empty, gridLineWidth: 1, rowMinHeight: 30, paddingAll: 3) // Add table frame style. { TableFrameStyle = new FrameStyle { FillColor = Color.AliceBlue, LineColor = Color.CornflowerBlue, LineWidth = 1, CornerRadius = 5 } }; // Set the star width (proportional width) of the columns. var columns = ta.ColumnRects; columns[0].SetStarWidth(1); columns[1].SetStarWidth(5); columns[2].SetStarWidth(2); columns[3].SetStarWidth(3); // Set text format. var fmt = new TextFormat { FontName = "Calibri", ForeColor = Color.CornflowerBlue, FontSize = 16 }; // Set cell style for normal text. var csNormal = new CellStyle { TextFormat = fmt, ParagraphAlignment = ParagraphAlignment.Center, PaddingLeftRight = 10, FillColor = Color.MistyRose, LineColor = Color.CornflowerBlue, LinePaddingAll = 2, LineWidth = 1, CornerRadius = 5 }; // Set text alignment to center. var csCenter = new CellStyle(csNormal) { TextAlignment = TextAlignment.Center, PaddingLeftRight = 0, }; // Set cell style for table header. var csHeader = new CellStyle(csCenter) { TextFormat = new TextFormat(fmt) { ForeColor = Color.White, FontBold = true }, FillColor = Color.LightBlue }; // Add cells to the table with data and cell style. ta.AddCell(csHeader, 0, 0, "#"); ta.AddCell(csHeader, 0, 1, "Name"); ta.AddCell(csHeader, 0, 2, "Age"); ta.AddCell(csHeader, 0, 3, "Country"); ta.AddCell(csCenter, 1, 0, "1."); ta.AddCell(csNormal, 1, 1, "Alice"); ta.AddCell(csCenter, 1, 2, "25"); ta.AddCell(csNormal, 1, 3, "Spain"); ta.AddCell(csCenter, 2, 0, "2."); ta.AddCell(csNormal, 2, 1, "Bob"); ta.AddCell(csCenter, 2, 2, "36"); ta.AddCell(csNormal, 2, 3, "Germany"); ta.AddCell(csCenter, 3, 0, "3."); ta.AddCell(csNormal, 3, 1, "Ken"); ta.AddCell(csCenter, 3, 2, "5"); ta.AddCell(csNormal, 3, 3, "Brazil"); ta.AddCell(csCenter, 4, 0, "4."); ta.AddCell(csNormal, 4, 1, "Teddy"); ta.AddCell(csCenter, 4, 2, "12"); ta.AddCell(csNormal, 4, 3, "Mexico"); // Draw the table. ta.Render(); // Save the image. bmp.SaveAsPng("add-data-to-cells.png"); |
|
The output of the above-mentioned example code is shown in the image below:
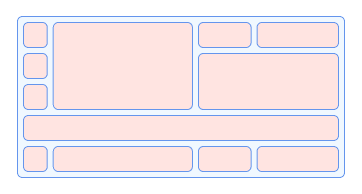
DsImaging allows you to merge cells by defining the column and row span in the AddCell method. To merge cells:
| C# |
Copy Code
|
|---|---|
// Initialize GcBitmap. var bmp = new GcBitmap(440, 270, true); // Create a graphic. var g = bmp.CreateGraphics(Color.White); // Initialize LayoutHost. var host = new LayoutHost(); // Create LayoutView. var view = host.CreateView(400, 230, Matrix.Identity); // Create LayoutRect. Add anchor points. var rt = view.CreateRect(); rt.AnchorTopLeftRight(null, 36, 36, 36); // Create an instance of TableRenderer. var ta = new TableRenderer( g, rt, FixedTableSides.TopLeftRight, rowCount: 5, columnCount: 4, gridLineColor: Color.Empty, gridLineWidth: 1, rowMinHeight: 30, paddingAll: 3) // Add table frame style. { TableFrameStyle = new FrameStyle { LineColor = Color.CornflowerBlue, LineWidth = 1, CornerRadius = 5, FillColor = Color.AliceBlue } }; // Set the star width (proportional width) of the columns. var columns = ta.ColumnRects; columns[0].SetStarWidth(1); columns[1].SetStarWidth(5); columns[2].SetStarWidth(2); columns[3].SetStarWidth(3); // Set default cell style. ta.DefaultCellStyle = new CellStyle { LinePaddingAll = 2, LineColor = Color.CornflowerBlue, LineWidth = 1, CornerRadius = 5, FillColor = Color.MistyRose }; // Add cells and set row and column spans. ta.AddCell(0, 1, 3, 1); ta.AddCell(3, 0, 1, 4); ta.AddCell(1, 2, 2, 2); // Fill gaps in the table with empty regular cells. ta.AddMissingCells(); // Calculate layout of the grid and cells. ta.ApplyCellConstraints(); // Set the transformation matrix of the LayoutView when creating the view. var m = Matrix3x2.CreateTranslation(20, 20); g.Transform = view.Transform.Multiply(m); // Draw the table. ta.Render(); // Save the image. bmp.SaveAsPng("merge-cells.png"); |
|
The output of the above-mentioned example code is shown in the image below:
Each table cell has an associated style (CellStyle) that describes the appearance and behavior of the cell. For example, the Background property in the CellStyle class defines whether the cell is in the background. The FrameStyle class provides several appearance properties, such as FillColor, LineColor, LineWidth, LinePadding, CornerRadius, etc., and it is also used to describe the appearance of the outer table frame.
GcImaging allows you to customize the table and cells by adding an outer table frame and inner cell borders. To customize the table and cells:
| C# |
Copy Code
|
|---|---|
// Initialize GcBitmap. var bmp = new GcBitmap(440, 270, true); // Create a graphic. var g = bmp.CreateGraphics(Color.White); // Initialize LayoutHost. var host = new LayoutHost(); // Create LayoutView. var view = host.CreateView(400, 230, Matrix.Identity); // Create LayoutRect. Add anchor points. var rt = view.CreateRect(); rt.AnchorTopLeftRight(null, 36, 36, 36); // Create an instance of TableRenderer. var ta = new TableRenderer( g, rt, FixedTableSides.TopLeftRight, rowCount: 5, columnCount: 4, gridLineColor: Color.Empty, gridLineWidth: 1, rowMinHeight: 30, paddingAll: 3) // Add table frame style. { TableFrameStyle = new FrameStyle { LineColor = Color.CornflowerBlue, LineWidth = 1, CornerRadius = 5, FillColor = Color.AliceBlue } }; // Set the star width (proportional width) of the columns. var columns = ta.ColumnRects; columns[0].SetStarWidth(1); columns[1].SetStarWidth(5); columns[2].SetStarWidth(2); columns[3].SetStarWidth(3); // Create empty cells. ta.AddMissingCells(new CellStyle { LinePaddingAll = 2, LineColor = Color.CornflowerBlue, LineWidth = 1, CornerRadius = 5, FillColor = Color.MistyRose }); // Calculate layout of the grid and cells. ta.ApplyCellConstraints(); // Set the transformation matrix of the LayoutView when creating the view. var m = Matrix3x2.CreateTranslation(20, 20); g.Transform = view.Transform.Multiply(m); // Draw the table. ta.Render(); // Save the image. bmp.SaveAsPng("table-cell-customization.png"); |
|
The output of the above-mentioned example code is shown in the image below:
The RightToLeft, TextAlignment, ParagraphAlignment, MaxWidth, and MaxHeight properties of CellStyle class resemble the properties of the TextLayout class that set the style for text in a cell. The CellStyle class also has RotationAngle property, which specifies the flow direction of the cell text. If cell content is rotated, then other properties of CellStyle are also defined relative to the current text direction.
The FixedWidth and FixedHeight properties of CellStyle class fix the width and height of the cell. The FixedWidth property is set to true by default, while the FixedHeight property is set to false. These properties work for merged and rotated cells as well.
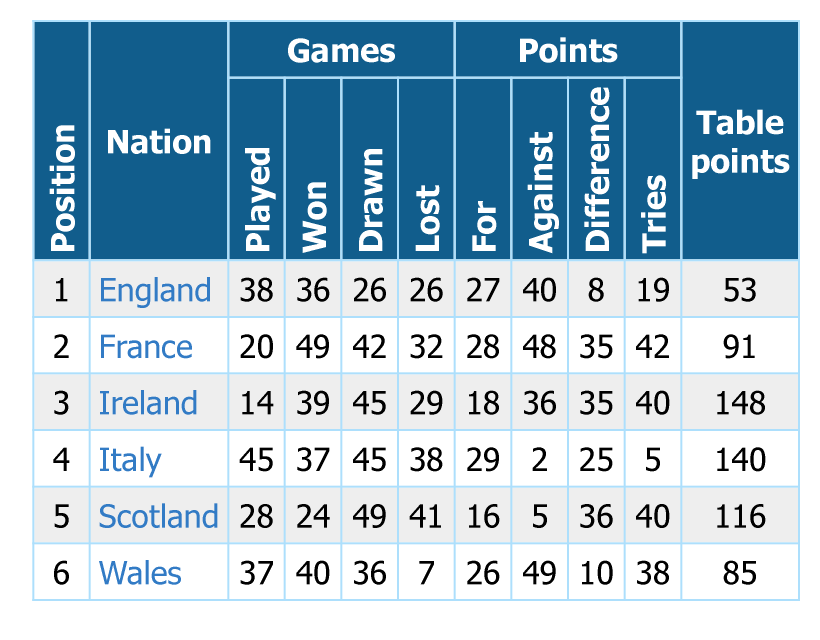
Refer to the following example code to add text customizations in the cells:
| C# |
Copy Code
|
|---|---|
// Initialize Team. var teams = new Team[] { new Team("England"), new Team("France"), new Team("Ireland"), new Team("Italy"), new Team("Scotland"), new Team("Wales"), }; int imgW = 410; int imgH = 320; int scale = 2; // Initialize GcBitmap. using var bmp = new GcBitmap(imgW * scale, imgH * scale, true); // Create a graphic. using var g = bmp.CreateGraphics(Color.White); // Set the transformation matrix of the LayoutView when creating the view. g.Transform = Matrix3x2.CreateScale(scale); // Initialize LayoutHost. var host = new LayoutHost(); // Create LayoutView. var view = host.CreateView(imgW, imgH); // Create LayoutRect. Add anchor points. var rt = view.CreateRect(); rt.AnchorTopRight(null, 10, 10); // Create an instance of TableRenderer. var ta = new TableRenderer(g, rt, FixedTableSides.TopRight, rowCount: teams.Length + 2, columnCount: 11, gridLineColor: Color.FromArgb(173, 223, 252), gridLineWidth: 1, rowMinHeight: 10, columnMinWidth: 10); // Set text format. var fmt = new TextFormat { FontName = "Tahoma", FontSize = 12 }; // Set cell style. var cs = new CellStyle { TextFormat = fmt, FixedWidth = false, PaddingAll = 4 }; // Set horizonal cell style for table header. var csHeaderH = new CellStyle(cs) { TextFormat = new TextFormat(fmt) { ForeColor = Color.White, FontBold = true }, FillColor = Color.FromArgb(17, 93, 140), TextAlignment = TextAlignment.Center, ParagraphAlignment = ParagraphAlignment.Center, }; // Set vertical cell style for table header. var csHeaderV = new CellStyle(csHeaderH) { RotationAngle = 270, TextAlignment = TextAlignment.Leading, PaddingLeft = 3 }; // Set cell style for numbers. var csNumber = new CellStyle(cs) { TextAlignment = TextAlignment.Center }; // Set cell style for Nation. var csNation = new CellStyle(cs) { TextFormat = new TextFormat(fmt) { ForeColor = Color.FromArgb(50, 123, 197) }, }; // Add the header cells. ta.AddCell(csHeaderV, 0, 0, 2, 1, "Position"); ta.AddCell(csHeaderH, 0, 1, 2, 1, "Nation"); ta.AddCell(csHeaderH, 0, 2, 1, 4, "Games"); ta.AddCell(csHeaderV, 1, 2, "Played"); ta.AddCell(csHeaderV, 1, 3, "Won"); ta.AddCell(csHeaderV, 1, 4, "Drawn"); ta.AddCell(csHeaderV, 1, 5, "Lost"); ta.AddCell(csHeaderH, 0, 6, 1, 4, "Points"); ta.AddCell(csHeaderV, 1, 6, "For"); ta.AddCell(csHeaderV, 1, 7, "Against"); ta.AddCell(csHeaderV, 1, 8, "Difference"); ta.AddCell(csHeaderV, 1, 9, "Tries"); ta.AddCell(csHeaderH, 0, 10, 2, 1, "Table\npoints"); // Add the data cells. for (int i = 0; i < teams.Length; i++) { var team = teams[i]; int rowIndex = i + 2; ta.AddCell(csNumber, rowIndex, 0, $"{i + 1}"); ta.AddCell(csNation, rowIndex, 1, team.Nation); ta.AddCell(csNumber, rowIndex, 2, $"{team.Played}"); ta.AddCell(csNumber, rowIndex, 3, $"{team.Won}"); ta.AddCell(csNumber, rowIndex, 4, $"{team.Drawn}"); ta.AddCell(csNumber, rowIndex, 5, $"{team.Lost}"); ta.AddCell(csNumber, rowIndex, 6, $"{team.For}"); ta.AddCell(csNumber, rowIndex, 7, $"{team.Against}"); ta.AddCell(csNumber, rowIndex, 8, $"{team.Diff}"); ta.AddCell(csNumber, rowIndex, 9, $"{team.Tries}"); ta.AddCell(csNumber, rowIndex, 10, $"{team.TablePoints}"); } // Change background for odd rows. ta.DefaultCellStyle = new CellStyle { Background = true, FillColor = Color.FromArgb(238, 238, 238) }; for (int i = 0; i < teams.Length; i += 2) { ta.AddCell(i + 2, 0, 1, 11); } // Draw the table. ta.Render(); // Save the image. bmp.SaveAsPng("text-customizations.png"); // Create the class. class Team { static readonly Random _rnd = new(24323429); public string Nation; public int Played, Won, Drawn, Lost; public int For, Against, Diff, Tries; public int TablePoints; internal Team(string nation) { Nation = nation; Played = _rnd.Next(0, 50); Won = _rnd.Next(0, 50); Drawn = _rnd.Next(0, 50); Lost = _rnd.Next(0, 50); For = _rnd.Next(0, 50); Against = _rnd.Next(0, 50); Diff = _rnd.Next(0, 50); Tries = _rnd.Next(0, 50); TablePoints = _rnd.Next(0, 150); } } |
|
DsImaging allows you to draw custom content in a cell using CustomDraw delegate property of CellStyle class and it is executed from the Render method of TableRenderer class. The CustomDraw property accepts two parameters: a GcGraphics object (passed to the Render method) and a TableCell object.
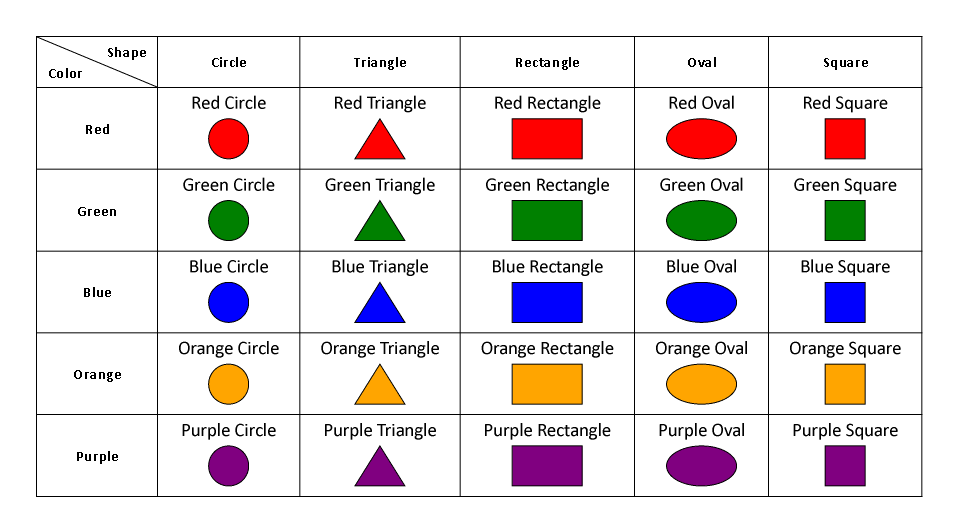
Refer to the following example code to add custom content in the cells:
| C# |
Copy Code
|
|---|---|
        // Initialize GcBitmap.
        var bmp = new GcBitmap(960, 530, true);

        // Create a graphic.
        var g = bmp.CreateGraphics(Color.White);

        // Initialize LayoutHost.
        var host = new LayoutHost();

        // Create LayoutView.
        var view = host.CreateView(800, 500);

        // Create LayoutRect. Add anchor points.
        var rt = view.CreateRect();
        rt.AnchorTopLeft(null, 36, 36);

        // Create an instance of TableRenderer.
        var ta = new TableRenderer(g,
            rt, FixedTableSides.TopLeft,
            rowCount: 6, columnCount: 6,
            gridLineColor: Color.Black,
            gridLineWidth: 1);

        // Set height and width of the the rows and columns.
        ta.RowRects[0].SetHeight(50);
        ta.ColumnRects[0].SetWidth(120);

        // Set the cell style.
        var cs = new CellStyle
        {
            TextAlignment = TextAlignment.Center,
            ParagraphAlignment = ParagraphAlignment.Center,

            // Set text format.
            TextFormat = new TextFormat
            {
                FontName = "Calibri",
                FontSize = 16,
                FontSizeInGraphicUnits = true,
                FontBold = true
            }
        };

        // Add a background style for displaying shapes with a custom drawn element (diagonal line).
        var csCornerTopRight = new CellStyle(cs)
        {
            Background = true,
            LineWidth = 1f,
            Borders = FrameBorders.MainDiagonal,
            TextAlignment = TextAlignment.Trailing,
            ParagraphAlignment = ParagraphAlignment.Near,
            PaddingRight = 10,
            PaddingTop = 5
        };

        // Add a regular style for displaying color at the bottom left corner of the same cell.
        var csCornerBottomLeft = new CellStyle(cs)
        {
            TextAlignment = TextAlignment.Leading,
            ParagraphAlignment = ParagraphAlignment.Far,
            PaddingLeft = 10,
            PaddingBottom = 5
        };

        // Add a background cell at the top left corner.
        ta.AddCell(csCornerTopRight, 0, 0, "Shape");

        // Add row header cells.
        ta.AddCell(cs, 0, 1, "Circle");
        ta.AddCell(cs, 0, 2, "Triangle");
        ta.AddCell(cs, 0, 3, "Rectangle");
        ta.AddCell(cs, 0, 4, "Oval");
        ta.AddCell(cs, 0, 5, "Square");

        // Add a regular cell at the top left corner.
        ta.AddCell(csCornerBottomLeft, 0, 0, "Color");

        // Add column header cells.
        ta.AddCell(cs, 1, 0, "Red");
        ta.AddCell(cs, 2, 0, "Green");
        ta.AddCell(cs, 3, 0, "Blue");
        ta.AddCell(cs, 4, 0, "Orange");
        ta.AddCell(cs, 5, 0, "Purple");

        // Add default cell style.
        ta.DefaultCellStyle = new CellStyle
        {
            PaddingTop = 3,
            PaddingLeftRight = 20,
            PaddingBottom = 55,
            FixedWidth = false,
            TextAlignment = TextAlignment.Center,
            TextFormat = new TextFormat
            {
                FontName = "Calibri",
                FontSize = 14
            },

            // Set text layout.
            CreateTextLayout = (g, cs, data) =>
            {
                var tl = g.CreateTextLayout();
                tl.Append(((Figure)data).Title, cs.TextFormat);
                return tl;
            },

            // Draw the custom content into the cells.
            CustomDraw = (g, tc) =>
            {
                ((Figure)tc.Data).Draw(g, tc.Width, tc.Height);
            }
        };

        // Add data cells.
        ta.AddCell(1, 1, new Figure("Red Circle", Shape.Circle, Color.Red));
        ta.AddCell(1, 2, new Figure("Red Triangle", Shape.Triangle, Color.Red));
        ta.AddCell(1, 3, new Figure("Red Rectangle", Shape.Rectangle, Color.Red));
        ta.AddCell(1, 4, new Figure("Red Oval", Shape.Oval, Color.Red));
        ta.AddCell(1, 5, new Figure("Red Square", Shape.Square, Color.Red));

        ta.AddCell(2, 1, new Figure("Green Circle", Shape.Circle, Color.Green));
        ta.AddCell(2, 2, new Figure("Green Triangle", Shape.Triangle, Color.Green));
        ta.AddCell(2, 3, new Figure("Green Rectangle", Shape.Rectangle, Color.Green));
        ta.AddCell(2, 4, new Figure("Green Oval", Shape.Oval, Color.Green));
        ta.AddCell(2, 5, new Figure("Green Square", Shape.Square, Color.Green));

        ta.AddCell(3, 1, new Figure("Blue Circle", Shape.Circle, Color.Blue));
        ta.AddCell(3, 2, new Figure("Blue Triangle", Shape.Triangle, Color.Blue));
        ta.AddCell(3, 3, new Figure("Blue Rectangle", Shape.Rectangle, Color.Blue));
        ta.AddCell(3, 4, new Figure("Blue Oval", Shape.Oval, Color.Blue));
        ta.AddCell(3, 5, new Figure("Blue Square", Shape.Square, Color.Blue));

        ta.AddCell(4, 1, new Figure("Orange Circle", Shape.Circle, Color.Orange));
        ta.AddCell(4, 2, new Figure("Orange Triangle", Shape.Triangle, Color.Orange));
        ta.AddCell(4, 3, new Figure("Orange Rectangle", Shape.Rectangle, Color.Orange));
        ta.AddCell(4, 4, new Figure("Orange Oval", Shape.Oval, Color.Orange));
        ta.AddCell(4, 5, new Figure("Orange Square", Shape.Square, Color.Orange));

        ta.AddCell(5, 1, new Figure("Purple Circle", Shape.Circle, Color.Purple));
        ta.AddCell(5, 2, new Figure("Purple Triangle", Shape.Triangle, Color.Purple));
        ta.AddCell(5, 3, new Figure("Purple Rectangle", Shape.Rectangle, Color.Purple));
        ta.AddCell(5, 4, new Figure("Purple Oval", Shape.Oval, Color.Purple));
        ta.AddCell(5, 5, new Figure("Purple Square", Shape.Square, Color.Purple));

        // Draw the table.
        ta.Render();

        // Save the image.
        bmp.SaveAsPng("custom-content.png");
    }
    // Create enum for Shape.
    enum Shape
    {
        Circle,
        Triangle,
        Rectangle,
        Oval,
        Square
    }

    // Create a class for Figure.
    class Figure
    {
        public string Title;
        public Shape Shape;
        public Color Color;

        public Figure(string title, Shape shape, Color color)
        {
            Title = title;
            Shape = shape;
            Color = color;
        }

        public void Draw(GcGraphics g, float w, float h)
        {
            RectangleF rc;
            var pen = new Pen(Color.Black, 1);
            switch (Shape)
            {
                case Shape.Circle:
                    rc = new RectangleF(w / 2 - 20, h - 50, 40, 40);
                    g.FillEllipse(rc, Color);
                    g.DrawEllipse(rc, pen);
                    break;
                case Shape.Triangle:
                    var points = new PointF[]
                    {
                new(w / 2, h - 50),
                new(w / 2 + 25, h - 10),
                new(w / 2 - 25, h - 10)
                    };
                    g.FillPolygon(points, Color);
                    g.DrawPolygon(points, pen);
                    break;
                case Shape.Rectangle:
                    rc = new RectangleF(w / 2 - 35, h - 50, 70, 40);
                    g.FillRectangle(rc, Color);
                    g.DrawRectangle(rc, pen);
                    break;
                case Shape.Oval:
                    rc = new RectangleF(w / 2 - 35, h - 50, 70, 40);
                    g.FillEllipse(rc, Color);
                    g.DrawEllipse(rc, pen);
                    break;
                case Shape.Square:
                    rc = new RectangleF(w / 2 - 20, h - 50, 40, 40);
                    g.FillRectangle(rc, Color);
                    g.DrawRectangle(rc, pen);
                    break;
            }
        }
    }
}
|
|
Nested tables are those in which a table (or tables) is drawn inside another table, where the larger table works as a container for the smaller table. The nested tables work as a way for you to organize images or text in evenly spaced cells. The nested tables can also be helpful in grouping different sets of data. DsImaging allows you to create nested tables and add and customize the data in the nested tables by creating different objects of LayoutView and LayoutRect.
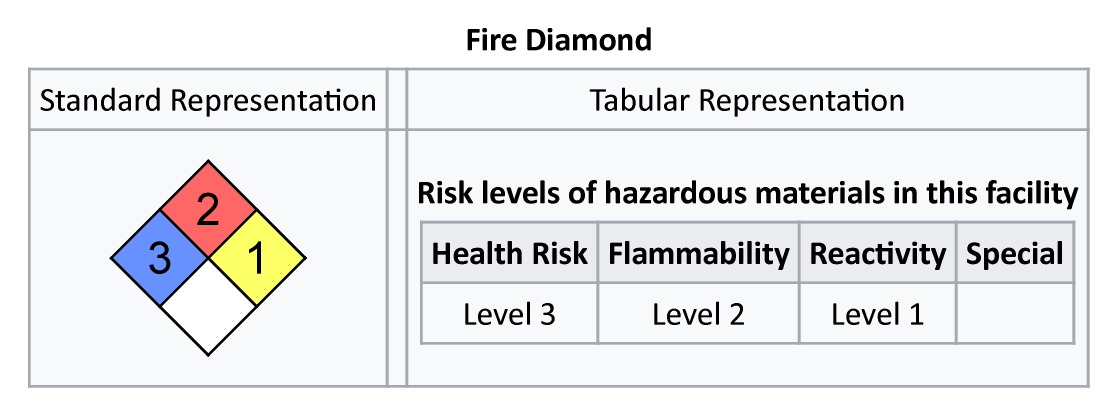
Refer to the following example code to draw nested tables:
| C# |
Copy Code
|
|---|---|
float scale = 1.4f; // Initialize GcBitmap. using var bmp = new GcBitmap((int)(800 * scale), (int)(300 * scale), true); // Create a graphic. using var g = bmp.CreateGraphics(Color.White); g.Transform = Matrix3x2.CreateScale(scale); // Initialize LayoutHost. var host = new LayoutHost(); // Create first table. The view is rotated 45 degrees counterclockwise. var view1 = host.CreateView(100, 100, Matrix.CreateRotation(-Math.PI / 4)); var rect1 = view1.CreateRect(); // Coincide the rect1 with the view. rect1.AnchorExact(null); // Create an instance of TableRenderer for the first table. var ta1 = new TableRenderer(g, rect1, FixedTableSides.All, rowCount: 2, columnCount: 2, Color.Black, gridLineWidth: 2); // Set height and width of the the rows and columns. var columns = ta1.ColumnRects; columns[0].SetStarWidth(1); columns[1].SetStarWidth(1); ta1.RowRects[0].SetStarHeight(1); ta1.RowRects[1].SetStarHeight(1); // Set text format. var fmt1 = new TextFormat { FontName = "Arial", FontSize = 32, FontSizeInGraphicUnits = true }; // Set cell style. var cs1 = new CellStyle { CustomDraw = (g, tc) => { var tl = g.CreateTextLayout(); tl.Append((string)tc.Data, fmt1); tl.PerformLayout(); var rc = tl.ContentRectangle; var m = g.Transform; // display the number centered and rotated 45 degrees clockwise m = Matrix3x2.CreateTranslation(tc.Width * 0.5f, tc.Height * 0.5f) * m; g.Transform = Matrix3x2.CreateRotation((float)Math.PI / 4) * m; g.DrawTextLayout(tl, new PointF(-rc.Width * 0.5f, -rc.Height * 0.5f)); } }; // Add the cells. ta1.AddCell(new CellStyle(cs1) { FillColor = Color.FromArgb(102, 145, 255) }, 0, 0).Data = "3"; ta1.AddCell(new CellStyle(cs1) { FillColor = Color.FromArgb(255, 102, 102) }, 0, 1).Data = "2"; ta1.AddCell(new CellStyle(cs1) { FillColor = Color.FromArgb(252, 255, 102) }, 1, 1).Data = "1"; ta1.AddCell(new CellStyle { FillColor = Color.White }, 1, 0); // Calculate the layout of the table and the cells. ta1.ApplyCellConstraints(); /* Shift the view down. The Y-coordinate of the top right point (P1) is zero, and all other coordinates are not negative.*/ var p = view1.Transform.Transform(rect1.P1); view1.ApplyOffset(null, 0f, -p.Y); /* The bottom right point (P3) is at the far right, which can be used to calculate the maximum width.*/ p = view1.Transform.Transform(rect1.P3); float w1 = p.X; /* The bottom left point (P2) is at the bottommost position, which can be used to calculate the maximum height.*/ p = view1.Transform.Transform(rect1.P2); float h1 = p.Y; // Create second table. var view2 = host.CreateView(0, 0); var rect2 = view2.CreateRect(); // Anchor the second table to top left corner. rect2.AnchorTopLeft(null, 0, 0); // Create an instance of TableRenderer for the second table. var ta2 = new TableRenderer(g, rect2, FixedTableSides.TopLeft, rowCount: 2, columnCount: 4, gridLineColor: Color.FromArgb(162, 169, 177), gridLineWidth: 2); // Set text format. var fmt = new TextFormat { FontName = "Calibri", FontSize = 24, FontSizeInGraphicUnits = true }; var fmtBold = new TextFormat(fmt) { FontBold = true }; // Set cell style. var cs = new CellStyle { TextFormat = fmt, PaddingAll = 6, TextAlignment = TextAlignment.Center, FixedWidth = false }; // Set default cell style. ta2.DefaultCellStyle = new CellStyle(cs) { TextFormat = fmtBold, FillColor = Color.FromArgb(234, 236, 240) }; // Add cells to the second table with data. ta2.AddCell(0, 0, "Health Risk"); ta2.AddCell(0, 1, "Flammability"); ta2.AddCell(0, 2, "Reactivity"); ta2.AddCell(0, 3, "Special"); ta2.AddCell(cs, 1, 0, "Level 3"); ta2.AddCell(cs, 1, 1, "Level 2"); ta2.AddCell(cs, 1, 2, "Level 1"); ta2.AddCell(cs, 1, 3); // Calculate the layout of the table and the cells. ta2.ApplyCellConstraints(); float w2 = rect2.Width; float h2 = rect2.Height; // Create a third table, which will be larger and the outer table. var view3 = host.CreateView(1, 1); var rect3 = view3.CreateRect(); // Anchor the third table to top left corner. rect3.AnchorTopLeft(null, 5, 20); // Create an instance of TableRenderer for the third table. var ta3 = new TableRenderer(g, rect3, FixedTableSides.TopLeft, rowCount: 3, columnCount: 3, gridLineColor: Color.FromArgb(162, 169, 177), gridLineWidth: 2); const float CellPaddingX = 6f; const float CellPaddingY = 20f; const float TextTableGap = 6f; // Set the width of the columns. columns = ta3.ColumnRects; columns[0].AppendMinWidth(CellPaddingX * 2 + w1); columns[1].SetWidth(12); columns[2].AppendMinWidth(CellPaddingX * 2 + w2); // Set the height of the row. ta3.RowRects[2].AppendMinHeight(CellPaddingY * 2 + h1); // Add cells to the table with data. ta3.AddCell(new CellStyle(cs) { TextFormat = fmtBold, Background = true }, 0, 0, 1, 3, "Fire Diamond"); ta3.AddCell(cs, 1, 0, "Standard Representation"); ta3.AddCell(cs, 1, 2, "Tabular Representation"); // Add the first table to the outer table. ta3.AddCell(new CellStyle { // Draw the first table. CustomDraw = (g, tc) => { float x = (tc.Width - w1) * 0.5f; float y = (tc.Height - h1) * 0.5f; g.Transform = Matrix3x2.CreateTranslation(x, y) * g.Transform; ta1.Render(g); } }, 2, 0); // Add the second table to the outer table. ta3.AddCell(new CellStyle(cs) { TextFormat = fmtBold, ParagraphAlignment = ParagraphAlignment.Center, PaddingTop = CellPaddingY, PaddingBottom = TextTableGap + h2 + CellPaddingY, // Draw the second table. CustomDraw = (g, tc) => { var tl = tc.TextLayout; float y = CellPaddingY + tl.ContentY + tl.ContentHeight + TextTableGap; float x = (tc.Width - w2) * 0.5f; g.Transform = Matrix3x2.CreateTranslation(x, y) * g.Transform; ta2.Render(g); } }, 2, 2, "Risk levels of hazardous materials in this facility"); // Fill gaps in the table with empty regular cells. ta3.AddMissingCells(1, 0, 2, 3); ta3.AddCell(new CellStyle { FillColor = Color.FromArgb(248, 249, 250), Background = true }, 1, 0, 2, 3); // Draw the third table. ta3.Render(); // Save the image. bmp.SaveAsPng("nested-table.png"); |
|
Limitations
A table created with TableRenderer is immutable. The number of rows and columns must be known before calling the TableRenderer constructor. To split the table between multiple pages, calculate the layout for the huge table first, then recreate the layout for a subset of rows to fit the available space on each page. Moreover, text having an "East Asian" font and aligned vertically can only be displayed in cells with both FixedWidth and FixedHeight set to true in the CellStyle.