DsImaging provides various drawing methods in GcGraphics class to draw graphic elements (shapes) on a drawing surface using an object of GcBitmapGraphics class. These shapes can be simple shapes, such as line, rectangle, etc. or complex shapes, such as graphics path, which can be any shape created using a sequence of connected lines and curves. All these shapes are drawn using draw methods available in the GcGraphics class. These draw methods accept a color or a Pen object as a parameter.
Moreover, DsImaging allows you to fill the shapes using fill methods available in the GcGraphics class. These methods fill the shapes using a color or a brush, which can be either SolidBrush, LinearGradientBrush, RadialGradientBrush, or HatchBrush. An instance of a required brush can be passed as a parameter to the fill methods.
| Shape | Draw methods | Fill methods |
|---|---|---|
| Line | DrawLine | - |
| Rectangle | DrawRectangle | FillRectangle |
| Rounded rectangle | DrawRoundRect | FillRoundRect |
| Ellipse | DrawEllipse | FillEllipse |
| Polygon | DrawPolygon | FillPolygon |
| Path | DrawPath | FillPath |
| Shapes | Graphics Path |
|---|---|
 |
 |
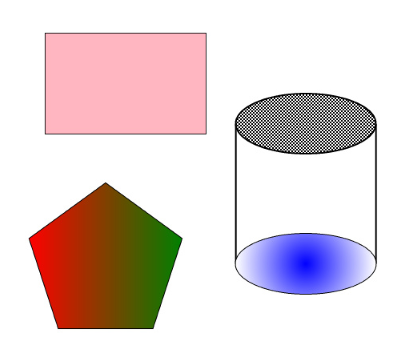
To draw a rectangle, polygon, and cylinder:
| C# |
Copy Code
|
|---|---|
    //Initialize GcBitmap
    GcBitmap origBmp = new GcBitmap(500, 500, true);

    //Create the graphics for the Bitmap
    GcBitmapGraphics g = origBmp.CreateGraphics(Color.White);

    //Define the start point and pen for drawng shapes
    Pen shapePen = new Pen(Color.Black, 2);

    //Draw rectangle
    //Start point for rectangle i.e. the upper left corner
    PointF startPoint = new PointF(50, 50);
    RectangleF rectangleBounds = new RectangleF(startPoint,
        new SizeF(200, 125));
    g.DrawRectangle(rectangleBounds, shapePen);

    //Draw Pentagon
    PointF center_Pent = new PointF(125, 337);

    //Defining distance of side from center and angle to start at
    float radius = 100, startAngle = (float)-Math.PI / 2;

    //Number of sides for polygon
    int n = 5;
    PointF[] pts = new PointF[n];

    //Defining the connecting points for the sides calculated
    //using the radius and start angle
    for (int i = 0; i < 5; ++i)
        pts[i] = new PointF(center_Pent.X +
            (float)(radius * Math.Cos(startAngle + 2 * Math.PI * i / n)),
            center_Pent.Y +
            (float)(radius * Math.Sin(startAngle + 2 * Math.PI * i / n)));
    g.DrawPolygon(pts, shapePen);

    //Draw Cylinder
    // Horizontal radius for ellipse
    float radX = 87.5f;

    // Vertical radius for ellipse
    float radY = 37.5f;

    //Cylinder Height
    float height = 250;

    //Center point for cylinder shape
    PointF center_cyl = new PointF(375, 250);

    //Rendering two ellipses and two lines to render cylinder shape
    //Rectangle bounds/startpoint/end point are calculated based
    //on the center point of the shape
    g.DrawEllipse(new RectangleF(center_cyl.X - radX,
        center_cyl.Y - height / 2, radX * 2, radY * 2), shapePen);
    g.DrawEllipse(new RectangleF(center_cyl.X - radX,
        center_cyl.Y + height / 2 - radY * 2, radX * 2,
        radY * 2), shapePen);
    g.DrawLine(new PointF(center_cyl.X - radX,
        center_cyl.Y - height / 2 + radY),
        new PointF(center_cyl.X - radX, center_cyl.Y +
        height / 2 - radY), shapePen);
    g.DrawLine(new PointF(center_cyl.X + radX,
        center_cyl.Y - height / 2 + radY), new PointF(center_cyl.X +
        radX, center_cyl.Y + height / 2 - radY), shapePen);

    //Save the image rendering different shapes
    origBmp.SaveAsJpeg("DrawShape.jpeg");
}
|
|
To fill different shapes with different types of brushes:
| C# |
Copy Code
|
|---|---|
//Initialize an instance of SolidBrush class to fill //rectangle with solid color SolidBrush solidBrush = new SolidBrush(Color.LightPink); g.FillRectangle(rectangleBounds, solidBrush); //Initialize an instance of LinearGradientBrush class to //fill pentagon with linear gradient LinearGradientBrush linearBrush = new LinearGradientBrush(Color.Red, Color.Green); g.FillPolygon(pts, linearBrush); //Initialize an instance of HatchBrush class to fill //cylinder top ellipse with hatch style HatchBrush hatchBrush = new HatchBrush(HatchStyle.Diagonal); g.FillEllipse(topEllipse, hatchBrush); //Initialize an instance of RadialGradientBrush class //to fill bottom ellipse with radial gradient RadialGradientBrush radialBrush = new RadialGradientBrush(Color.Blue, Color.White); g.FillEllipse(bottomEllipse, radialBrush); //Save the image rendering different shapes origBmp.SaveAsJpeg("FillShape.jpeg"); |
|
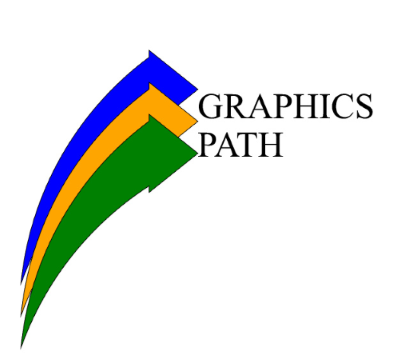
To draw a graphics path:
| C# |
Copy Code
|
|---|---|
//Define and return the graphic path public IPath CreatePath(RectangleF rec, GcGraphics g, SizeF sz) { var path = g.CreatePath(); path.BeginFigure(new PointF(rec.X + 50, rec.Y + rec.Height)); path.AddArc(new ArcSegment() { Point = new PointF(rec.X + 250, rec.Y + 50), RotationAngle = 30, SweepDirection = SweepDirection.Clockwise, Size = sz }); path.AddLine(new PointF(rec.X + 250, rec.Y + 40)); path.AddLine(new PointF(rec.X + 325, rec.Y + 100)); path.AddLine(new PointF(rec.X + 250, rec.Y + 160)); path.AddLine(new PointF(rec.X + 250, rec.Y + 150)); path.AddArc(new ArcSegment() { Point = new PointF(rec.X + 50, rec.Y + rec.Height), RotationAngle = 30, SweepDirection = SweepDirection.CounterClockwise, Size = sz }); path.EndFigure(FigureEnd.Closed); return path; } //Create an image using the Graphic Path public void DrawPath() { //Initialize GcBitmap GcBitmap origBmp = new GcBitmap(640, 530, true); //Create the graphics for the Bitmap GcBitmapGraphics g = origBmp.CreateGraphics(Color.White); //Define the start point and pen for drawing shapes Pen shapePen = new Pen(Color.Black, 2); //Size of the graphics path image SizeF sz = new SizeF(500, 500); RectangleF rect1 = new RectangleF(0, 0, 500, 400); var path1 = CreatePath(rect1, g, sz); g.DrawPath(path1, shapePen); // Draw graphic path g.FillPath(path1, Color.Blue); // Fill graphic path RectangleF rect2 = new RectangleF(0, 50, 500, 400); var path2 = CreatePath(rect2, g, sz); g.DrawPath(path2, shapePen); g.FillPath(path2, Color.Orange); RectangleF rect3 = new RectangleF(0, 100, 500, 400); var path3 = CreatePath(rect3, g, sz); g.DrawPath(path3, shapePen); g.FillPath(path3, Color.Green); //Define TextFormat to render text in the image TextFormat tf = new TextFormat { Font = Font.FromFile(Path.Combine("Resources", "Fonts", "times.ttf")), FontSize = 42 }; g.DrawString("GRAPHICS", tf, new PointF(325, 95)); g.DrawString("PATH", tf, new PointF(325, 155)); //Save the image rendering different shapes origBmp.SaveAsJpeg("GraphicPath.jpeg"); } |
|
DsImaging, by default, renders the graphics in fast antialiasing mode that gives the good quality result with fast rendering. However, if you want to render the graphics in slow antialiasing mode to get the highest quality while compromising on the speed, you can set the SlowAntialiasing property of BitmapRenderer class to true. Similarly, you can also render the graphics without antialiasing which gives you poor quality but very fast rendering, by setting the Aliased property to true.
In addition, BitmapRenderer class also provides ForceAntialiasingForText property which when true, forces the text layout to draw with antialiasing even if the Aliased property is set to true. This is generally required in scenarios where graphics are required to be aliased but text needs to be antialiased. For instance, in the case of rendering barcodes with digits, barcodes should be aliased to make them crisp and readable by devices while digits under the barcodes needs to be drawn with better quality.
To render a text with slow antialiasing on an image:
| C# |
Copy Code
|
|---|---|
//Initialize GcBitmap GcBitmap origBmp = new GcBitmap(1000, 500, true); //Create the graphics for the Bitmap GcBitmapGraphics g = origBmp.CreateGraphics(Color.White); //Render using multithreaded mode g.Renderer.Multithreaded = true; var text = @"Different(anti)aliasing modes of rendering text are no antialiasing, fast antialiasing and slow antialiasing."; var tfcap = new TextFormat() { Font = Font.FromFile(Path.Combine("Resources", "Fonts", "timesbd.ttf")), FontSize = 16, }; var tl = g.CreateTextLayout(); tl.TextAlignment = TextAlignment.Justified; //Render text without antialiasing //origBmp.Renderer.Aliased = true; //Render text with slow antialiasing origBmp.Renderer.SlowAntialiasing = true; tl.AppendLine("Fast antialiasing (default quality)", tfcap); tl.Append(text, tfcap); g.DrawTextLayout(tl, new PointF(50, 200)); //Save the image depicting different antialiasing modes origBmp.SaveAsJpeg("Antialiasing.jpeg"); |
|
For more information about drawing and filling geometric shapes using DsImaging, see DsImaging sample browser.