How to Create an RDL Report in .NET C# Code
You may find yourself needing to create an RDL report in code, conditionally manage data binding of a page or RDL report at run time, or change the layout of a report based on some user input. These are some reasons why you may consider creating a report in code.
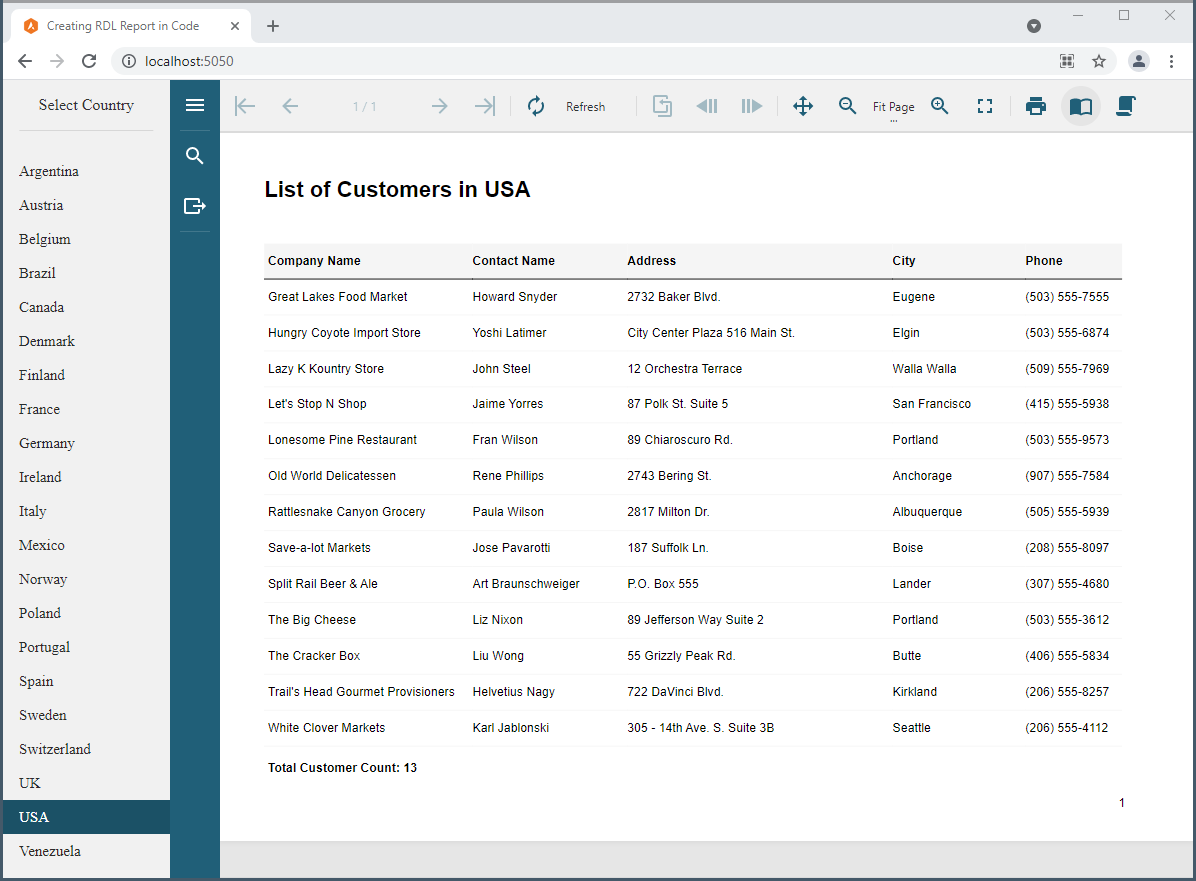
To demonstrate this process, we’ll create a project that shows a list of countries on the left side of the page. If you select a country, you want to see a report displaying all customers who reside in the country and their contact information (see image below).
This blog will show you how to:
- Set up the project
- Create an RDL report
- Create a table using C#
- Create a parameter
- Data binding
- Passing the report to the JSViewer using CustomStore
Ready to get started with ActiveReports .NET? Download a free trial today!
Setting up the project
First thing, we will create a new ActiveReports 17 JSViewer Core MVC Application.

This project template is integrated into Visual Studio when you install ActiveReports. The template will install all the NuGet packages and resources required to render a report in the JSViewer–eliminating the need for manual installation.
Open and the index.html file in the wwwroot:

Use a Listbox to display our country list by modifying the code in the body tag as follows:
    <div style="width: 100%; overflow-x: hidden">

        <div style="float:left; width: 125pt" class="main-nav navbar">

            <div id='list-heading'>Select Country</div>

            <ul id="countriesList" class="nav navbar-nav"></ul>

        </div>

        <div style="float:right;width:calc(100% - 125pt)" id="viewerContainer">

        </div>

    </div>
Then change the onload event of the body to populate the countriesList.
<body onload="populateList()">
The code below shows how to fetch the "countries" field from a JSON service, create a distinct and sorted list, and populate countriesList element.
function populateList() {
          let countriesList = document.getElementById("countriesList");
          let oReq = new XMLHttpRequest();
          oReq.onload = function () {
              var lookup = {};
              var countriesObj = [];
              fetch('https://demodata.grapecity.com/northwind/api/v1/Customers')
                  .then(res => res.json())
                  .then((out) => {
                      for (var item, i = 0; item = out[i++];) {
                          var country = item.country;
                          if (!(country in lookup)) {
                              lookup[country] = 1;
                              countriesObj.push(country);
                          }
                      }
                      countriesObj.sort();
                      for (let i = 0; i < countriesObj.length; i++) {
                          const countryName = countriesObj[i];
                          const countries = document.createElement('li');
                          countries.className = 'countriesList_item';
                          const countryItem = document.createElement('span');
                          countryItem.innerText = countryName;
                          countries.appendChild(countryItem);
                          countriesList.appendChild(countries);

                          countries.addEventListener('click', function () {
                              loadViewer(countryName);
                          });
                      }
                  })
                  .catch(err => { throw err });
          }
          oReq.open("get", "reports", false);
          oReq.send();
      }
At this point, we’ve created the countriesList element, populated it, and added an event listener to pass the selected country from this list to the loadViewer() function. The loadViewer function takes the user input, a parameter, and passes it to the report to display filtered data:
let viewer=null;
function loadViewer(country) {
          if (viewer == null) {
              viewer = GrapeCity.ActiveReports.JSViewer.create({
                  element: '#viewerContainer',
                  reportID: "MyReport",
                  reportParameters: [{ name: 'selectedCountry', values: [country] }]
              });
          }
          else { viewer.openReport("MyReport", [{name: 'selectedCountry', values:[country]}])}
}
Creating an RDL report
For the RDL report, let’s create a custom class in the Reports folder. We’ll call it ReportDefinition.cs. Let's start by creating a public instance of an RDL report:
public PageReport rdlReport = new PageReport();
Create the layout of the report's page in the constructor:
 rdlReport.Report.PaperOrientation = GrapeCity.ActiveReports.PageReportModel.PaperOrientation.Landscape;
 rdlReport.Report.PageHeight = "8in";
 rdlReport.Report.PageWidth = "11in";

 //Page Header
 GrapeCity.ActiveReports.PageReportModel.PageHeaderFooter headers = new GrapeCity.ActiveReports.PageReportModel.PageHeaderFooter();
 rdlReport.Report.PageHeader = headers;
 headers.Height = ".5in";
 headers.PrintOnFirstPage = true;
 headers.PrintOnLastPage = true;

 //Page Footer
 GrapeCity.ActiveReports.PageReportModel.PageHeaderFooter footer = new GrapeCity.ActiveReports.PageReportModel.PageHeaderFooter();
 rdlReport.Report.PageFooter = footer;
 footer.Height = ".5in";
 footer.PrintOnFirstPage = true;
 footer.PrintOnLastPage = true;
Next, add a report title at the very top of the page and page numbers in the page footer:
GrapeCity.ActiveReports.PageReportModel.TextBox reportTitle = new GrapeCity.ActiveReports.PageReportModel.TextBox()
{
        Name = "Report Title",
        Value = "=\"List of Customers in \" & Parameters!selectedCountry.Value",
        Height = "0.5in",
        Width = "5in",
        Top = "0in",
        Left = "0.5in",
        Style = { TextAlign = "Left", FontSize = "18pt", FontWeight = "Bold" }
};

GrapeCity.ActiveReports.PageReportModel.TextBox pageNumber = new GrapeCity.ActiveReports.PageReportModel.TextBox();
pageNumber.Name = "pNumber";
pageNumber.Height = ".5cm";
pageNumber.Width = "1cm";
pageNumber.Left = "25cm";
pageNumber.Top = "0cm";
pageNumber.Value = "=Globals!PageNumber";
footer.ReportItems.Add(pageNumber);
Add every control we need in the report to the report definition. In this case, add the “reportTitle” textbox:
rdlReport.Report.Body.ReportItems.Add(reportTitle);
Creating a table in code
The table will display our list of customers and their contacts in the specified country. Let’s create an instance of a table object using the code below:
GrapeCity.ActiveReports.PageReportModel.Table customersTable = new GrapeCity.ActiveReports.PageReportModel.Table()
{
       Name = "CustomersTable",
       Top = "0.75in",
       Left = "0.5in",
       DataSetName = "MyDataSet"
};
The table will need 5 columns (Company Name, Contact Name, Address, City, and Phone) and three rows (header, details, and footer). We will create a cell for each row and use it 5 times to represent the columns.
Let's start by creating a customerHeader cell that will represent a cell in the table header:
//Creating table header
customersTable.Header = new GrapeCity.ActiveReports.PageReportModel.Header();
customersTable.Header.TableRows.Add(new GrapeCity.ActiveReports.PageReportModel.TableRow() { Height = ".4in" });
var customerHeader = customersTable.Header.TableRows[0].TableCells;
Then format and style the customerHeader cell for each of the five columns and add it to the table:
//First cell in the table header
customerHeader.Add(new GrapeCity.ActiveReports.PageReportModel.TableCell());
customerHeader[0].ReportItems.Add(new GrapeCity.ActiveReports.PageReportModel.TextBox()
{
        Name = "Company Name",
        Value = "Company Name",
        Style = { BorderStyle = { Bottom = "Solid" },
                    VerticalAlign = "Middle",
                    PaddingLeft="3pt",
                    TextAlign = "Left",
                    BackgroundColor = "WhiteSmoke",
                    FontWeight = "Bold" }
        });
customersTable.TableColumns.Add(new GrapeCity.ActiveReports.PageReportModel.TableColumn() { Width = "2.35in" });
Repeat this formatting for the rest of the four columns while changing the Name, Value, and Width properties accordingly.
Next, add a details row to the table. You only need one detail row, which will repeat as many times as there are records. Creating a details row follows the same procedure as creating the header row. But first, create the customerDetails cell that will represent a cell in the table details row:
//Detail Row
customersTable.Details.TableRows.Clear();
customersTable.Details.TableRows.Add(new GrapeCity.ActiveReports.PageReportModel.TableRow() { Height = ".3in" });
var customerDetails = customersTable.Details.TableRows[0].TableCells;
Now it's time to style the customerDetails cell for each column and add it into the details row:
//First cell in the Details row
customerDetails.Add(new GrapeCity.ActiveReports.PageReportModel.TableCell());
customerDetails[0].ReportItems.Add(new GrapeCity.ActiveReports.PageReportModel.TextBox()
{
       Name = "CompanyNameBox",
       Value = "=Fields!CompanyName.Value",
       Width = "2.35in",
       Style = { BorderColor = { Bottom = "WhiteSmoke" }, BorderStyle = { Bottom = "Solid" }, TextAlign = "Left", PaddingLeft="3pt", VerticalAlign="Middle"}
});
Again, repeat the same formatting for each of the remaining four columns while changing the Name, Value, and Width properties accordingly.
Similarly, create the table footer and add an expression to calculate the number of customers shown.
//Table footer
customersTable.Footer = new GrapeCity.ActiveReports.PageReportModel.Footer();
customersTable.Footer.TableRows.Add(new GrapeCity.ActiveReports.PageReportModel.TableRow() { Height = ".5in" });
var customerFooter = customersTable.Footer.TableRows[0].TableCells;

//First cell in the footer
customerFooter.Add(new GrapeCity.ActiveReports.PageReportModel.TableCell());
customerFooter[0].ReportItems.Add(new GrapeCity.ActiveReports.PageReportModel.TextBox()
{
          Name = "Company Name",
          Value = "=\"Total Customer Count: \" & CountRows()",
          Style = {
                    VerticalAlign ="Middle",
                    PaddingLeft="3pt",
                    TextAlign = "Left",
                    FontWeight = "Bold" }
});
customersTable.TableColumns.Add(new GrapeCity.ActiveReports.PageReportModel.TableColumn() { Width = "2.35in" });
With the customersTable now complete, add it to the report definition.
rdlReport.Report.Body.ReportItems.Add(customersTable);
Creating a parameter
When the user selects a country from the list box to the left of our page, that selection is passed to the report via a report parameter. In the next section, you'll use this parameter to filter the data set.
You can either create this parameter in such a way as to prompt the user for input before rendering the report or hide the prompt altogether. By hiding the parameter, the user is not asked to enter a parameter value. In our case, since the user is already making a selection on our web page, outside of the viewer component, we should create this as a hidden parameter.
//Create a hidden parameter
GrapeCity.ActiveReports.PageReportModel.ReportParameter selectedCountry = new GrapeCity.ActiveReports.PageReportModel.ReportParameter()
{
                Name = "selectedCountry",
                Prompt = "Select a country",
                Hidden = true
};

//Add the parameter to the report
rdlReport.Report.ReportParameters.Add(selectedCountry);
Data binding
To manage the data binding, add a data source and a data set to the report in the ReportDefinition constructor as follows:
rdlReport.Report.DataSources.Add(myDataSource());
rdlReport.Report.DataSets.Add(myDataSet());
Then use the myDataSource() method to connect to a JSON data source.
private GrapeCity.ActiveReports.PageReportModel.DataSource myDataSource()
{
            GrapeCity.ActiveReports.PageReportModel.DataSource myDS = new GrapeCity.ActiveReports.PageReportModel.DataSource();
            myDS.Name = "MyDataSource";
            myDS.ConnectionProperties.DataProvider = "JSON";
            myDS.ConnectionProperties.ConnectString = "jsondoc=https://demodata.grapecity.com/northwind/api/v1/Customers";
            return myDS;
}
In the myDataSet() method, we retrieve the data. We also need to add each field to the data set. In the code below we are also creating a countryFilter to filter the data set based on the hidden parameter created earlier.
private GrapeCity.ActiveReports.PageReportModel.IDataSet myDataSet()
{
            GrapeCity.ActiveReports.PageReportModel.DataSet myDSet = new GrapeCity.ActiveReports.PageReportModel.DataSet();
            GrapeCity.ActiveReports.PageReportModel.Query myQuery = new GrapeCity.ActiveReports.PageReportModel.Query();
            myDSet.Name = "MyDataSet";
            myQuery.DataSourceName = "MyDataSource";
            myQuery.CommandText = "$.[*]";
            myDSet.Query = myQuery;

            //Create individual fields
            GrapeCity.ActiveReports.PageReportModel.Field country = new GrapeCity.ActiveReports.PageReportModel.Field("country", "country", null);
            GrapeCity.ActiveReports.PageReportModel.Field compName = new GrapeCity.ActiveReports.PageReportModel.Field("companyName", "companyName", null);
            GrapeCity.ActiveReports.PageReportModel.Field contactName = new GrapeCity.ActiveReports.PageReportModel.Field("contactName", "contactName", null);
            GrapeCity.ActiveReports.PageReportModel.Field address = new GrapeCity.ActiveReports.PageReportModel.Field("address", "address", null);
            GrapeCity.ActiveReports.PageReportModel.Field cityName = new GrapeCity.ActiveReports.PageReportModel.Field("city", "city", null);
            GrapeCity.ActiveReports.PageReportModel.Field phone = new GrapeCity.ActiveReports.PageReportModel.Field("phone", "phone", null);

            //Create filter to use Parameter
            GrapeCity.ActiveReports.PageReportModel.Filter countryFilter = new GrapeCity.ActiveReports.PageReportModel.Filter
            {
                FilterExpression = "=Fields!country.Value",
                FilterValues = { "=Parameters!selectedCountry.Value" }
            };

            //Add fields and filter to the dataset
            myDSet.Fields.Add(country);
            myDSet.Fields.Add(compName);
            myDSet.Fields.Add(contactName);
            myDSet.Fields.Add(address);
            myDSet.Fields.Add(cityName);
            myDSet.Fields.Add(phone);
            myDSet.Filters.Add(countryFilter);

            return myDSet;
}
Passing the report to the JSViewer using CustomStore
To put everything together, modify the Startup.cs file to pass the report from our custom ReportDefinition class to the JSViewer. To do so, utilize the UseCustomStore setting of the Reporting service in the Configure method as follows:
app.UseReporting(settings =>
{
                settings.UseEmbeddedTemplates(EmbeddedReportsPrefix, Assembly.GetAssembly(GetType()));
                settings.UseCustomStore(GetReport);
                settings.UseCompression = true;
});
Create a GetReport() method that will call our ReportDefinition class and return the RDL report:
private object GetReport(string arg)
{
            if (!IsReport(arg))
                return null;
            Reports.ReportDefinition reportDef = new Reports.ReportDefinition();
            return reportDef.rdlReport;
}
Finally, running this project should give you an output that looks something like this

To see the detailed implementation and code, please download the sample from the link below. Please note that this project requires the necessary ActiveReports packages to run. If you don't yet have ActiveReports installed, please download the latest version using the link below.
Get the sample.
Ready to get started with ActiveReports .NET? Download a free trial today!
Related Blogs
Try Our .NET Reporting Tool
ActiveReports.NET Resources

Mateen Firoz