Getting Started with C1FileExplorer in Studio for ASP.NET Wijmo
A File Explorer is a file manager that provides a graphical user interface for accessing the file systems. C1FileExplorer for ASP.NET Wijmo brings to you a web control which fills the gap for a file management GUI for the web application. It allows your web application to access directories, similar to Windows Explorer and helps in organizing files and folders by performing all the basic file operations such as create, delete, rename, drag and drop. In this tutorial, you will learn how to setup a page with C1FileExplorer and how to use and implement the top 5 features. The Top 5 features of FileExplorer are:
- Perform Powerful Functionalities like creating a new folder, deleting, renaming or copying a folder.
- Sorting & Filtering
- Paging
- Define View Modes and Customize Appearance
- Rich Client Side Model
By the end of this tutorial, you will learn how to use C1FileExplorer and create a Windows like file management view in your web application as depicted in the image below. 
Let’s Get Started
The first step in our Tutorial is to setup our application with C1FileExplorer.
- Create a Web Application - You can refer to the steps mentioned in our previous blog.
- Add C1FileExplorer - In the Toolbox, locate the C1FileExplorer control and drag it onto the Web Form.
-
Set Initial Path - Right click the C1FileExplorer control and select Properties. In the Properties Window, add the folder location to the InitPath property. For instance, set it to "~/Example". With C1FileExplorer, you can configure the file explorer to show which folders, and show what kind of files by following properties:
- ViewPaths: set target folders which will be shown by the file explorer.
- InitPath: set the inital path for which sub folder/files will be listed out in the right grid. If not set, the control will use the first path in ViewPaths.
- DeletePaths: set the paths that can be deleted by user. Please note that if the path is not in ViewPaths, it can't be deleted.
- SearchPatterns: filter what type of files to show.
By default, the all path properties are set the same as InitPath and the SearchPatterns is set to .jpg,.jpeg,.gif,.png
When you run the project, C1FileExplorer appears as shown in the image below. 
Tutorial 1 : FileExplorer Functions
The C1FileExplorer provides many powerful functionalities such as creating a new folder, deleting, renaming or copying a folder, you can perform these actions through the tool bar or context menu, you can also do this with your keyboard and shortcut keys. When you right click the file or folder, a context menu like the one below will appear.  All file operations are enabled by default but you can disable the Copy, New Folder and Open file operations.
- In Visual Studio, right click FileExplorer and select Properties.
- In the Properties Window,
- Set the EnableCopy property to False, to disable the files and folders from being copied.
- Set the EnableCreateNewFolder property to False, to disable users from creating new folders.
- Set the EnableOpenFile property to False, to disable users from opening files.
To enable multiple file selection in FileExplorer, set the AllowMultipleSelection to True. You can also define shortcut keys for the control. The complete list of shortcuts are given here.
Tutorial 2 : Sorting & Filtering
These are interesting features of FileExplorer. Generally, the Windows Explorer does not provide these options. However, with C1FileExplorer, you sort the list of files and folders by simply clicking the column header in the file browser.  To filter files enter the name of the file you want to find in the filter textbox located at the top of the FileExplorer. The FileExplorer automatically filters out the files based on the alphabets entered, as shown in the image below.
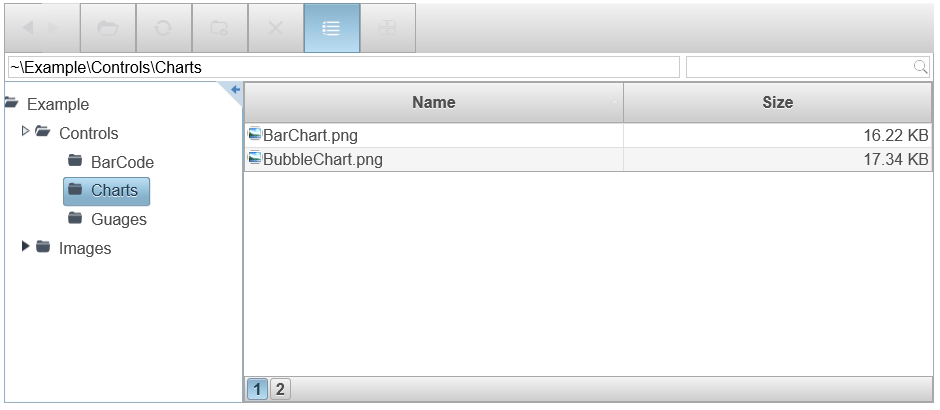
Tutorial 3 : Paging
C1FileExplorer supports Paging if there are too many items in the right grid view. To enable paging,
- Set AllowPaging to True
- Set PageSize to a value, say 2, to let user set the page size.

Tutorial 4 : Define Views & Customize Appearance
Following are some ways to customize appearance of C1FileExplorer :
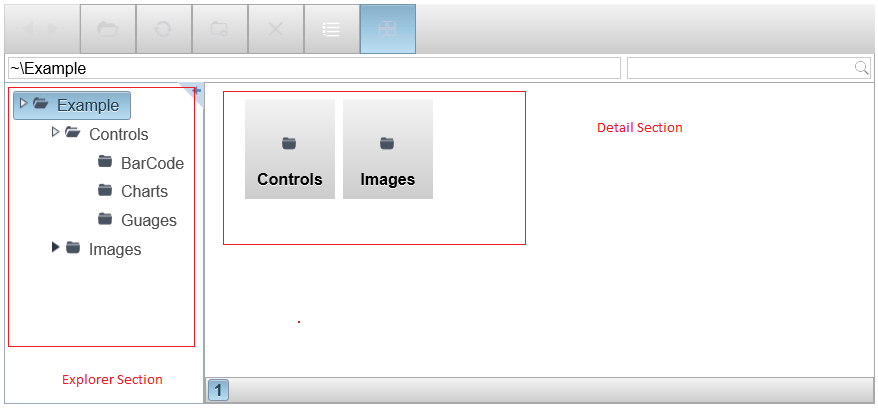
- Define Display Modes - C1FileExplorer provides two sections : the Explorer and the detail section.
- Mode property defines the explorer mode. Set it to FileTree (by default it is set to Default).
- ViewMode defines the detail view. Set it to ThumbNail (by default it is Detail).
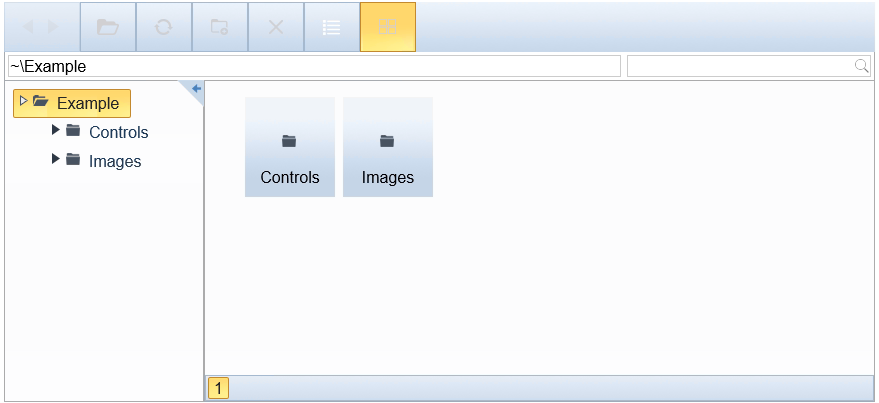
- Set Theme - Set the Theme property to any ThemeRoller theme, say Cobalt.
- Manage Visual Elements - You can customize the Visual elements of a C1FileExplorer by simply setting the VisibleControls property. If you wish to set show multiple options, then you can set this property in code. For instance, to show only the TreeView, Address Box and Detail section, use the code given below :
C1FileExplorer1.VisibleControls = FileExplorerControls.AddressBox |
        FileExplorerControls.TreeView | FileExplorerControls.ListView;


Tutorial 5 : Rich Client Model
C1FileExplorer provides following client side events:
- OnClientItemSelected - fired after the item is selected.
- OnClientFolderLoaded - fired after a folder content is loaded.
- OnClientFileOpened - fired after a file is opened.
- OnClientFolderChanged - fired after current active folder is changed.
- OnClientNewFolderCreated - fired after a new folder is created.
- OnClientDelete - fired before deleting an item.
- OnClientMove - fired after an item is moved to a new place or renamed.
- OnClientCopy - fired before an item is copied to the new destination directory.
To subscribe to these events, simply create a JavaScript method and set the property to the function name. For instance, create the following function for OnClientFileOpened event:
 function onClientFileOpened(evt, path) {
    alert("FileOpened");
}
Set the OnClientFileOpened to "onClientFileOpened" function as:
OnClientFileOpened="onClientFileOpened"
A detailed sample on client side events is available here. For more related samples on C1FileExplorer, refer to our ControlExplorer demo.

MESCIUS inc.