Getting Started with C1SiteMap for ASP.NET Wijmo
A sitemap is a file where you can list the web pages of your site to tell search engines about the organization of your site content. Search engine web crawlers like Googlebot read this file to more intelligently crawl your site - think of it as a map to find all the content on your site. ComponentOne SiteMap for ASP.NET Wijmo allows you to create nodes and makes navigating through the web-application easierby producing a list of all your webpages. It also allows users to create a custom template for each node level by letting you create different styles and layouts for each node level. The C1SiteMap package contains two controls: ➧ C1SiteMap : Used to create site maps in data bound or unbound modes. ➧ C1SiteMapDataSource : Used to bind the SiteMap control to sitemap files. In this tutorial, you will learn how to
- SetUp page with C1Sitemap and set properties.
- Bind SiteMap to a DataSource (C1SiteMapDataSource, SiteMapDataSource, XmlDataSource).
- Add Templates.
By the end, you will have a web application that looks like the screen shown below and you will have an understanding of how C1SiteMap works.
Let's Get Started
Now let's get started with C1Sitemap. The first step is to create a Web Application in VisualStudio.
- From the Visual Studio File menu select New │ Project. The New Project dialog box will appear. In the New Project dialog box expand a language in the left-hand pane and select Web. In the right pane, choose ASP.NET Empty Web Application, enter a Name for your application, and select OK. A new application will be created.
- Right-click the project in the Solution Explorer and from the context menu choose Add │ New Item. In the Add New Item dialog box choose Web Form from the list of templates, name the item "Default.aspx", and click Add. The new page should open.
- Add ComponentOne Assemblies by adding a reference to ComponentOne Controls and Designers. In the Solution Explorer, right-click the project and choose Add │ Reference. In the Reference Manager, locate and select the ComponentOne Controls for ASP.NET Wijmo (C1.Web.Wijmo.Controls.4.dll) and ComponentOne Designer for ASP.NET Wijmo (C1.Web.Wijmo.Controls.Design.4.dll) assemblies and click OK. The references will be added. Note that we are targeting the .NET Framework 4.5, so we are using version 4.0.x controls. Version 3.5.x controls are also available.
Tutorial 1 : SetUp page with C1SiteMap
Now that our website is ready to go, lets start with our first Tutorial. Following are 3 simple steps to setup C1Sitemap in an application with 3 webforms (ProductsPage.aspx, Catalogs.aspx, Orders.aspx.
- Add C1SiteMap on the form - In the Toolbox, locate the C1SiteMap control and drag it onto the Web Form.
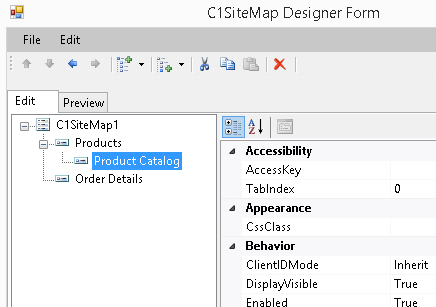
- Add Nodes to the C1SiteMap - Click the smart tag to open the C1SiteMap Tasks Menu and click Edit Nodes to open the C1SiteMap Designer Form. Click the Add Child Item button three times to add three child nodes. Set the Text to 'Products', 'Product Catalog' and 'Order Details' for the three nodes respectively. Select 'Product Catalog' node and drag it on 'Products' node to make it a child node.
- Set Navigation for SiteMapNodes - Select Products node. On the right hand side, in the PropertiesWindow, set the NavigateUrl property to ProductsPage.aspx. Similarly, set the NavigateUrl property for 'Product Catalog' and 'Order Details' nodes to Catalogs.aspx, Orders.aspx respectively.

When you run the project, C1SiteMap appears as shown in the image below. 
Tutorial 2 : Bind SiteMap to a Datasource
C1SiteMap supports binding to all kinds of hierarchical datasources. Lets see how to bind it to a C1SiteMapDataSource, SiteMap DataSource, XmlDataSource.
Binding with SiteMapDataSource and C1SiteMapDataSource
If you have an existing SiteMap file in your application, then you can bind C1SiteMap to the SiteMapDataSource or C1SiteMapDataSourceProvider.
- Select C1SiteMap control and click the smart tag to open the SiteMap Tasks Menu.
- Open the Choose Data Source dropdown and select . This opens the Data Source Configuration Wizard with a SiteMapDataSource1 defined in the ID field.
- If you select the first SiteMap option, the Data Source Configuration Wizard with a SiteMapDataSource1 defined in the ID field. If you select this option for binding, SiteMapDataSource will be automatically added to the webpage.
- If you select the second SiteMap option, the Data Source ID C1SiteMapDataSource1 will be defined in the ID field and C1SiteMapDataSource will be automatically added to the webpage. If you have multiple sitemap files in your project, with C1SiteMapDataSource, you can also specify which sitemap file you wish to bind it to by setting the 'SiteMapFile' property.
Binding with XMLDataSource
- Select C1SiteMap control and click the smart tag to open the SiteMap Tasks Menu.
- Open the Choose Data Source dropdown and select . This opens the Data Source Configuration Wizard with a SiteMapDataSource1 defined in the ID field.
- Select the XML file option, the Data Source ID XmlDataSource will be defined in the ID field and XmlDataSource will be automatically added to the webpage.
- In the Configure Data Source dialog box that appears, select the XML file under Data File and click OK.
Here is the sample which demonstrates databinding with different hierarchical datasources.
Tutorial 3 : Add Templates
You can add images and customize the styles of any node level, by adding node templates. With the following tutorial, you can add images as node templates in C1SiteMap.
- Bind C1Sitemap to a C1SitemapDataSource as mentioned in Tutorial 2.
- Open C1SiteMap Smart tag and select 'Edit Templates' option.
- Place Image control and set ImageUrl to an image say "~/Images/Wijmo.png".
- Open Smart tag again and click 'End Template Editing' option.
- Switch to the HTML code of the webpage and add "<%# Eval("description") %>" just below the
tag. This would show the text set in 'description' attribute of the nodes in Sitemap file.
- Run the application.
The SiteMap would now show images along with text in sitemap as shown in the image below.  For more samples on Sitemap, check out our ControlExplorer sample.

MESCIUS inc.