Spread ASP.NET allows you to customize the appearance of a sheet by applying a "skin" to it. Built-in (default) skins are provided with Spread to create common formats. You can also create your own custom skin and save it to use again or share it, similar to a template. A skin, whether built-in or custom, can be applied to any number of sheets in a Spread component. Because a skin can be saved to a file, you can use it across projects and share it with other developers. Skins allow you to apply a consistent look across sheets or the control. A skin includes the following appearance settings:
- cell colors
- header colors
- whether headers are displayed
- bold header text
- row colors
- selection colors
- Spread background color
- grid lines
- cell spacing
You can save several appearance properties of a sheet as a custom skin. Any custom skins that you create can be saved to a file in the Spread Designer using the SheetSkin editor. Use the following steps to create a custom skin with the SheetSkin editor.
- Select Sheet Skins... from the FpSpread Tasks dialog to display the SheetSkin editor. You can also access the SheetSkin editor from the Settings menu in the Spread Designer.
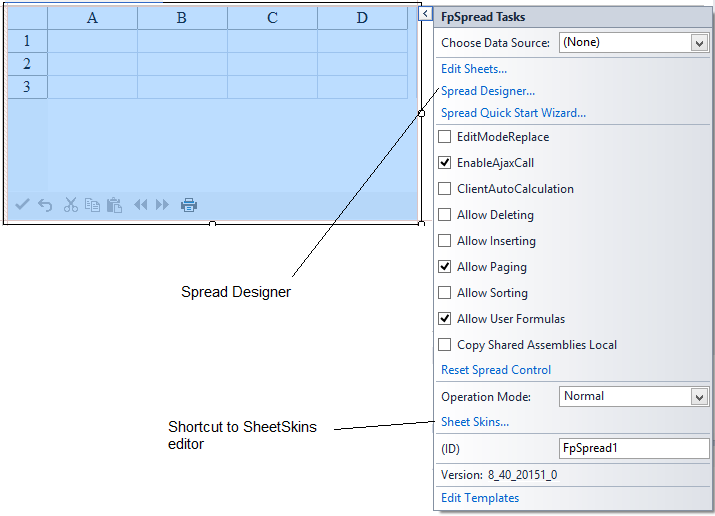 Select SheetSkins Editor
 - Use the Custom tab to create your own skin. Create a custom skin by changing the properties in the Property window. Click Save when you are done making changes. The Skin Repository dialog is displayed and you can enter a name for your skin.

 Custom Tab
  Skin Repository After you select OK, the file name is displayed in the list of saved custom skins in the Saved tab. You can use the custom skin again later by selecting the Saved tab and then applying the appropriate custom skin. The skn file is saved to GrapeCity\Spread Studio 8\ASP.NET\v8.40.xxxxx\Skins or ComponentOne\Spread Studio 8\ASP.NET\v8.40.xxxxx\Skins depending on the version of Spread you are using. You can use the Apply button in the SheetSkin editor to review the changes as shown in the following image.
  Review Changes You can also access the SheetSkin editor from a menu in the Spread Designer.
  SheetSkin Editor Use the following steps to access the SheetSkin editor from a menu in the Spread Designer.
- Select the Settings tab.
- Select the SheetSkin icon under the Appearance Settings section.
- Select the Custom tab to create a custom skin.
- Set the properties.
- Click Save and type in a name for the custom skin.
- Click OK.
Click Apply and Exit to close the Spread Designer. This example code sets the sheet to use a custom skin. Use the SheetSkin object constructor, and set its parameters to specify the settings for the skin.  Custom Skin C#
FarPoint.Web.Spread.SheetSkin myskin = new FarPoint.Web.Spread.SheetSkin("MySkin", System.Drawing.Color.BlanchedAlmond, System.Drawing.Color.Bisque, System.Drawing.Color.Navy, 2,
System.Drawing.Color.Blue, GridLines.Both, System.Drawing.Color.Beige, System.Drawing.Color.BurlyWood,
System.Drawing.Color.AntiqueWhite, System.Drawing.Color.Brown, System.Drawing.Color.Bisque, System.Drawing.Color.Bisque, true, true, true, true, false);
myskin.Apply(FpSpread1.Sheets[0]);
VB
Dim myskin As New FarPoint.Web.Spread.SheetSkin("MySkin", System.Drawing.Color.BlanchedAlmond, System.Drawing.Color.Bisque, System.Drawing.Color.Navy, 2, System.Drawing.Color.Blue, GridLines.Both, System.Drawing.Color.Beige, System.Drawing.Color.BurlyWood, System.Drawing.Color.AntiqueWhite, System.Drawing.Color.Brown,
System.Drawing.Color.Bisque, System.Drawing.Color.Bisque, True, True, True, True, False)
myskin.Apply(FpSpread1.Sheets(0))
The following example sets the first sheet to use the Colorful2 predefined skin (built-in skin). Use the GetAt method of the DefaultSkins object to specify the index of the default skin to return, then the default skin Apply method to assign it to a specific FpSpread component, collection of sheets, or sheet. C#
FarPoint.Web.Spread.DefaultSkins.Colorful2. Apply(FpSpread1.Sheets[0]);
VB
FarPoint.Web.Spread.DefaultSkins.Colorful2. Apply(FpSpread1.Sheets(0))
This example applies the built-in skin to the control. C#
FarPoint.Web.Spread.DefaultSkins.Colorful2.Apply(FpSpread1);
VB
FarPoint.Web.Spread.DefaultSkins.Colorful2.Apply(FpSpread1)
You can use the Save method to save a skin to a file or the Load method to load a sheet skin with code.

MESCIUS inc.