Background:
It is a very common use-case to need to enforce a minimum and maximum value for a numeric input box. This article will show you how to add basic min/max value validation without code using the designer and in-code programmatically as well.
Steps to Complete (Designer):
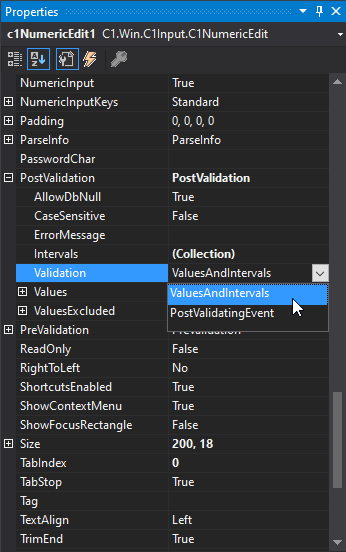
Select your C1NumericEdit control in the designer view and then set the PostValidation > Validation property to ValuesAndIntervals. Set the validation type for your C1NumericEdit control to ValuesAndIntervals:
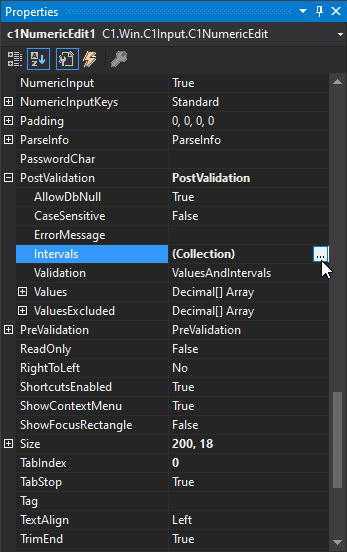
Open the PostValidation > Intervals collection by clicking the … button:
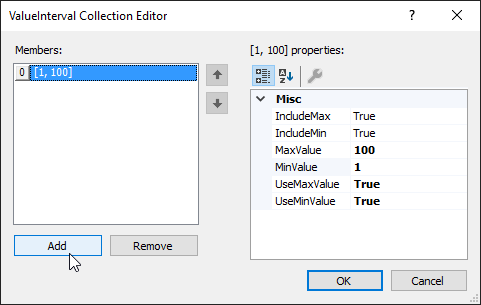
Click “Add” to add a new member to the collection and then customize the properties of that member however you like to suit the needs of your project:
That’s it! You should now have a C1NumericEdit that will accept values between your specified interval.
Steps to Complete (Code):
Note: Replace any instances of c1NumericEdit1 with the name of your C1NumericEdit control.
Set the validation type for your C1NumericEdit control to ValuesAndIntervals:
c1NumericEdit1.PostValidation.Validation = C1.Win.C1Input.PostValidationTypeEnum.ValuesAndIntervals;Add an interval in the form of an array to the ValueInterval collection:
c1NumericEdit1.PostValidation.Intervals.AddRange(new C1.Win.C1Input.ValueInterval[] {
                new C1.Win.C1Input.ValueInterval(
                    //Minimum value
                    new decimal(new int[] {1/*this should be your min value*/,0,0,0}),
                    //Maximum value
                    new decimal(new int[] {100/*this should be your max value*/,0,0,0}),
                    //Include minimum
                    true,
                    //Include maximum
                    true)
            });
That’s it! You should now have a C1NumericEdit that will accept values between your specified interval.
Tags:
Alec Gall