Create a Two-Variable data table with SpreadJS in JavaScript
Background:
Developers can implement a two-variable data table with SpreadJS, our Javascript excel spreadsheet. A two-variable data table is best suited in situations when users want to see how the final result changes when two of the input variables change simultaneously.
To accomplish this developers must created a custom dataTable function that can be used to create this two-variable data table:
function dataTable(sheet, columnRange, rowRange, colInputCell, rowInputCell, formulaCell),
Steps to Complete:
1. Create construct of the data table
2. Create custom dataTable function
3. Apply the dataTable function
Step 1: Create construct of the data table
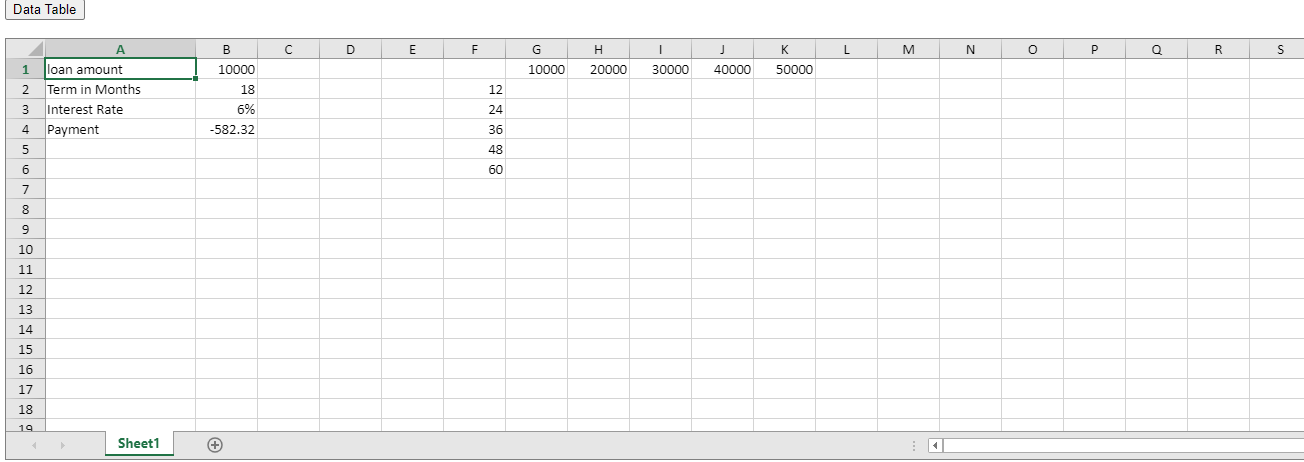
Create a data table construct that is in line with the two-variable being used in the data table. For this example we are trying to identify the combination of monthly payments and loan amounts so we will programmatically add a column range of numbers of months and a row range of load amounts like so:
// 1.) Create the construct for the 2 input variables: monthly payments (B2) & Loan Amount (B1)
            for (var i=0; i<5; i++) {
                // Loan amount
                sheet.setValue(0, i+6, 10000 + 10000*i);
            }
            for (var j=0; j<5; j++) {
                // number of months
                sheet.setValue(1+j, 5, 12 + 12*j);
            }
For this sample we have added the following sample data:
            // Sample data
            sheet.setColumnWidth(0, 150);
            sheet.setValue(0, 0, 'loan amount'); // Loan Amount
            sheet.setValue(1, 0, 'Term in Months'); // Term in Months
            sheet.setValue(2, 0, "Interest Rate"); // Interest Rate
            sheet.setValue(3, 0, "Payment");

            sheet.setValue(0, 1, 10000); // Loan Amount
            sheet.setValue(1, 1, 18); // Term in Months
            sheet.setValue(2, 1, 0.06); // Interest Rate
            sheet.setFormatter(2, 1, "0%"); // Interest Rate
            sheet.setFormatter(3, 1, "0.00");
            sheet.setFormula(3, 1, "PMT(B3/12,B2,B1)"); // Payment
Results:
Step 2: Create custom dataTable function
Next, we will create a custom dataTable function that takes the column and row range, col/row input cells, and formula cell to make the two-variable data table.
The col/row range includes the construct that was created in step 1.
The col/row input cells for the col will be where the loan amount is entered and the row input cell is where the number of months is entered.
The formula cell will be the cell of the SpreadJS instance that contains the formula that creates the monthly payments using the built-in PMT function.
// 2.) Create dataTable custom function
        function dataTable(sheet, columnRange, rowRange, colInputCell, rowInputCell, formulaCell) {
            // Convert the formula string to specified cell ranges and store into variables
            var colRg = GC.Spread.Sheets.CalcEngine.formulaToRange(sheet, columnRange);
            var rowRg = GC.Spread.Sheets.CalcEngine.formulaToRange(sheet, rowRange);
            var colCell = GC.Spread.Sheets.CalcEngine.formulaToRange(sheet, colInputCell);
            var rowCell = GC.Spread.Sheets.CalcEngine.formulaToRange(sheet, rowInputCell);
            var fCell = GC.Spread.Sheets.CalcEngine.formulaToRange(sheet, formulaCell);

     for (var i=colRg.col; i<colRg.col + colRg.colCount; i++) {
      sheet.setValue(colCell.row, colCell.col, sheet.getValue(colRg.row, i));
         for (j=rowRg.row; j<rowRg.row + rowRg.rowCount; j++) {
      sheet.setValue(rowCell.row, rowCell.col, sheet.getValue(j, rowRg.col));
                    // get the value from the Formulas cell
                    var v = sheet.getValue(fCell.row, fCell.col);
                 // set the value from the formula cells to the range of items in the column and row range
                    sheet.setValue(j, i, v);
                }
            }
        }
Step 3: Apply the dataTable function
Finally, for this example we have added a button to the webpage that onclick the the createDataTable() function triggered and it uses the custom dataTable to set and display the two-variable data table.
        function createDataTable() {
            var ss = GC.Spread.Sheets.findControl('ss');
            var sheet = ss.getActiveSheet();
            ss.suspendPaint();
            dataTable(sheet, 'G1:K1', 'F2:F6', 'B1', 'B2', 'B4');
            ss.resumePaint();
        }
Outcome:
With the construct and custom dataTable function applied we are able to create and see the two-variable data table displayed in the JS spreadsheet: