[{"id":"f322fea7-4ca5-4b5d-86c1-001912c850b2","tags":[{"name":"New","color":"Red","productId":"c15646e4-63d8-4965-8d62-7549a2986e99","links":null,"id":"c3c0ef13-c7a9-4649-9fcb-23b3abec175d"}]},{"id":"f7bf5f33-288c-4893-b444-055be654e93a","tags":[{"name":"New","color":"Red","productId":"c15646e4-63d8-4965-8d62-7549a2986e99","links":null,"id":"c3c0ef13-c7a9-4649-9fcb-23b3abec175d"}]},{"id":"4244ec5a-a6a9-42fc-9651-072233db3cf0","tags":[{"name":"New","color":"Red","productId":"c15646e4-63d8-4965-8d62-7549a2986e99","links":null,"id":"c3c0ef13-c7a9-4649-9fcb-23b3abec175d"}]},{"id":"53155f14-d53e-4d53-a087-0a32d9b088e8","tags":[{"name":"Upd","color":"Blue","productId":"c15646e4-63d8-4965-8d62-7549a2986e99","links":null,"id":"2f377cfe-f512-431a-895b-f89af32041ce"}]},{"id":"d5b83782-724a-4dcd-a518-0ae69944e387","tags":[{"name":"New","color":"Red","productId":"c15646e4-63d8-4965-8d62-7549a2986e99","links":null,"id":"c3c0ef13-c7a9-4649-9fcb-23b3abec175d"}]},{"id":"7c54099b-4e27-4e88-91eb-0c637639e54d","tags":[{"name":"New","color":"Red","productId":"c15646e4-63d8-4965-8d62-7549a2986e99","links":null,"id":"c3c0ef13-c7a9-4649-9fcb-23b3abec175d"}]},{"id":"20765fbe-aa2d-45e9-b63f-0efcc5225c16","tags":[{"name":"New","color":"Red","productId":"c15646e4-63d8-4965-8d62-7549a2986e99","links":null,"id":"c3c0ef13-c7a9-4649-9fcb-23b3abec175d"}]},{"id":"17f5bd45-99ce-43d5-b68e-0f5049943703","tags":[{"name":"New","color":"Red","productId":"c15646e4-63d8-4965-8d62-7549a2986e99","links":null,"id":"c3c0ef13-c7a9-4649-9fcb-23b3abec175d"}]},{"id":"8c11df37-0484-40c2-a9b4-103ead6c8314","tags":[{"name":"New","color":"Red","productId":"c15646e4-63d8-4965-8d62-7549a2986e99","links":null,"id":"c3c0ef13-c7a9-4649-9fcb-23b3abec175d"}]},{"id":"1c4f2565-d1d8-4ad5-89d3-1980a756bab0","tags":[{"name":"New","color":"Red","productId":"c15646e4-63d8-4965-8d62-7549a2986e99","links":null,"id":"c3c0ef13-c7a9-4649-9fcb-23b3abec175d"}]},{"id":"cccfd524-1150-4583-98f4-1c78277fb19b","tags":[{"name":"New","color":"Red","productId":"c15646e4-63d8-4965-8d62-7549a2986e99","links":null,"id":"c3c0ef13-c7a9-4649-9fcb-23b3abec175d"}]},{"id":"18b5ea90-6de5-4399-90d1-2238cfb3382e","tags":[{"name":"New","color":"Red","productId":"c15646e4-63d8-4965-8d62-7549a2986e99","links":null,"id":"c3c0ef13-c7a9-4649-9fcb-23b3abec175d"}]},{"id":"dac211bb-2f29-4663-8bb3-2359b67c5dc3","tags":[{"name":"New","color":"Red","productId":"c15646e4-63d8-4965-8d62-7549a2986e99","links":null,"id":"c3c0ef13-c7a9-4649-9fcb-23b3abec175d"}]},{"id":"0d811d5c-d17f-4262-96ef-272da4fee248","tags":[{"name":"New","color":"Red","productId":"c15646e4-63d8-4965-8d62-7549a2986e99","links":null,"id":"c3c0ef13-c7a9-4649-9fcb-23b3abec175d"}]},{"id":"83e0bc87-eb53-4a6c-a354-28ec6433cc9f","tags":[{"name":"New","color":"Red","productId":"c15646e4-63d8-4965-8d62-7549a2986e99","links":null,"id":"c3c0ef13-c7a9-4649-9fcb-23b3abec175d"}]},{"id":"f3aca57e-9e1e-4242-a235-31898017ee25","tags":[{"name":"New","color":"Red","productId":"c15646e4-63d8-4965-8d62-7549a2986e99","links":null,"id":"c3c0ef13-c7a9-4649-9fcb-23b3abec175d"}]},{"id":"af280636-785f-4b45-8c31-3433882a446a","tags":[{"name":"New","color":"Red","productId":"c15646e4-63d8-4965-8d62-7549a2986e99","links":null,"id":"c3c0ef13-c7a9-4649-9fcb-23b3abec175d"}]},{"id":"6308caea-fbe5-4424-b9af-34c24356e951","tags":[{"name":"New","color":"Red","productId":"c15646e4-63d8-4965-8d62-7549a2986e99","links":null,"id":"c3c0ef13-c7a9-4649-9fcb-23b3abec175d"}]},{"id":"6433ad22-3173-436a-8ff9-355a17142bc5","tags":[{"name":"Upd","color":"Blue","productId":"c15646e4-63d8-4965-8d62-7549a2986e99","links":null,"id":"2f377cfe-f512-431a-895b-f89af32041ce"}]},{"id":"49c3c113-8550-43de-a6c8-35829e88e5e6","tags":[{"name":"New","color":"Red","productId":"c15646e4-63d8-4965-8d62-7549a2986e99","links":null,"id":"c3c0ef13-c7a9-4649-9fcb-23b3abec175d"}]},{"id":"18eede08-b743-418d-94db-37c2af1dbc30","tags":[{"name":"New","color":"Red","productId":"c15646e4-63d8-4965-8d62-7549a2986e99","links":null,"id":"c3c0ef13-c7a9-4649-9fcb-23b3abec175d"}]},{"id":"decb7443-11fe-4aa0-8b93-3c200275616a","tags":[{"name":"Upd","color":"Blue","productId":"c15646e4-63d8-4965-8d62-7549a2986e99","links":null,"id":"2f377cfe-f512-431a-895b-f89af32041ce"}]},{"id":"6d98d12d-125b-4741-b4a5-3db1a0f2e301","tags":[{"name":"New","color":"Red","productId":"c15646e4-63d8-4965-8d62-7549a2986e99","links":null,"id":"c3c0ef13-c7a9-4649-9fcb-23b3abec175d"}]},{"id":"5b251a9f-5a3b-4a44-8408-3fdcf02f3d90","tags":[{"name":"Upd","color":"Blue","productId":"c15646e4-63d8-4965-8d62-7549a2986e99","links":null,"id":"2f377cfe-f512-431a-895b-f89af32041ce"}]},{"id":"1e5d6f9f-050e-4b0c-a881-41dd5951c7e5","tags":[{"name":"New","color":"Red","productId":"c15646e4-63d8-4965-8d62-7549a2986e99","links":null,"id":"c3c0ef13-c7a9-4649-9fcb-23b3abec175d"}]},{"id":"9922f417-b683-48c6-bad6-439c91ebf668","tags":[{"name":"New","color":"Red","productId":"c15646e4-63d8-4965-8d62-7549a2986e99","links":null,"id":"c3c0ef13-c7a9-4649-9fcb-23b3abec175d"}]},{"id":"c907e410-0d04-4906-ac6f-452336e8d44f","tags":[{"name":"New","color":"Red","productId":"c15646e4-63d8-4965-8d62-7549a2986e99","links":null,"id":"c3c0ef13-c7a9-4649-9fcb-23b3abec175d"}]},{"id":"e36475b1-32f5-4b0b-a33b-47e34aa1a708","tags":[{"name":"New","color":"Red","productId":"c15646e4-63d8-4965-8d62-7549a2986e99","links":null,"id":"c3c0ef13-c7a9-4649-9fcb-23b3abec175d"}]},{"id":"37f2c3b0-6b80-4da3-9d06-481bb204a2b1","tags":[{"name":"Upd","color":"Blue","productId":"c15646e4-63d8-4965-8d62-7549a2986e99","links":null,"id":"2f377cfe-f512-431a-895b-f89af32041ce"}]},{"id":"5f15dcdb-9002-46de-9423-4d87ce9e8cb9","tags":[{"name":"New","color":"Red","productId":"c15646e4-63d8-4965-8d62-7549a2986e99","links":null,"id":"c3c0ef13-c7a9-4649-9fcb-23b3abec175d"}]},{"id":"c126327a-cafc-49a4-8d18-4daaa1e9b2b0","tags":[{"name":"Upd","color":"Blue","productId":"c15646e4-63d8-4965-8d62-7549a2986e99","links":null,"id":"2f377cfe-f512-431a-895b-f89af32041ce"}]},{"id":"6f091bb9-87ea-4ff0-9b1b-4f280c1d96c1","tags":[{"name":"New","color":"Red","productId":"c15646e4-63d8-4965-8d62-7549a2986e99","links":null,"id":"c3c0ef13-c7a9-4649-9fcb-23b3abec175d"}]},{"id":"4ef5fa73-b193-400b-942e-51646095e0f5","tags":[{"name":"New","color":"Red","productId":"c15646e4-63d8-4965-8d62-7549a2986e99","links":null,"id":"c3c0ef13-c7a9-4649-9fcb-23b3abec175d"}]},{"id":"6eed225d-831a-4ad0-ace7-52c306719b0e","tags":[{"name":"New","color":"Red","productId":"c15646e4-63d8-4965-8d62-7549a2986e99","links":null,"id":"c3c0ef13-c7a9-4649-9fcb-23b3abec175d"}]},{"id":"3a5cd23f-8c36-47a0-ba1f-565c13d9dc41","tags":[{"name":"Upd","color":"Blue","productId":"c15646e4-63d8-4965-8d62-7549a2986e99","links":null,"id":"2f377cfe-f512-431a-895b-f89af32041ce"}]},{"id":"3e527c36-c9a3-4850-bd83-578097ae97f4","tags":[{"name":"Upd","color":"Blue","productId":"c15646e4-63d8-4965-8d62-7549a2986e99","links":null,"id":"2f377cfe-f512-431a-895b-f89af32041ce"}]},{"id":"2a064357-436f-48b6-9d47-57fafa83ca83","tags":[{"name":"New","color":"Red","productId":"c15646e4-63d8-4965-8d62-7549a2986e99","links":null,"id":"c3c0ef13-c7a9-4649-9fcb-23b3abec175d"}]},{"id":"f28d747e-a0a9-4967-9940-581cdf4e6a07","tags":[{"name":"New","color":"Red","productId":"c15646e4-63d8-4965-8d62-7549a2986e99","links":null,"id":"c3c0ef13-c7a9-4649-9fcb-23b3abec175d"}]},{"id":"28d36d47-c582-4210-a848-5ba48491bb80","tags":[{"name":"New","color":"Red","productId":"c15646e4-63d8-4965-8d62-7549a2986e99","links":null,"id":"c3c0ef13-c7a9-4649-9fcb-23b3abec175d"}]},{"id":"bd4ffbde-fb59-44f0-8166-5de0e2f8dcb3","tags":[{"name":"New","color":"Red","productId":"c15646e4-63d8-4965-8d62-7549a2986e99","links":null,"id":"c3c0ef13-c7a9-4649-9fcb-23b3abec175d"}]},{"id":"538ebc70-b737-4e61-a1a5-5f33e41367f6","tags":[{"name":"New","color":"Red","productId":"c15646e4-63d8-4965-8d62-7549a2986e99","links":null,"id":"c3c0ef13-c7a9-4649-9fcb-23b3abec175d"}]},{"id":"7fc447a7-c879-424d-832b-603f956c3cb3","tags":[{"name":"Upd","color":"Blue","productId":"c15646e4-63d8-4965-8d62-7549a2986e99","links":null,"id":"2f377cfe-f512-431a-895b-f89af32041ce"}]},{"id":"2e3972d0-8608-4a5c-920d-66734b85033c","tags":[{"name":"New","color":"Red","productId":"c15646e4-63d8-4965-8d62-7549a2986e99","links":null,"id":"c3c0ef13-c7a9-4649-9fcb-23b3abec175d"}]},{"id":"c916ab18-d86f-45ce-b2ac-6aa47581a625","tags":[{"name":"New","color":"Red","productId":"c15646e4-63d8-4965-8d62-7549a2986e99","links":null,"id":"c3c0ef13-c7a9-4649-9fcb-23b3abec175d"}]},{"id":"40a13a36-7246-4f8b-8ccc-6b5d494fc344","tags":[{"name":"New","color":"Red","productId":"c15646e4-63d8-4965-8d62-7549a2986e99","links":null,"id":"c3c0ef13-c7a9-4649-9fcb-23b3abec175d"}]},{"id":"13811256-dbe9-48a8-88b9-6ec49b2467ac","tags":[{"name":"Upd","color":"Blue","productId":"c15646e4-63d8-4965-8d62-7549a2986e99","links":null,"id":"2f377cfe-f512-431a-895b-f89af32041ce"}]},{"id":"4d4adcc8-433a-4969-9daa-732be28b5d0d","tags":[{"name":"New","color":"Red","productId":"c15646e4-63d8-4965-8d62-7549a2986e99","links":null,"id":"c3c0ef13-c7a9-4649-9fcb-23b3abec175d"}]},{"id":"c3f78991-8a84-451e-8704-7414c1318b9e","tags":[{"name":"Upd","color":"Blue","productId":"c15646e4-63d8-4965-8d62-7549a2986e99","links":null,"id":"2f377cfe-f512-431a-895b-f89af32041ce"}]},{"id":"664d4485-f5e8-49e4-9766-748abe7aeac2","tags":[{"name":"Upd","color":"Blue","productId":"c15646e4-63d8-4965-8d62-7549a2986e99","links":null,"id":"2f377cfe-f512-431a-895b-f89af32041ce"}]},{"id":"3a548f28-610d-42d6-8602-7d982025750f","tags":[{"name":"New","color":"Red","productId":"c15646e4-63d8-4965-8d62-7549a2986e99","links":null,"id":"c3c0ef13-c7a9-4649-9fcb-23b3abec175d"}]},{"id":"754efafe-744e-452e-9e46-833c9b36c763","tags":[{"name":"Upd","color":"Blue","productId":"c15646e4-63d8-4965-8d62-7549a2986e99","links":null,"id":"2f377cfe-f512-431a-895b-f89af32041ce"}]},{"id":"59774e97-ff52-425e-8b41-8657dcb115ef","tags":[{"name":"New","color":"Red","productId":"c15646e4-63d8-4965-8d62-7549a2986e99","links":null,"id":"c3c0ef13-c7a9-4649-9fcb-23b3abec175d"}]},{"id":"d5f1de25-5097-46ca-8e8c-881e41679af8","tags":[{"name":"New","color":"Red","productId":"c15646e4-63d8-4965-8d62-7549a2986e99","links":null,"id":"c3c0ef13-c7a9-4649-9fcb-23b3abec175d"}]},{"id":"71cfa296-3ff8-4259-acc9-8d89d0268c3f","tags":[{"name":"New","color":"Red","productId":"c15646e4-63d8-4965-8d62-7549a2986e99","links":null,"id":"c3c0ef13-c7a9-4649-9fcb-23b3abec175d"}]},{"id":"de1c695a-c31f-4884-8215-8eeb468cb36d","tags":[{"name":"Upd","color":"Blue","productId":"c15646e4-63d8-4965-8d62-7549a2986e99","links":null,"id":"2f377cfe-f512-431a-895b-f89af32041ce"}]},{"id":"81fc1b9e-a9e4-41f6-be4f-9043eaa82970","tags":[{"name":"New","color":"Red","productId":"c15646e4-63d8-4965-8d62-7549a2986e99","links":null,"id":"c3c0ef13-c7a9-4649-9fcb-23b3abec175d"}]},{"id":"8d952ce2-b977-4976-b8cb-91999367d807","tags":[{"name":"New","color":"Red","productId":"c15646e4-63d8-4965-8d62-7549a2986e99","links":null,"id":"c3c0ef13-c7a9-4649-9fcb-23b3abec175d"}]},{"id":"e742bb05-9f35-412d-bac5-91f0094a7c44","tags":[{"name":"New","color":"Red","productId":"c15646e4-63d8-4965-8d62-7549a2986e99","links":null,"id":"c3c0ef13-c7a9-4649-9fcb-23b3abec175d"}]},{"id":"bbbef556-1bcd-4fe9-8bd2-93593b315e0b","tags":[{"name":"New","color":"Red","productId":"c15646e4-63d8-4965-8d62-7549a2986e99","links":null,"id":"c3c0ef13-c7a9-4649-9fcb-23b3abec175d"}]},{"id":"d3e0049c-437f-4361-b452-97464367f2ca","tags":[{"name":"Upd","color":"Blue","productId":"c15646e4-63d8-4965-8d62-7549a2986e99","links":null,"id":"2f377cfe-f512-431a-895b-f89af32041ce"}]},{"id":"7d2857c8-1f21-4806-ae86-9a33ebef97c5","tags":[{"name":"New","color":"Red","productId":"c15646e4-63d8-4965-8d62-7549a2986e99","links":null,"id":"c3c0ef13-c7a9-4649-9fcb-23b3abec175d"}]},{"id":"b26b60af-f0f9-4dc7-baba-9cb816e469df","tags":[{"name":"New","color":"Red","productId":"c15646e4-63d8-4965-8d62-7549a2986e99","links":null,"id":"c3c0ef13-c7a9-4649-9fcb-23b3abec175d"}]},{"id":"7ccb20b2-7e36-4fe8-9c24-9fecc761cc4e","tags":[{"name":"Upd","color":"Blue","productId":"c15646e4-63d8-4965-8d62-7549a2986e99","links":null,"id":"2f377cfe-f512-431a-895b-f89af32041ce"}]},{"id":"b3c7e8d4-8fd1-4c1f-891d-a01f59233ac7","tags":[{"name":"Upd","color":"Blue","productId":"c15646e4-63d8-4965-8d62-7549a2986e99","links":null,"id":"2f377cfe-f512-431a-895b-f89af32041ce"}]},{"id":"9f59a948-51e5-4973-a1f2-a2317e6558b0","tags":[{"name":"New","color":"Red","productId":"c15646e4-63d8-4965-8d62-7549a2986e99","links":null,"id":"c3c0ef13-c7a9-4649-9fcb-23b3abec175d"}]},{"id":"fd091a7c-6bb2-40d3-b471-a26eec95cf9e","tags":[{"name":"New","color":"Red","productId":"c15646e4-63d8-4965-8d62-7549a2986e99","links":null,"id":"c3c0ef13-c7a9-4649-9fcb-23b3abec175d"}]},{"id":"d5b1f409-61c4-4e5b-838d-a61f619ad369","tags":[{"name":"New","color":"Red","productId":"c15646e4-63d8-4965-8d62-7549a2986e99","links":null,"id":"c3c0ef13-c7a9-4649-9fcb-23b3abec175d"}]},{"id":"c610be2b-7242-4f96-a82d-ace5c6780110","tags":[{"name":"Upd","color":"Blue","productId":"c15646e4-63d8-4965-8d62-7549a2986e99","links":null,"id":"2f377cfe-f512-431a-895b-f89af32041ce"}]},{"id":"ef28807f-c72f-4a28-8f05-b5b918225c63","tags":[{"name":"New","color":"Red","productId":"c15646e4-63d8-4965-8d62-7549a2986e99","links":null,"id":"c3c0ef13-c7a9-4649-9fcb-23b3abec175d"}]},{"id":"473587ec-9bbe-400e-b1ba-be46ff5490c6","tags":[{"name":"New","color":"Red","productId":"c15646e4-63d8-4965-8d62-7549a2986e99","links":null,"id":"c3c0ef13-c7a9-4649-9fcb-23b3abec175d"}]},{"id":"b2cc3c1a-3f57-47ac-838c-c60760ca2057","tags":[{"name":"New","color":"Red","productId":"c15646e4-63d8-4965-8d62-7549a2986e99","links":null,"id":"c3c0ef13-c7a9-4649-9fcb-23b3abec175d"}]},{"id":"c5cc96ac-e1f4-442d-8a20-c91d613dfc8e","tags":[{"name":"New","color":"Red","productId":"c15646e4-63d8-4965-8d62-7549a2986e99","links":null,"id":"c3c0ef13-c7a9-4649-9fcb-23b3abec175d"}]},{"id":"fcb88fc4-f83c-4c6c-8ef2-c9f726913d66","tags":[{"name":"New","color":"Red","productId":"c15646e4-63d8-4965-8d62-7549a2986e99","links":null,"id":"c3c0ef13-c7a9-4649-9fcb-23b3abec175d"}]},{"id":"5a29931c-50d2-4535-ace2-cd9e0f04d9b8","tags":[{"name":"New","color":"Red","productId":"c15646e4-63d8-4965-8d62-7549a2986e99","links":null,"id":"c3c0ef13-c7a9-4649-9fcb-23b3abec175d"}]},{"id":"c6a516da-4175-4615-8c69-cde1f1c97471","tags":[{"name":"Upd","color":"Blue","productId":"c15646e4-63d8-4965-8d62-7549a2986e99","links":null,"id":"2f377cfe-f512-431a-895b-f89af32041ce"}]},{"id":"79ba78c3-596e-4c91-84e2-cf209029f9a7","tags":[{"name":"New","color":"Red","productId":"c15646e4-63d8-4965-8d62-7549a2986e99","links":null,"id":"c3c0ef13-c7a9-4649-9fcb-23b3abec175d"}]},{"id":"7c93af39-5091-4a6d-ba35-d63aee420f6d","tags":[{"name":"New","color":"Red","productId":"c15646e4-63d8-4965-8d62-7549a2986e99","links":null,"id":"c3c0ef13-c7a9-4649-9fcb-23b3abec175d"}]},{"id":"97dbcd20-2993-40b6-bd9d-d957fd36c682","tags":[{"name":"New","color":"Red","productId":"c15646e4-63d8-4965-8d62-7549a2986e99","links":null,"id":"c3c0ef13-c7a9-4649-9fcb-23b3abec175d"}]},{"id":"7f0db861-bec6-4083-a3a1-dc63dc748d4d","tags":[{"name":"New","color":"Red","productId":"c15646e4-63d8-4965-8d62-7549a2986e99","links":null,"id":"c3c0ef13-c7a9-4649-9fcb-23b3abec175d"}]},{"id":"b34be8fb-7180-4d6f-9a82-dca69d533948","tags":[{"name":"New","color":"Red","productId":"c15646e4-63d8-4965-8d62-7549a2986e99","links":null,"id":"c3c0ef13-c7a9-4649-9fcb-23b3abec175d"}]},{"id":"5e710667-f653-4604-ab4e-e0e5f77b2001","tags":[{"name":"New","color":"Red","productId":"c15646e4-63d8-4965-8d62-7549a2986e99","links":null,"id":"c3c0ef13-c7a9-4649-9fcb-23b3abec175d"}]},{"id":"a2c07f8c-4eb2-452a-b592-e7e868907e46","tags":[{"name":"New","color":"Red","productId":"c15646e4-63d8-4965-8d62-7549a2986e99","links":null,"id":"c3c0ef13-c7a9-4649-9fcb-23b3abec175d"}]},{"id":"1652b4e6-63f5-4307-9a32-eae723728651","tags":[{"name":"New","color":"Red","productId":"c15646e4-63d8-4965-8d62-7549a2986e99","links":null,"id":"c3c0ef13-c7a9-4649-9fcb-23b3abec175d"}]},{"id":"4c1940f2-b444-4821-b372-eba9877a246c","tags":[{"name":"New","color":"Red","productId":"c15646e4-63d8-4965-8d62-7549a2986e99","links":null,"id":"c3c0ef13-c7a9-4649-9fcb-23b3abec175d"}]},{"id":"b4108347-e0ee-4c23-a269-ecf370879fef","tags":[{"name":"New","color":"Red","productId":"c15646e4-63d8-4965-8d62-7549a2986e99","links":null,"id":"c3c0ef13-c7a9-4649-9fcb-23b3abec175d"}]},{"id":"4c3f9ce0-b19f-4784-985a-edd29b21e713","tags":[{"name":"New","color":"Red","productId":"c15646e4-63d8-4965-8d62-7549a2986e99","links":null,"id":"c3c0ef13-c7a9-4649-9fcb-23b3abec175d"}]},{"id":"689fe533-2f18-436e-82ff-eefe1b908783","tags":[{"name":"New","color":"Red","productId":"c15646e4-63d8-4965-8d62-7549a2986e99","links":null,"id":"c3c0ef13-c7a9-4649-9fcb-23b3abec175d"}]},{"id":"08e3a5db-2265-42d4-bd30-efc17de0d028","tags":[{"name":"New","color":"Red","productId":"c15646e4-63d8-4965-8d62-7549a2986e99","links":null,"id":"c3c0ef13-c7a9-4649-9fcb-23b3abec175d"}]},{"id":"1b402080-435c-43f2-a191-f21385bb8dc7","tags":[{"name":"New","color":"Red","productId":"c15646e4-63d8-4965-8d62-7549a2986e99","links":null,"id":"c3c0ef13-c7a9-4649-9fcb-23b3abec175d"}]},{"id":"e138f0f4-c8c7-49d7-8ea0-f65f8845d8e0","tags":[{"name":"New","color":"Red","productId":"c15646e4-63d8-4965-8d62-7549a2986e99","links":null,"id":"c3c0ef13-c7a9-4649-9fcb-23b3abec175d"}]},{"id":"9bab41b8-5227-4c3b-8d40-f9ebae939eeb","tags":[{"name":"Upd","color":"Blue","productId":"c15646e4-63d8-4965-8d62-7549a2986e99","links":null,"id":"2f377cfe-f512-431a-895b-f89af32041ce"}]},{"id":"2872e81a-93c5-4540-bd3b-fe8f172cddf8","tags":[{"name":"New","color":"Red","productId":"c15646e4-63d8-4965-8d62-7549a2986e99","links":null,"id":"c3c0ef13-c7a9-4649-9fcb-23b3abec175d"}]}]

.fa9a54.png)

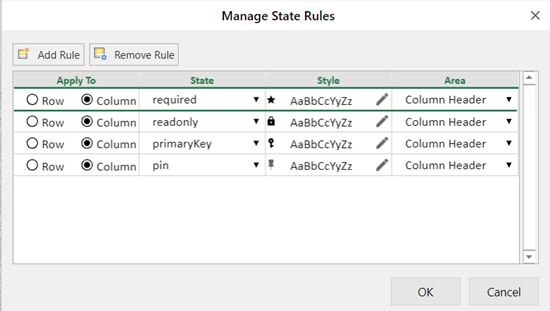
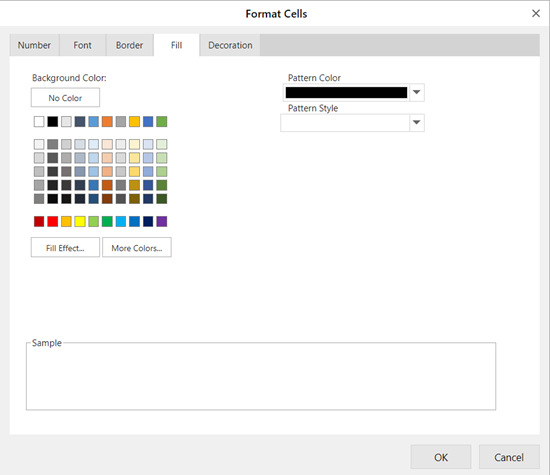
 icon from the Style column that opens the Format Cells dialog box.