You can customize the appearance of borders of the cell. You can specify whether a cell or range of cells has a border. Borders can be displayed on the left, right, top, or bottom, or around all four sides of the cell or cell range.
Cell borders follow the precedence used by the sheet. For more information on precedence, refer to the list in Object Parentage.
If you import cell border information from an Excel file, the width of the cell border may be changed. If the EnableClientScript property of the FpSpread component is set to True, then BorderCollapse is set to True. This helps the appearance of most borders and grid lines together. However, if a cell border is set to a size equal to 1, the left and top borders are overwritten by the grid lines due to the behavior of HTML tables. So the solid, dash, dot, etc. borders are set to a width of 2 so that they are displayed when loaded into Spread from Excel. The "hair" border is not set to a size of 1.
Set border color, style, and size with strict compliance mode to get the best results.
Borders are different from grid lines in that they create a border around a cell or group of cells rather than distinguishing rows and columns. For more information about grid lines, which are set for an entire sheet, refer to Displaying Grid Lines on the Sheet.
For information about cascading style sheets, refer to Assigning a Cascading Style Sheet to a Cell.
Set the Border property to the new border that you specify.
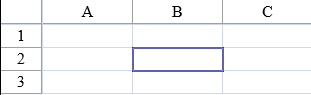
This example code creates a bevel border and then sets a cell border to be the bevel border.
| C# |
Copy Code
|
|---|---|
// Set cell border to the bevel border. fpSpread1.Sheets[0].Cells[2, 2].Border = new FarPoint.Web.Spread.Border(System.Web.UI.WebControls.BorderStyle. Double, Color.DarkBlue, 2); |
|
| VB |
Copy Code
|
|---|---|
' Set cell border to the bevel border. FpSpread1.Sheets(0).Cells(2, 2).Border = New FarPoint.Web.Spread.Border(System.Web.UI.WebControls.BorderStyle. Double, Color.DarkBlue, 2) |
|
There are several ways to set cell borders in the Spread Designer. The first method is the following:
This is the second method: