A tag cloud cell allows you to display a box or cloud of text tags, a weighted list of linked items. In the figure below several strings (Web site names) are listed in a tag cloud in the order of their weights. The color of the text is also an indication of their weights. Notice that they have corresponding link URLs.
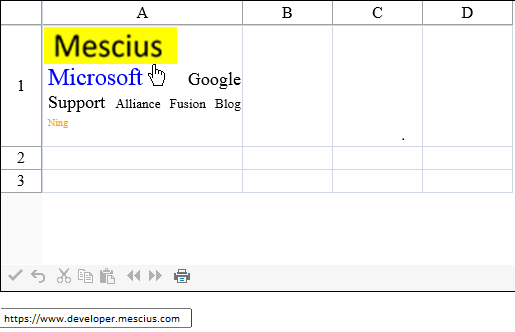
A text tip appears with the HTML anchor for the cloud item when the cursor pauses over the cell as displayed in the above image. You can specify an additional text tip with the Title property.
You can customize how many tags are displayed, their order, their font and color, and other aspects of the tag cloud. The size of the displayed item depends on the weight of the item. The tag cloud cell can also be bound to a data source.
For details on the properties and methods for this cell type, refer to the TagCloudCellType class.
You can also use the TagCloudItem class to specify properties for the tag cloud cell.
To set up a tag cloud cell type, simply define the tags and weights and assign the tag cloud cell type to a particular cell.
This example puts items in the cell, sets the rank colors and weights, and creates links for the items.
| C# |
Copy Code
|
|---|---|
// Place this code in ASPX.Form load: string[] text = { "Mescius", "Blog", "Ning", "Fusion", "Alliance", "Google", "Microsoft", "Support" }; string[] weight = { "290", "50", "41", "56", "78", "170", "208", "140" }; string[] href = { "http://www.componentone.com", "http://www.FarPointSpread.com/Blog", "http://www.ning.com", "http://labs.developerfusion.co.uk", "http://aspalliance.com/", "http://www.google.com", "http://www.microsoft.com", "http://www.clubFarPoint.com" }; string[] rc = { "Red", "Orange", "Black", "Black", "Black", "Blue", "Green" }; FarPoint.Web.Spread.TagCloudCellType tagger = new FarPoint.Web.Spread.TagCloudCellType(); tagger.BackColor = System.Drawing.Color.Empty; tagger.RankingColors = rc; tagger.HoverColor = "Yellow"; tagger.DisplayCount = 8; tagger.SortOrder = FarPoint.Web.Spread.SortOrder.WeightDescending; FpSpread1.Sheets[0].Cells[0, 0].CellType = tagger; FpSpread1.Sheets[0].Cells[0, 0].Value = FarPoint.Web.Spread.TagCloudCellType.ConvertToTagCloudItems(text, weight, href); FpSpread1.Sheets[0].Columns[0, 0].Width = 200; FpSpread1.Sheets[0].Rows[0, 0].Height = 120; |
|
| VB |
Copy Code
|
|---|---|
' Place this code in ASPX.Form load: Dim text As String() = { "Mescius", "Blog", "Ning", "Fusion", "Alliance", "Google", "Microsoft", "Support" } Dim weight As String() = { "290", "50", "41", "56", "78", "170", "208", "140" } Dim href As String() = { "http://www.componentone.com", "http://www.FarPointSpread.com/Blog", "http://www.ning.com", "http://labs.developerfusion.co.uk", "http://aspalliance.com/", "http://www.google.com", "http://www.microsoft.com", "http://www.clubFarPoint.com" } Dim rc As String() = {"Red", "Orange", "Black", "Black", "Black", "Blue", "Green"} Dim tagger As New FarPoint.Web.Spread.TagCloudCellType() tagger.BackColor = System.Drawing.Color.Empty tagger.RankingColors = rc tagger.HoverColor = "Yellow" tagger.DisplayCount = 8 tagger.SortOrder = FarPoint.Web.Spread.SortOrder.WeightDescending FpSpread1.Cells(0, 0).CellType = tagger FpSpread1.Cells(0, 0).Value = FarPoint.Web.Spread.TagCloudCellType.ConvertToTagCloudItems(text, weight, href) FpSpread1.Sheets(0).Columns(0, 0).Width = 200 FpSpread1.Sheets(0).Rows(0, 0).Height = 120 |
|