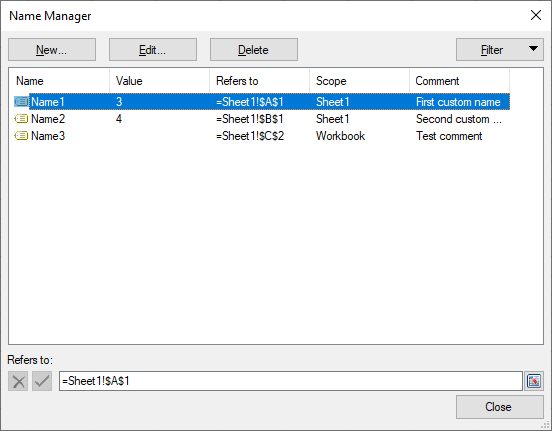
You can create, edit, or delete custom names in the Spread Designer. You can also filter the list of custom names by scope or error status. The Name Manager dialog is located under the Formulas menu in the Spread Designer.
The following buttons allow you to work with custom names.
| Button | Description |
|---|---|
| New Button | Click the New button to display the New Name dialog box. This allows you to enter a range name and cell location. You can also click the Collapse button which allows you to use the mouse to select the desired cell(s). Press Enter or click Expand to return to the New Name dialog box. |
| Edit Button | Click an existing range name and then click the Edit button (or double-click the name), to display the Edit Name dialog box. Use this dialog box to change the range name or the cell range location reference. |
| Delete | Click an existing range name and then click the Delete button. A confirmation message appears to confirm that you wish to delete the range name. |
| Filter Button | Click the Filter drop-down to create a subset of the custom names based on scope or error status. |
| Close | Click the Close button to return to the Spread Designer. |
The Name Manager dialog has the following columns for the custom names.
| Column | Description |
|---|---|
| Name | The first character of a custom name must be a letter, an underscore character (_), or a backslash (\). Remaining characters in the name can be letters, numbers, periods, and underscore characters. The uppercase and lowercase characters "C", "c", "R", or "r" cannot be used as a defined name, because they are used as shorthand for selecting a row or column for the currently selected cell in a Name or Go To text box. Names cannot be the same as a cell reference. Spaces are not allowed as part of a name. A name can contain up to 255 characters. Spread does not distinguish between uppercase and lowercase characters in names. |
| Value | The current value of the name, such as the result of a formula, a string constant, a cell range, an error, an array of values, or a placeholder if the formula cannot be evaluated. If the name refers to a cell range, all the values in the range are displayed by row, from top to bottom, and are separated by a ";" character. All values are wrapped with " ". For example, {"a","b";"c","d"}. |
| Refers to | The current reference for the name. For example, Sheet1!$C$2. |
| Scope | The scope of a name is the location within which the name is recognized without qualification. The scope can be a sheet (local Sheetview level) or a workbook (global Spread level). For example, Name1 is only recognized in Sheet1 since the scope is Sheet1. In order to use Name1 in Sheet2, qualify it by preceding it with the sheetview name such as Sheet2!Name1. A name must be unique within its scope; however, you can use the same name in different scopes. The local sheetview level takes precedence over the global spreadview level if there is a name conflict. |
| Comment | Additional information about the name and can be up to 255 characters. |
You can sort the list of names in ascending or descending order by clicking the column header. Double-click the right side of the column header to automatically size the column to fit the largest value in that column. Adjust the list view height by dragging the bottom of the list view.
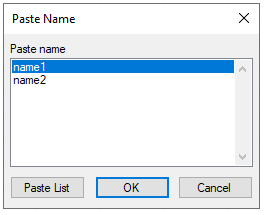
You can insert a defined name using the Paste Name dialog. To call this dialog, you can use the keyboard function key F3.