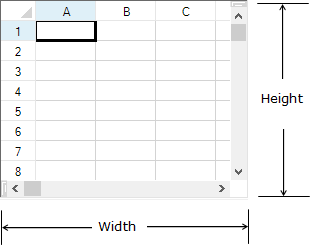
You can set the overall dimensions of the Spread component and this determines the size of the visible area of the spreadsheet. The following figure shows the dimensions that you can set by setting the number of pixels for each.
Refer to the Microsoft .NET Framework documentation for more details on the Control.Height property or Control.Width property.
To calculate the height of the Spread, assuming scroll bars turned off and no headers, calculate the height of all the rows and then add one pixel for every border, so if 10 rows of 20 pixel height, (10 x 20) + (10 x 1) + 1, or 211 in this example. For the Spread width, the process is the same. For more information on setting the row height and column width, refer to Setting the Row Height or Column Width.
Refer to the Microsoft.NET Framework documentation for setting the units of measurement for height to something other than the default, which is pixels.
Add a line of code that sets the specific dimension. Unless you have set it otherwise, the default for the unit of measurement is pixels. Use the Height and Width properties of the FpSpread class.
This example shows how to set the height of the Spread component to 250 pixels and the width to 300.
| C# |
Copy Code
|
|---|---|
fpSpread1.Height = 250; fpSpread1.Width = 300; |
|
| VB |
Copy Code
|
|---|---|
fpSpread1.Height = 250
    fpSpread1.Width = 300
|
|